
Definition tab
This tab provides a visual interface for mapping the structure of a skeleton. This process results in a HumanIK Skeleton Definition, which is required to create a Control Rig and/or retarget animation to and from the skeleton of a character. This character is referred to as a HumanIK defined character.
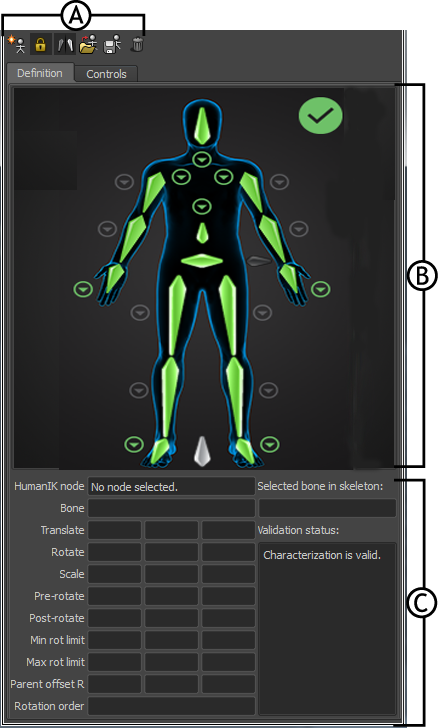
Definition tab A. Toolbar B. Character and Name Match views C. Skeleton properties
To create a skeleton definition, click ![]() .
.
To map a bone, navigate from the:
Definition tab to your skeleton: Double-click a cell in the Character view (cells turn blue when picked), then click the corresponding bone in the scene.
or
Skeleton to the Definition tab: Select a bone, right-click the corresponding cell in the Character view, and select Assign Selected Bone. Bones in the Figure view turn green to indicate each valid bone assignment.
For more information on which bones map to which nodes, see HIK character structure.
To change a mapped bone:
- Right-click the cell and select Change Assigned Bone. , then
- From the drop-down list, select from the listed bone names or type the name of the bone you want to use instead.
- Press Enter or click Ok.
To clear a mapped bone:
Right-click the cell in the Character view and select Clear Assigned Bone.
The name of the selected bone appears in the drop-down list.
Press Enter or click OK.
To clear all mapped bones in the current view (full body, hands, feet, or spine view):
- Right-click anywhere in the view.
- Select Clear All in View.
To clear all mapped bones for the current character:
- Right-click anywhere in the view.
- Select Clear All.
To map mirror pairs of bones:
Select
 > Edit > Definition > Mirror Matching.Tip:
Alternatively, click
 in the Definition toolbar.
Select
> Edit > Definition > Configure Mirror Matching to open the Mirror Configuration window.This window contains a list of all sub-string pairs currently configured for mirror matching mode.
Click the + or - button to add or remove substrings, respectively.