
Visualize contours and hatches received from the host application, generated from ATU code or EBPAs, or loaded from an external file
The Exposure Preview is used to inspect the layer data resulting from the selected input geometry files and the toolpath data which is calculated by the buildstyle script based on these input geometries.
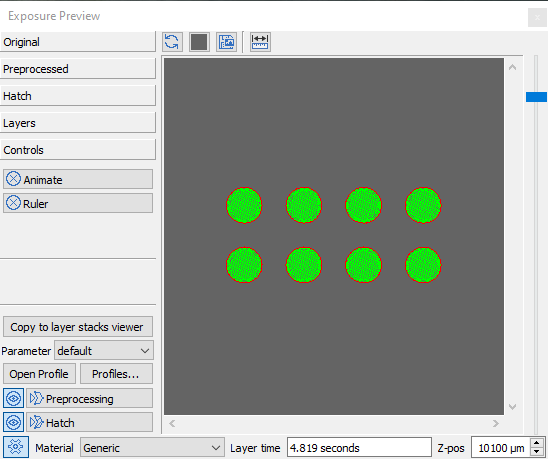
The graphic view shows the current layer. A slider on the right is used to navigate through the layers. The coordinate system is X (right), Y (up) and Z (pointing out of the screen).
Mouse interactions
- Mouse wheel: Zoom
- Pan view: leftclick and drag
- Zoom rectangle: rightclick and drag
- Context menu: rightclick
- Element selection: leftclick
| Reset view | Zooms to include all available objects |
| Background color | Opens a color picker dialog |
| Save view | Saves a snapshot of the current view to file |
| Measure line | Provides distance measurement. Click and drag to define the measurement. You can adjust measurement lines once created by clicking and dragging the endpoints. Measure lines persist through layer scrolling until clicking the measurement button again. |
Context menu
If an element is selected in the view, then a context menu can be opened for that element.
| Attribute info | Opens a dialog showing all available information about the selected element. |
| Save | Save the selected element to an ASCII CLI file. |
| Go to Construction Code | Based on the action history of the selected item, the constructing script code line is opened in an editor window. |
| Go to Last Action Code | Based on the action history of the selected item, the last modifying script code line is opened in an editor window. |
| Action History | Opens the action history dialog for the selected item. |
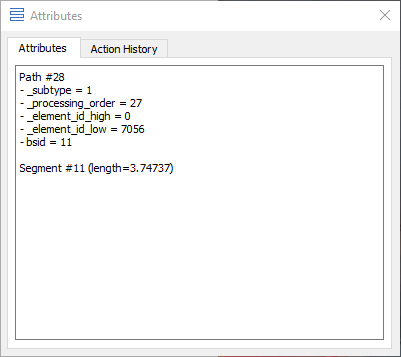
Attribute info
There are path attributes as well as segment attributes for individual segments of the path. Attributes can be internally assigned by the buildstyle processor. Other attributes can be originated in the script code of the buildstyle project where it is possible to declare and assign custom attributes.
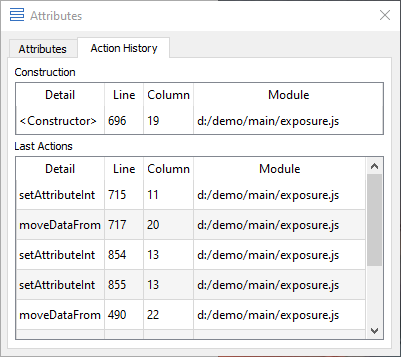
On a second dialog tab the dialog is showing an action history for the selected element. There the user can see the script code line at which the element is created as well as other script code lines where the element has been modified. Double clicking an entry here opens the script code line in an editor window.
View settings
On the left side the view settings are categorized in Original, Preprocessed, Hatch, Layers, Controls. Clicking on one category opens it while closing all others.
| Original | |
|---|---|
| Part | Shows the build part geometry as it is imported from the specified input geometry files. |
| Fixtures | Shows the support geometry as it is imported from the specified input geometry files. |
| Preprocessed | |
| Part | Shows the build part geometry after the preprocessing script function preprocessLayerStack has been executed. |
| Fixtures | Shows the support geometry after the preprocessing script function preprocessLayerStack has been executed. |
| Hatch | |
| Hatch | Shows hatch toolpath created by the script function makeExposureLayer. |
| Arrows | Shows the toolpath orientation by adding an arrow tip to each path segment. |
| Skips | Shows the traveling paths from the end of a toolpath to the start of the next toolpath. |
| Overlaps | Highlighting overlapping paths. See in the main menu for configurable detection parameters. |
| Layers | |
| Upper | Displays the next layer above in grey in addition to the current layer. |
| Lower | Displays the previous layer below in addition to the current layer. |
| Skip empty Layers | When navigating up or down through the layer stack, this skips layers without data. |
| Controls | |
| Animate | Adds a horizontal slider below the graphics view to draw the toolpaths cumulatively in their processing order. |
| Ruler | Shows horizontal and vertical rulers in the view to visualize the current scale depending on the current zoom setting. |
Further functions
| Copy to layer stacks viewer | Copies the current layer stack from the preview to the layer stacks viewer control as a snapshot |
| Parameter | A parameter profile can be selected which is used to calculate the preview data. Open Profile shows a dialog to edit the selected parameter profile. Profiles opens the profile manager. |
| Preprocessing | You can trigger the preprocessing script calculation manually. Automatic update can be toggled with the button on the left side. |
| Hatch | The hatching script calculation can be triggered manually. Automatic update can be toggled with the button on the left side. |
| Material | A material can be selected for the hatch preview calculation. This selected material is given to the script function as the current material. The materials available here must be specified within the script function declareMachine. |
| Layer Time | The time for building the current preview layer is shown here. This is the time the machine is expected to use for this layer. This estimation is generated by the buildstyle script. |
| Z-pos | Shows the current Z position of the preview layer. |