
To create a custom stand-alone user menu
- Create an XML file and name it as user_menu.xml.
- Create a copy of the TreeSchema.xml file found in the PowerMill installation path\sys\hci\popups folder.
- Place both the user_menu.xml file and the copy of the TreeSchema.xml file in the sub-folder of the PowerMill Home folder.
- Rename the TreeSchema.xml file to user_menu.xsd. This allows the user_menu.xml file to follow the PowerMill schema.
Format of the custom stand-alone user menu
<?xml version="1.0" ?>
<menus xmlns="x-schema:user_menu.xsd">
	<usermenu value="user_menu">
		<menupage label="This is the Title">
			<spacer/>
			<button
			label="Button Label"
			command="SOME POWERMILL COMMAND"/>
		</menupage>
	</usermenu>
</menus>
The first three lines and the last three lines are compulsory.
For example, to create this sample user menu:
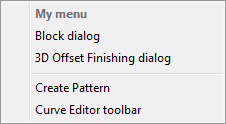
the user_menu.xml contains:
<?xml version="1.0" ?>
<menus xmlns="x-schema:user_menu.xsd">
	<usermenu value="user_menu">
		<menupage label="My menu"><button label="Block dialog" command = "Form Block"/>
			<button label="Block dialog" command = "Form Block"/>
			<button label="3D Offset Finishing dialog" command = "IMPORT TEMPLATE ENTITY TOOLPATH TMPLTSELECTORGUI'Finishing\3D-Offset-Finishing.ptf'"/>
		<spacer/>
			<button label="Create Pattern" command = "CREATE PATTERN"/>
			<button label="Curve Editor toolbar" command = "CREATE PATTERN ; EDIT PATTERN ; CURVEEDITOR START"/>
		</menupage>
	</usermenu>
</menus>