Use the options in the Views panel to select views and projections of your model.
From
Use the options on this menu to set the orientation of the model in the active window.
Each view looks towards the origin, down the axis given in the brackets. For example, the Top view is looking at the model down its Z axis.
ISO
Use the ISO options on this menu to select an isometric view of the model shown in the active window.
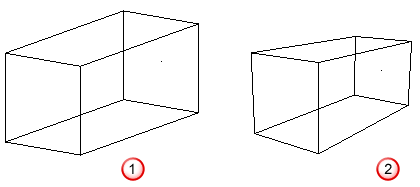
Select View tab > Views panel > ISO > Perspective to scale objects according to their distance from the viewpoint. Select Perspective again to draw objects at the same scale regardless of their depth.
For example, when this option is deselected
 , objects are drawn to the same scale regardless of whether they are near or far away.
With this option selected
 , objects are drawn as they would appear to the eye, and objects that are further away appear smaller than those are closer. This gives the appears of depth to the model.

User
Use these options to quickly switch to custom views of the model. Select:
- User View to switch to the currently selected view in the Stored Views dialog.
- Store Views to create and manage your custom views.
To create a custom view:
- Orientate your model to the view you want to store.
- Select View tab > Views panel > User > Store Views. The Stored Views dialog is displayed.
- Click Store. View 1 is added to the list.
- If you want to change the name of the view:
- Select its entry in the list.
- Click Rename.
- In the Rename Stored View dialog, enter a new name and click OK.
- Click OK to save your changes and close the Stored Views dialog.
To display a stored view, open the Stored Views dialog, and click the view you want to see.
Angle
Use the options on this menu to show multiple views of the model. Select:
- 3rd Angle to display the model in the XY plane looking in +Z direction (Top), in the YZ plane looking in the +X direction (Right), and in the XZ plane looking in the -Y direction (Front).
- 3rd Angle + ISO to display the third angle views plus the ISO1 view of the model. When you view or sketch onto objects using the 3rd Angle + ISO view, each view has a different principal plane, which is at right angles to the viewpoint. The principal plane is automatically selected appropriate to each view.
- 1st Angle to display the model in the XY plane looking in +Z direction (Top), in the YZ plane looking in the -X direction (Left), and in the XZ plane looking in the +Y direction (Back).
- 1st Angle + ISO to display the third angle views plus the ISO1 view of the model. When you view or sketch onto objects using the 1st Angle + ISO view, each view has a different principal plane, which is at right angles to the viewpoint.
The views are linked, so, if you rotate the top left view, the other views follow the rotation.
Last
Select this option to switch between the current view and the view before it was last changed. Select the option again to return to the current view.
Refresh
Select this option to clear your graphics cache and redraw the items in your graphics window. This is useful if the view loses definition as items are created, modified or deleted.