
Working with Logos and Projecting Textures
When working with logos, decals, and any other kind of projected texture, the first place to start is the texture. Here are two approaches for adding a texture to geometry:
- Assign the texture to a material, then drag and drop the material onto the geometry.
- Drag and drop a texture from outside of VRED directly onto geometry in VRED. With this method, when working with decals, see Creating a Decal.
After this, adjust the texture placement. Then, if the projection needs some depth, add a bump map.
For information on working with projected textures, see the following:
- Texture Projection Settings (Video)
- Texture Drag and Drop
- Triplanar Projection Improvement (Reference)
- vrdTexture (Python)
Mapping a Logo onto a Material
The Genesis file uses a logo texture image for the license plate, which is mapped to a material and applied to the geometry.Let's apply a logo onto a material ball, then assign it to some geometry.
- Create a plastic material.
- In the Diffuse Texture section, enable Use Texture.
- Click
 , locate your logo text image, then click Open.
 - To assign the material, drag the material onto the geometry.
Next, we will work on adjusting the placement of the texture.
Adjusting Texture Placement
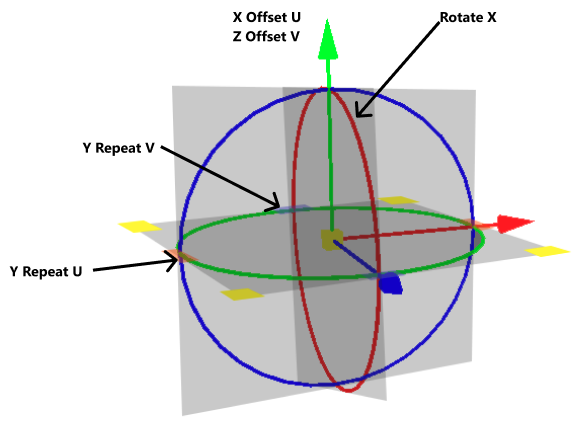
Use the Material Editor Diffuse Texture attributes to fix the size, placement, alignment, and repetition of the logo or decal. Refer to the License Plate group node of the Genesis example file, if making a license plate, to better understand how different values affect decal placement.
To set the UV mapping type used, click Mapping Type and select Planar for decals. The first two values define the orientation of the plane in 3D, the third value defines the rotation in 2D around the plane normal.
Note:For applying textures to a geometry with no UVs, use Triplanar. There is a blend zone where the projections overlap on the surface. If this does not give the desired result, actual UV coordinates need to be created, and UV must be used as the Mapping Type for the texture in the material.
For Incandescence, Transparency, and Displacement textures with radial and planar brush mapping, use UV.
Set Repeat Mode UV to Decal. This ensures the image is not repeated or mirrored.
For the planar placement of the logo text, use Projection Center.
To resize the logo, use Projection Size.
Click Fit Size to see the placement of the texture.
Click Manipulate to access the manipulator for transforming, rotating, and scaling your texture projection. When satisfied with the placement, click Manipulate again to disable it.
Decal Troubleshooting
Issue: When projecting decals, they appear on other unintended objects.
Explanation: A Z value is set for Projection Size. This sets a Z depth for the decal, so the projection appears on other objects with the same applied material that are within the Z depth.
Solution: In the Material Editor > Diffuse Texture section, set the Projection Size Z value to 0. Now, when the material is dropped onto an object, the projection depth of a texture (the decal) is limited to that object.
Adding Depth
A bump map is used to add depth to the plate's content. Using the Bump Texture section, if making a license plate, to give it some depth.
A quick way to make a bump map for your plate is to make a copy the image, then invert the color.
- In the Bump Texture section, enable Use Texture.
- Click , locate the bump map for the plate, then click Open.
Creating a Material Texture
Drag a texture image file from outside VRED onto an object in the Render Window. This opens the Texture Drag & Drop dialog.
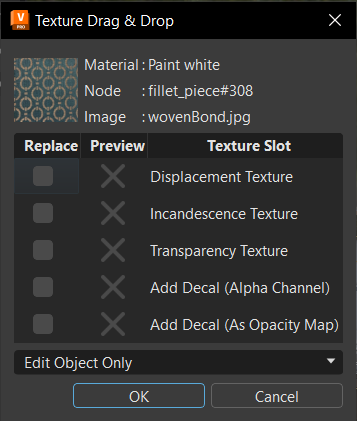
In the Texture Drag & Drop dialog, select material attributes for the new image texture.
Note:If you select Add Decal, the material attributes will be disabled.
With Add Decal not selected, from the drop-down list and choose Edit Material or Edit Object Only.
Note:Both options are only available when using the dropped image as a material texture and if the material is NOT assigned to multiple objects.
Creating a Decal
For a great video that covers decal application in VRED and a simple technique for applying dirt and scratches, so your images feel a bit more lived-in, check out Mike Turner's Decals and Dirt in VRED.
Drag an image file onto an object in the Render Window.
In the Texture Drag and Drop dialog, select Add Decal.
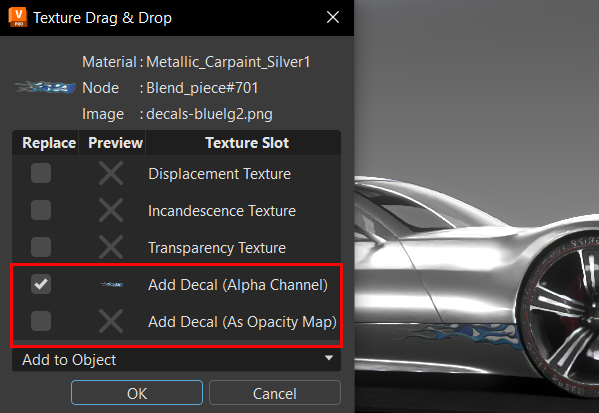
From the drop-down list, select Add to Object or Add to Material.
Note:Add to Object is only available if the material is assigned to multiple objects.
A Plastic material, named Decal, with a planar projection of the diffuse texture and a multipass material are created. If a multipass material is already assigned to the geometry, this multipass material is used. VRED switches automatically to Texturing Mode. A manipulator appears on the image to resize and position the decal.
Hold the Shift key and drag the manipulator to rotate, scale, or translate the texture. Dragging the blue scale control adjusts the depth limit of the texture. The default Z value of the projection size is two hundred. Having a value other than zero, ensures the decal only appears on one side of the object.
Press T or ESC to exit the manipulator.
Thank you to the person who requested information on mapping logo text and graphics.