 Transform Editor
Interaction > Transform
A transformation contains information about the position, size, and orientation of an object and its pivot within 3D space. It also provides information about the position and orientation of the object's coordinate system.
Use the Transform Editor to transform selected objects in two ways. The first is interactively with the transform manipulator in the toolbar. The second is by entering transformation values into the Transform Editor.
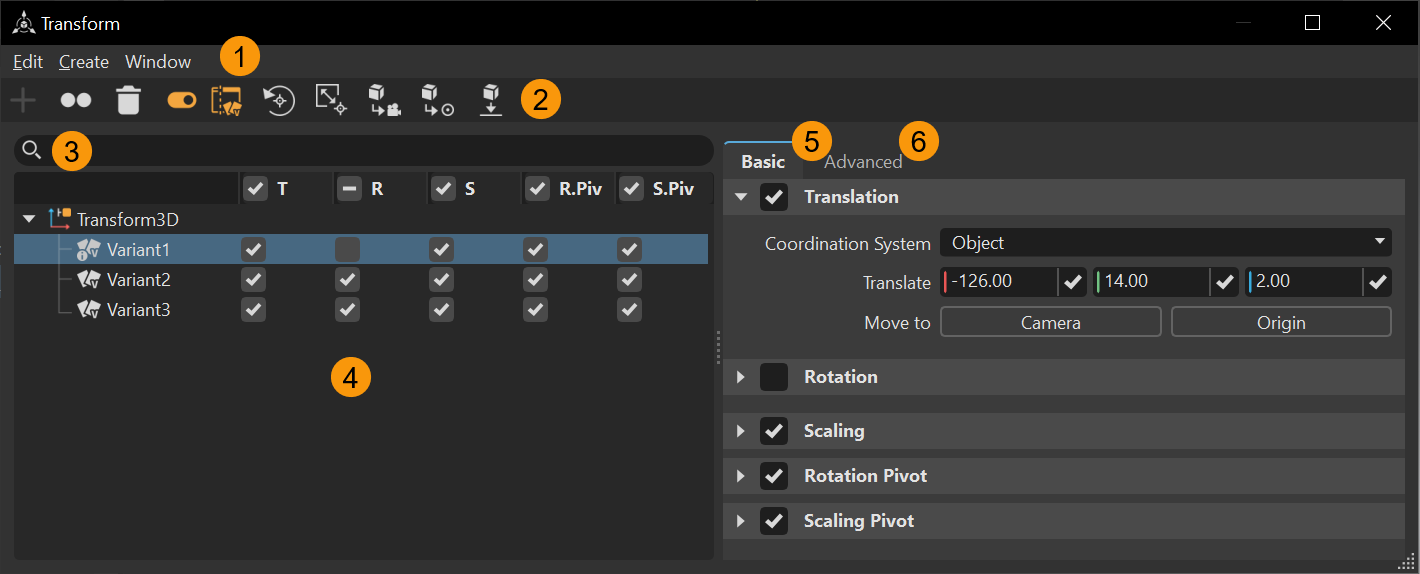
Move geometry, resize it, rotate it, and redefine its pivot. When transforming multiple objects at once, the Transform Editor always shows the transformation properties of the last selected object and the transform manipulator is connected to the last selected object.
A pale blue background in the respective input field highlights transformation values that differ among the selected objects. When entering a certain value, it is applied to all selected objects. With your scroll wheel, the arrow control, or the field itself, you can increase or decrease the respective values of all selected objects at once.

You can also create Transform Variants to display a single set of geometry in multiple orientations. Using a Transform Variant reduces file size, root structure, and memory usage.
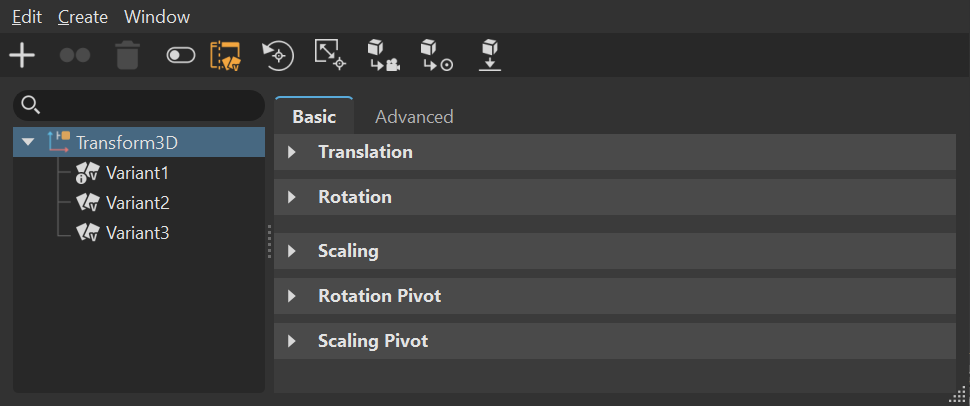
The Transform Editor contains a menu bar and context menu, two tabs, QuickActions Bar, Search, Transform Variants tree, and Attributes with two tabs, Basic and Advanced.
 QuickActions Bar
Icons for commonly used commands are easily accessible in the QuickActions Bar.
![]() Create - Creates a transform variant. Select the parent to create one.
Create - Creates a transform variant. Select the parent to create one.
![]() Duplicate - Creates a duplicate of the selected variant and pastes it below the original.
Duplicate - Creates a duplicate of the selected variant and pastes it below the original.
![]() Delete - Deletes the selected content.
Delete - Deletes the selected content.
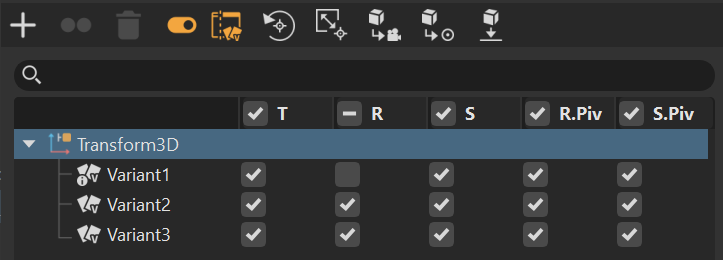
![]() Options - Enables and disables any basic transform functions for the variant. When enabled, the tree below expands to display translation, rotation, scaling, rotation pivot, and scaling pivot columns with a check boxes for each variant. When disabled, these columns are hidden.
Options - Enables and disables any basic transform functions for the variant. When enabled, the tree below expands to display translation, rotation, scaling, rotation pivot, and scaling pivot columns with a check boxes for each variant. When disabled, these columns are hidden.
| Options Enabled | Options Disabled |
|---|---|
 |
 |
If the columns are hidden when Options is enabled, drag the handle to expose them.
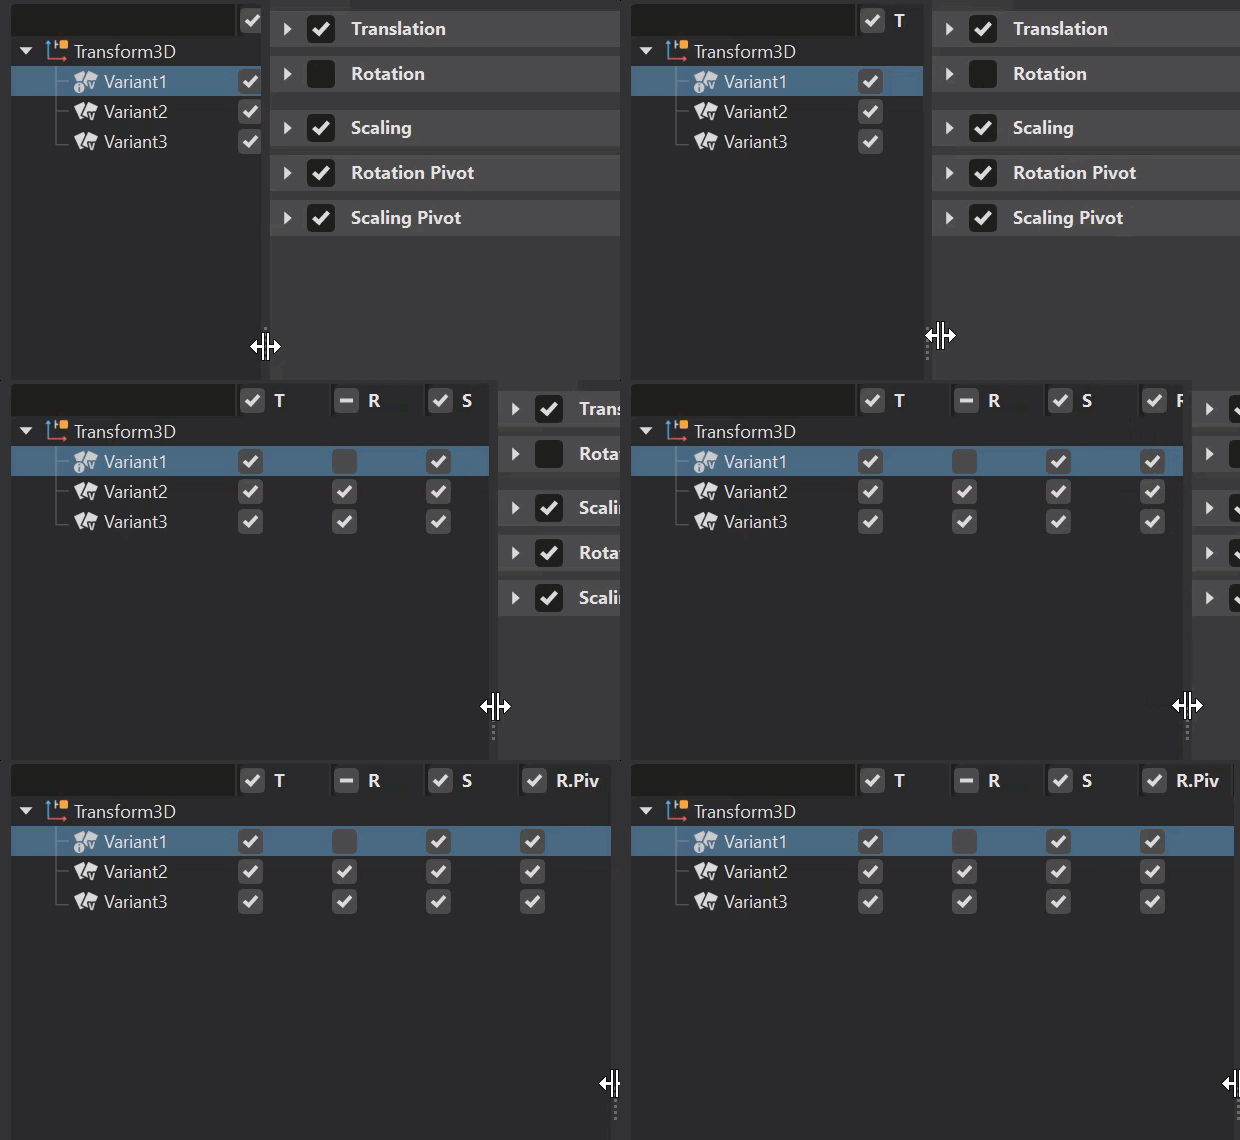
When a column's box is unchecked, those values are not applied to the node. For example, disabling the rotation in a transform variant means the rotation is not applied to the node when the variant is activated.

You can change the options for an individual or all variants.
| How to disable all options of the same type |
|---|
 |
When a change is made to an option, this notification icon ![]() appears on the affected variant. It is displayed even if the options are toggled off. heck boxes are also displayed in the Basic tab next to each function.
appears on the affected variant. It is displayed even if the options are toggled off. heck boxes are also displayed in the Basic tab next to each function.

Variant options are recommended only for advanced transform variant use and are not required in most situations.
![]() Transform Variants - Toggles between the Transform Variants or only the Attributes tabs to quickly access different options.
Transform Variants - Toggles between the Transform Variants or only the Attributes tabs to quickly access different options.
![]() Position Rotate Pivot in Object Center - Sets the rotate pivot to the center of the selected object.
Position Rotate Pivot in Object Center - Sets the rotate pivot to the center of the selected object.
![]() Position Scale Pivot in Object Center - Sets the scale pivot to the center of the selected object.
Position Scale Pivot in Object Center - Sets the scale pivot to the center of the selected object.
![]() Move the Object to Camera Position - Moves the selected object to the current camera position.
Move the Object to Camera Position - Moves the selected object to the current camera position.
![]() Move the Object to Origin - Moves the selected object to the center of the world coordination system.
Move the Object to Origin - Moves the selected object to the center of the world coordination system.
![]() Put Object on Ground - Translates the selected objects along the Z-axis in such a way as to have the bottom face of the object’s bounding box at the same level as the ground plane.
Put Object on Ground - Translates the selected objects along the Z-axis in such a way as to have the bottom face of the object’s bounding box at the same level as the ground plane.
 Transform Variants List and Window
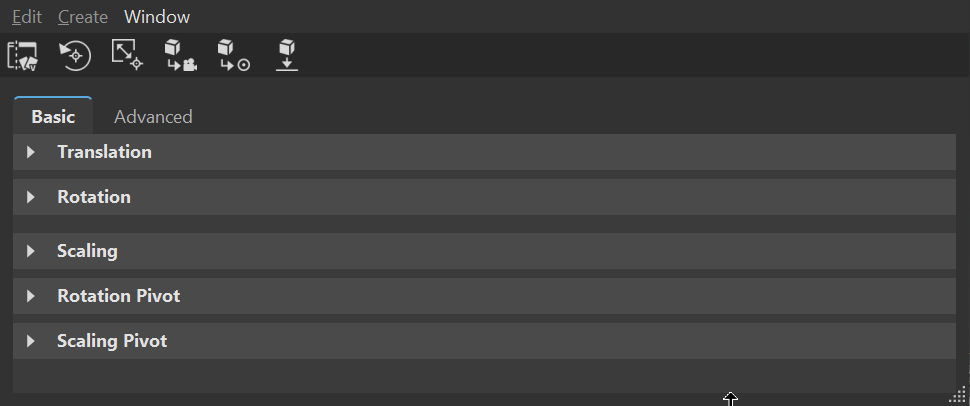
When ![]() Transform Variants is enabled, the Transform Variants list appears to the left of the attributes, listing all transform variants for the selected Scenegraph node. Use Search when the list is long to locate a specific variant.
Transform Variants is enabled, the Transform Variants list appears to the left of the attributes, listing all transform variants for the selected Scenegraph node. Use Search when the list is long to locate a specific variant.
| Transform Variants Disabled | Transform Variants Enabled |
|---|---|
 |
 |
When ![]() Options is enabled, you can set the basic transform functions for a selected variant. The tree expands to display translation, rotation, scaling, rotation pivot, and scaling pivot columns with a check boxes for each variant.
Options is enabled, you can set the basic transform functions for a selected variant. The tree expands to display translation, rotation, scaling, rotation pivot, and scaling pivot columns with a check boxes for each variant.
| Options Disabled | Options Enabled |
|---|---|
 |
 |
Context Menu
When the Transform Variants window ![]() is exposed, right-click the node or a variant to access the context menu. Use its options to create, rename, delete, and duplicate variants, copy and paste transformations, or copy and paste transformation variants.
is exposed, right-click the node or a variant to access the context menu. Use its options to create, rename, delete, and duplicate variants, copy and paste transformations, or copy and paste transformation variants.
- Activate Variant - Displays the selected variant by pushing the variant information to the Scenegraph node.
- Create Transform Variant - Creates a transform variant. Select the parent to create one.
- Edit - Contains options for making changes to your content. See Edit in the Menu Bar section above.
 Basic (tab)
The functions in the transformation tool help with exact placement of objects within a scene. All numerical input fields have a wheel beside them. Click-drag it to the left or right increase or decrease values.
Translation
Moves the selected objects along the coordinate system axis.
Coordinate System - Defines whether the translation values are presented based on world or object space. In world space, the translation defines the object’s global position within the world. In object space, the translation defines the object’s offset from its origin.
Example - Translate a parent node by (0, 0, 10) (TX TY TZ) in world space. If you translate the child node by (0, 0, 5) in local space, its translation values in world space is (0, 0, 15).
Translate - Moves selection depending on threshold and unit setting (mm, cm, m). Red is X, green is Y, and blue is Z. Move to Camera moves the selection to the same position in 3D space where the camera is located; Move to Origin moves the selection to the position of its pivot point; Put on Ground makes selection move to environment floor height.
Move to - Click one of the following to translate the selected object's position.
Camera - Translates the selected object to the position of the current active camera.
Origin - Translates the selected object to the world coordinate system’s origin.
Rotation
Changes the orientation of the object around the rotational pivot. There are two methods of rotating objects using this tool. The first method is to manually select the rotation values and order with Rotate X/Y/Z and Rotation Order. The second method is to either pick or define an axis to rotate the object about and use the Rotate dial to rotate the object around this axis.
Rotation Order - Euler rotations are not clear. The rotation order defines the order in which the rotations around all axes are realized.
Rotate - Changes the orientation of the selection in on related axis about threshold in degrees. Red is X, green is Y, and blue is Z. The Center Pivot button on the right moves objects local rotation axis to the center of its bounding box.
Scaling
Contains the following options when scaling content:
Uniform Scaling - Connects X-, Y-, and Z-axis and keys the same value to all of them. Disable this option to scale an object in only one direction or unequally in different directions.
Scale - Scales selection on related axis depending on threshold and unit setting. Red is X, green is Y, and blue is Z. Enabling check box for Uniform Scaling restricts execution to set new value also on other related axes. The Center Pivot button on the right moves objects local scale pivot to the center of its bounding box.
Rotation Pivot
The rotational pivot is the point in 3D around which an object is oriented when using the Rotate tool.
Coordinate System - Sets the coordinate system, Object or World, used as a reference on rotations.
Position - Translates the rotation pivot point on the X-, Y-, or Z-axis.
Move to - Click one of the following to translate the rotation pivot point.
Object Center - Moves the rotation pivot point to the center of the object’s bounding box.
World Center - Moves the rotation pivot point to the center of the world’s coordination system.
Alignment - Sets the coordinate system, Orientation or Direction Vector, used as a reference on rotations.
Orientation - Only available for Orientation Alignment. Rotates the rotation pivot point on the X-, Y-, or Z-axis.
Direction - Only available for Direction Alignment. Locates the second point of a vector with X-, Y-, and Z values. The first point is the pivot point of the object.
Show Axis - Displays the defined axis of the pivot mapped to the picked vector (2-Points) or triangle normal (3-Points), when this option is enabled.
Pick - Click one of the following to define the rotation pivot. The pivot is moved to the center of the picked points. When Show Axis is enabled, an X, Y, or Z axis is displayed.
2-Points - Shift-LMB click your first point, then another location for the second point to define an axis.
3-Points - Shift-LMB click your first point, then another location for the second, and another for the third point to define an axis.
Scaling Pivot
The scaling pivot is the point in 3D from which an object is scaled, when using the Scale tool.
Coordinate System - Sets the coordinate system, Object or World, used as a reference on scaling.
Position - Translates the scaling pivot along the X-, Y-, or Z-axis.
Move to - Click one of the following to translate the scaling pivot point.
Object Center - Moves the scaling pivot point to the center of the object’s bounding box.
World Center - Moves the scaling pivot point to the center of the world coordination system.
 Advanced (tab)
The functions in this tab deal with the bounding box, shearing, and pivot translations. All numerical input fields have a wheel beside them. Click-drag it to the left or right increase or decrease values.
Bounding Box
Contains the following options for working with the bounding box center:
Bounding Box Center - Retrieves the coordinates (X,Y,Z) of the bounding box center from the selected object when
 (Get Bounding Box Center) is pressed.
Create - Determines the kind of tranformation used for the transform node of the bounding box center.
Transform - Creates a transform node with the transformation of the selected bounding box center when Get Transform3D is pressed. The generated node appears at the top level of the Scenegraph.
Inverse Transform - Creates a transform node with inverse transformation of the selected bounding box center when Get Transform3D is pressed. The generated node appears at the top level of the Scenegraph.
Shearing
Shearing deforms the object by tilting the selected bounding box plane.
- Shear - Shears the object on the X- and Y-axis, X- and Z-axis, and Y- and Z-axis.
Pivot Translations
Sets pivot translations to preserve existing tranformations when a pivot is moved (and the object is not at the origin, with a non-unit rotation and/or scale).
- Rotation - Preserves the existing rotate transformations when moving the pivot. Used to prevent an object from moving when the object's pivot point is not at the origin and the pivot is moved.
- Scaling - Preserves the existing scale transformations when moving the pivot. Used to prevent an object from moving when the object's pivot point is not at the origin and a non-unit scale is applied to the object.
 Menu Bar
 Search