
Injection pressure result
The Injection pressure result shows the highest injection pressure reached before the machine switches from velocity to pressure control.
Things to look for
When viewing the Injection pressure result, watch for the following:
- Pressure variations during packing, which affect the volumetric shrinkage
- Pressure variation in the cavity, which should be minimized during the packing stage
- Hesitation
- Overpacking caused by high injection pressure
- Shrinkage.
Using this result
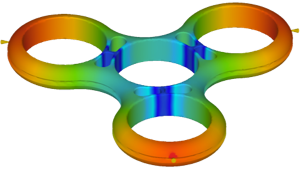
At the beginning of filling, the pressure is zero, or 1 atm in the absolute pressure scale, throughout the mold. The pressure at a specific location starts to increase once the melt front reaches that location. The pressure continues to increase as the melt front moves further away, due to the increasing flow length between this specific location and the melt front.
The force that pushes the polymer melt to flow during filling is the pressure difference between one location and the next. Like water flowing from higher elevations to lower elevations, polymer always moves in the direction of the negative pressure gradient, from higher pressure to lower pressure; therefore, the maximum pressure occurs at the polymer injection locations and, the minimum pressure occurs at the melt front during the filling stage, as shown in the following diagram.
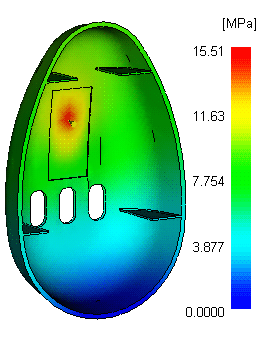
The magnitude of the pressure or pressure gradient depends on the resistance of the polymer in the mold. This is because polymer with high viscosity requires more pressure to fill the cavity. Restricted areas in the mold, such as thin sections, small runners, and long flow lengths, also require a larger pressure gradient, and, therefore, a higher pressure to fill.
Next steps
The following options can be used to solve problems with underfilling or overpacking caused by injection pressure:
- Move the injection location or use additional injection locations to fill a problem area. The number of gate locations depends on part geometry, material, and processing conditions.
- Position injection locations to create a balanced filling pattern and uniform pressure distribution.
- Avoid placing injection locations close to thin areas that will cause hesitation and in areas that will fill early and overpack.
- Alter the part geometry.
- If changing the gate location to lower the injection pressure is not possible, redesign the part to increase the wall thickness. A complex and thin geometry can cause filling difficulties and require a high injection pressure.
- Select a different material with a lower viscosity, which requires less injection pressure to fill the mold. Increase the melt temperature to reduce the viscosity. This reduces the injection pressure required to fill the mold.