Learn about the Copy Design interface.
The Tool Bar
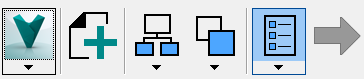
Use the toolbar to log in and out of a vault, access administrative options like numbering schemes, add objects to the main view, control copy settings and rule sets, and create copies.
|
Icon and Details |
Sub-Menus |
|---|---|
 Master Menu Log in and out of a Vault, refresh the view, and access administrative options with the Master Menu. |
|
 Add Objects Add the files that you want to copy to the main view with the Add Objects button. |
N/A |
 Include Children Select whether to show or hide the model attachments and library files in the copy view. |
By default, all library files and attachments are set for copy. However, you can assign different copy actions to children files by displaying them in the Copy Design view. Use the Include Children button to toggle whether children files are displayed in the Copy Design view. Select which types of children files to show by choosing one or both of the following check-boxes:
|
 Select Copy Settings Control how files are copied at a master level. |
|
 Select Rule Set Select the Rule Set that you want to use for your current copy operations or leave the Rule Set option turned off. |
Rule sets determine the file properties and settings for copied files when certain conditions are met. Users can select from a list of existing rule sets. The sub-menu for the Rule Set button lists all existing rule sets. If no rule set is selected, the target file receives the same file properties and settings as the source file. See Copy Design–Action Rules for more information about creating and editing rule sets. |
 Create Copy Once everything is configured, click Create Copy to begin the copy operation. |
N/A |
The Main View Grid
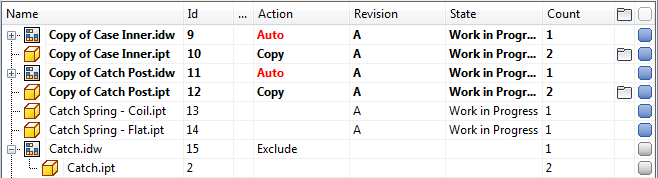
The main Copy Design view shows the name of the files available for copy, the file identification number, the action that will be performed on the file, the revision and state of the file, and how many instances (Count) of the file occur within the current list.
You can also manage copy actions and customize the view from the main view.
The Navigation Panel
There are four different navigation panels.
|
Panel |
Details |
|---|---|
|
Where Used  |
The Where Used panel lets users track the origin of the copy objects and their destination. Since you can replace existing files with uncommitted instances of files that are being copied, this means that the copied instance may have numerous destinations. Use the Where Used tab to make sure that the files are being copied to the right locations. See Copy Design–Where Used for more information. |
|
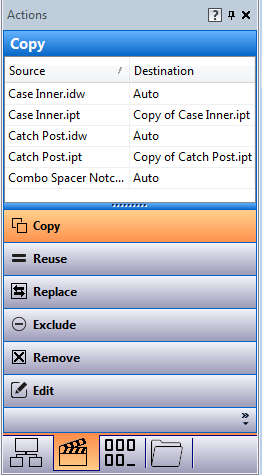
Actions  |
The Actions Panel lets you review which operations are assigned to be performed on files in the main view. Once you have configured the files in the main view, you can use the Actions Panel to filter the files based on their assigned operation. Assigned operations include copied, reused, replaced, excluded, or edited. Use the Actions Panel to verify the copy design configuration in the main view and to make any necessary changes. Note: You can also set action operations by dragging and dropping files from the main grid onto the desired operation button in the Actions Panel.
See Copy Design–Actions for more information. |
|
Numbering  |
The Numbering Panel lists all of the files selected for copy. It also shows the original and new name for each selected file. The grid displays the renaming options based on available numbering schemes. In the Numbering Panel grid, you can edit certain fields and individual numbering schemes. See Copy Design–Numbering Schemes Panel for more information. |
|
Folders  |
The Folders Panel lets you review the source and destination folders for the copy design operation. This is a great way to verify that the necessary files are selected and will be copied to the correct location. You can group selected files for operations based on the folder location. You can also drag-and-drop files between folders or from the main grid to perform a copy. See Copy Design–Folders for more information. |