Symmetry improvements
When you turn Symmetry on while components are selected, Maya automatically selects the appropriate mirrored components. There is also now a HUD element that displays the current axis of symmetry when one is active.
In addition, symmetry support has been expanded to the following tools:
UV Editor Improvements
- The
UV Distortion options in the
UV Editor (Image > UV Distortion >
 ) to show distortion errors per shell or per object. See
Identify UV distortion.
) to show distortion errors per shell or per object. See
Identify UV distortion.
- Layout UVs has been updated with a new algorithm to provide more customizable results.
- The
Symmetrize UVs Tool allows you to quickly lay out UVs across a line of symmetry. See
Symmetrize UVs.

Auto Seams for UV Shells
You can now use the new Auto Seams command to automatically select or cut appropriate seams for your meshes or UV shells. This saves you from having to select and cut edges manually, while also ensuring that edges aren't missed accidentally. See Auto Seams.
Curve Warp Deformer
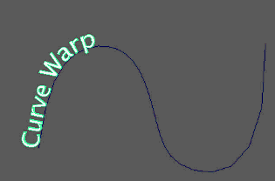
The new Curve Warp deformer allows you to quickly connect a mesh to a curve to drive a variety of deformation effects. It is similar to motion paths but offers greater customization with a more streamlined workflow. See Curve Warp deformer.
Blend Shape Sculpting Tools
A new set of Sculpt Target Tools have been added to specifically support Shape Authoring workflows. These include:
- Erase Target Tool
- Mask Target Tool
- Smooth Target Tool
Bevel improvements
The Bevel Options have been updated with new attributes related to Depth, Mitering, and Chamfer to give you more precise control over a Bevel operation. See Bevel Options.
Bridge Direction
You can now choose the direction in which to bridge source and target edges/faces when using the Bridge command. See Bridge Options.
Cleanup orphaned components
Select the new Isolated Components option (Mesh > Cleanup) before performing a mesh cleanup to remove orphaned components that are created during modeling operations. See Cleanup Options.
Combined mesh pivot points
When using the Combine command to combine separate meshes into one, you can now specify where the pivot for the newly combined mesh appears. See Combine options.
Custom Pivot improvements
Bake Pivot Orientation has been renamed to Bake Pivot (Modify > Bake Pivot). By default, Bake Pivot now bakes the edited pivot's position and orientation, but the new Bake Pivot Options also lets you bake only position or orientation. See Modify > Bake Pivot.
Extrude improvements
Improvements to the Extrude command's thickness algorithm produce more predictable results when using extrude to generate thickness on a mesh.
Hide / Show components improvements
Showing and hiding components now functions like hiding and showing objects. See Show or hide components.
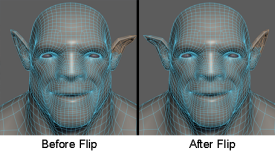
Mirror improvements
Mirror Geometry and Mirror Cut have been consolidated into a single Mirror command that supports a new and more robust mirroring workflow. See Mirror Options.
Nudge UVs improvements
Nudge UVs now supports an extra decimal place for more fine-tuned adjustments. See Nudge shells and components in the UV Editor.
Preselection Highlight improvements
The minimum cursor distance required to highlight a component via Preselection Highlight can now be modified in the Selection Preferences. It has also been improved with better accuracy, particularly when trying to select components that are behind other components in wireframe mode or when the cursor is hovering just outside a mesh. See Highlight components before selecting them.
Project along an object's normals
The Conform operation now supports projection along normals. The new Along Normals option is selected by default in the Conform Options (Mesh > Conform), projecting the vertices of the selected object onto the live surface along the direction of its normals.
Subdivision Method display
The polyShape node now displays the current global subdivision method in parentheses next to the Subdivision Method attribute. This saves you from having to go to the Preferences when deciding how to set this attribute. See Smooth Mesh node.
Quad Draw Tool improvements
- A new Snap to Backfaces option allows you to create dots on forward or backward (reversed normals) faces. See Quad Draw Tool options.
- Drawing points on a Live object now works with Symmetry.
Wedge Faces along other object edges

Wireframe on sculpted
You can now adjust the transparency and color of wireframes displayed when sculpting a mesh. See Sculpting Tool Settings.
Add Divisions limitation removal
Add Divisions is no longer limited to a maximum of four division levels. See Add Divisions Options.