New render setup system
The new render setup system, replacing the legacy render layer system, simplifies the management of complex scenes. It brings a modern approach to adding shot-based overrides to scenes, and you can then easily generate templates for the setup of a shot and propagate these setups from one shot to another.
Click
 on the Status line to open the
Render Setup editor.
on the Status line to open the
Render Setup editor.
 For a series of video tutorials, see
Render Setup workflow video tutorials.
For a series of video tutorials, see
Render Setup workflow video tutorials.
- Create render layers that represent a scene state and an image output from rendering.
- Populate layers via collections, and add objects to your collection dynamically via an expression and/or statically via selection.
- Add overrides to collections of objects.
- Add all scene lights to a render layer in one step, and apply overrides to the lights in the layer.
- Share render setups among scenes: import and export a render setup.
- Batch render the render layers.
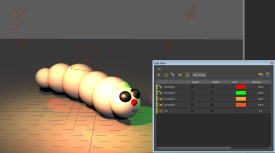
New Light Editor
The new Light Editor simplifies light management. Use it in conjunction with the render setup system to apply overrides to the lights in a layer.It provides a convenient interface to create, group and position lights, and enables you to adjust attributes for multiple lights in a single editor.
Click
 on the Status line to open the
Light Editor.
on the Status line to open the
Light Editor.
Pause Viewport 2.0 and the Material Viewer in the Hypershade
You can pause updates in Viewport 2.0, in the Material Viewer, and in other editors such as the UV Editor. This allows you to make changes in your scene without having to wait for the editors to update. This can be especially useful when you have a complex scene.
Click
 in the Status line or
Material Viewer toolbar to pause and resume updates. When updates resume, the scene is updated with all the changes made while paused. The paused panels are re-rendered and monitoring of scene updates begins again.
in the Status line or
Material Viewer toolbar to pause and resume updates. When updates resume, the scene is updated with all the changes made while paused. The paused panels are re-rendered and monitoring of scene updates begins again.
New Viewport 2.0 features
- Ramp textures with indices mapped to procedural textures or file textures can now be visualized in Viewport 2.0.
- Frame of image plane hidden by default, but can be displayed via the Frame Visibility attribute or by selecting the image plane. This frame is also hidden when Show ornaments is disabled in the Playblast Options window.
- When not selected, the camera no longer appears as a green frame in the viewport when Display Resolution is enabled. A white frame is still displayed when the camera is selected.
-
Rock and Stucco textures are now supported in Viewport 2.0. Creating a node network with these textures is faster as a result, and playback performance is also improved.
- See What's New in Performance in Autodesk Maya 2016 Extension 2 for a list of performance improvements.
New camera features
- You can lock your current camera by clicking the
 icon on the Panel toolbar to avoid inadvertently changing its position and thus your animation.
- A default fit factor is set that determines how closely the camera should zoom into the objects when Frame Selection or Frame All is executed.
- You can tumble your orthographic camera around the center of interest.
- You can move the camera to the center of a selected object without zooming in by selecting View > Center View of Selection from the viewport panel menu; or, by using the viewFit command with the -center flag.
-
You can move your camera to view your scene along different axes; for example, -X or Y. Select the axis you want from the View > View Along Axis viewport panel menu.
- The camera heads up display at the bottom of the viewport reflects the axis on which you are viewing the scene; for example, persp -Z versus persp Z.
-
The size of your objects remain constant in the viewport when you switch your camera from perspective to orthographic mode. You can easily switch between the two modes via View > Camera Settings in the viewport panel menu; or, use the hotkey Alt + P.
-
When used with an orthographic camera, the dolly tool can now operate in Dolly mode so that the camera is tracked forward and backward. Similarly, it can behave in Zoom mode, so that the Orthographic Width changes and you can control how much of the scene the camera sees.
Select either mode from the Dolly Tool options window (select View > Camera Tools > Dolly Tool >
 ). Alternatively, use the
dollyCtx command with the new
orthoZoom flag.
). Alternatively, use the
dollyCtx command with the new
orthoZoom flag.
- The default orthographic camera is now positioned farther away from the origin so that, when you switch to orthographic view, you can still see all of your objects from different views. The position and corresponding center of interest of the default orthographic camera has been increased from 100 units to 1000 units.
- When framing objects, you can now frame parent and child objects together, or only the parent objects without their children. Find these options in the viewport's View menu, and in the main Display menu. See also Frame all or selected objects in a view.
Display shaders assigned to objects in the Outliner
You can expose the shaders assigned to each object in the scene by enabling Display > Assigned Materials in the Outliner.
A shader contextual menu has also been added to the Outliner, allowing you to assign materials to selected objects or use painting to assign a shader, and so forth. To access this menu, right-click any material in the Outliner.
OpenGL Core Profile now the default rendering engine
OpenGL Core Profile (Compatibility) is now the default rendering engine for Viewport 2.0 on the Windows and Linux platforms. This mode includes features from OpenGL 2.1 and below, and lets you take advantage of features from OpenGL version 3.2 and above.
On Mac OS X, the default rendering engine is set to OpenGL - Core Profile (Strict) which supports features from OpenGL version 3.2 and above. Features from OpenGL versions 2.1 and below are not supported in this mode.
Hardware selection enabled by default
Hardware selection is now enabled by default in Viewport 2.0. Hardware selection is enabled for all viewport modes (legacy OpenGL, DirectX 11, and OpenGL Core Profile (Compatibility) and OpenGL Core Profile (Strict)).
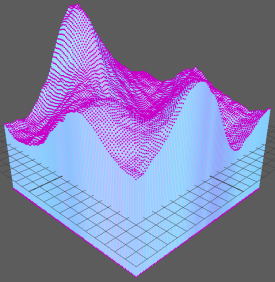
To understand how to write a shader that performs hardware selection on displaced geometry, and to draw vertex, edge, and face components at their correct displaced positions, see the WaterSimulation example (pictured). For the GLSL version, see WaterSimulation.ogsfx in the presets\GLSL\examples folder of the Maya installation directory. For the DX11 version, see WaterSimulation.fx in the presets\HLSL11\examples folder.
See also the apiMeshShape, dx11Shader, and glslShader examples in the Maya Developer Kit and the What's New section in the Maya Developer Help for more information on API interfaces related to hardware selection.
New Stingray physically based shader features
The StingrayPBS node now supports subsurface scattering and refraction, and the Material Variable node can be used to represent a float2 value.
In the StingrayPBS node Attribute Editor, the Parent Material drop-down list is now called Preset Material. The In Engine Material attribute is now called Parent Material.
Additionally, use the Engine Resource attribute to assign a material name for your StingrayPBS. When you send your assets to Stingray with File > Send to Stingray, this name is used for your material in your Stingray project.
Hypershade Material Viewer now supports camera interaction
You can now move and rotate the camera in the Hypershade Material Viewer.