To set up your render, you can do the following:
-
Create render layers. Divide your scene into layers, then populate them with collections.
-
Create collections to group nodes based on the attributes you want to override in your scene; for example, create a collection of your background objects to matte them out of your character.
Create collections also to control the visibility of a group of objects. You can enable or disable a collection so that only enabled collections contribute to the layer and are visible, or use isolate select to focus on specific collection(s) of interest in the viewport.
You can add objects to your collection dynamically via an expression. This expression can be reapplied to dynamically adapt to changes in the scene. See Dynamically update your render setup when your scene updates.
This allows you to easily manage data changes in complex scenes.
- Create one or more overrides for each collection to apply non-destructive changes to your scene. Create an absolute override to set the attribute to a new value, or a relative override to multiply the original value and/or add an offset; for example, to increase the transparency of the shaders applied to the character by 10%.
Overrides are clearly listed in the Property Editor and can be easily enabled or disabled, allowing for experimentation and frequent modification.
- Add all scene lights to your render layer in one step, and apply overrides to the lights in your layer.
- You can import or export your render setup (render layers, collections and overrides) in the .json file format. Create and export a master setup and import and reuse it to build shots from a sequence.
- Set render layers as renderable and batch render.
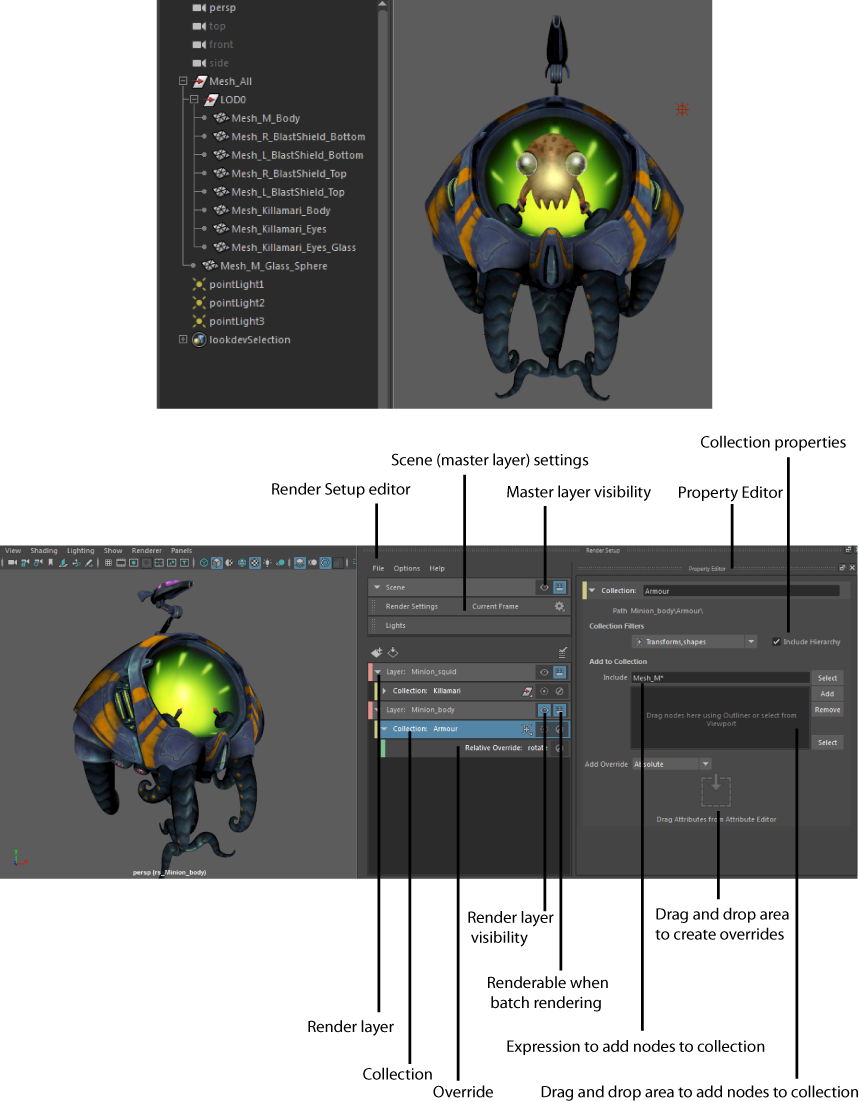
Click
 on the status line to open the
Render Setup editor. The
Render Setup workspace window appears, with the
Render Setup editor on the left and the
Property Editor on the right. The
Render Setup editor allows you to create layers, collections and overrides, while the
Property Editor allows you to set their corresponding values. In addition, the
Render Setup editor allows you to access your scene (master layer) settings via its
Scene tab.
on the status line to open the
Render Setup editor. The
Render Setup workspace window appears, with the
Render Setup editor on the left and the
Property Editor on the right. The
Render Setup editor allows you to create layers, collections and overrides, while the
Property Editor allows you to set their corresponding values. In addition, the
Render Setup editor allows you to access your scene (master layer) settings via its
Scene tab.
This render setup system and the legacy render layers system are separate, independent systems and you can only use one or the other during a given Maya session. To switch between systems, select Windows > Settings/Preferences > Preferences to open the Preferences window, and navigate to the Rendering category. Select Legacy Render Layers or Render Setup as the Preferred Render Setup system and restart Maya.
In this example, the armor of the Minion character is added to a collection in a render layer, and a relative override applied to its Rotate attribute.