- Found in the Modeling menu set.
Normals
- Average
- Averages the directions of vertex normals. This affects the appearance of shaded polygons.
Select Mesh Display > Average >
 to set the
Average Normals Options.
to set the
Average Normals Options.
- Conform
- Unifies the direction of the surface normals for a selected polygon mesh. The resulting direction of the surface normals will be based on the direction that is shared by the majority of the faces on the mesh. See Edit the vertex normals to affect polygon shading.
- Reverse
- Reverses the normals on the selected polygons. You can also specify whether or not the user-defined normals get reversed.
Select Mesh Display > Reverse >
to set the
Reverse Normals Options.
- Set to Face
-
Lets you set vertex normals to the same direction as the face normals.
Select Mesh Display > Set to Face >
to set the
Set to Face Normal Options.
- Set Vertex Normal
- Controls the positions of vertex normals. This affects the appearance of shaded polygons. By default, Maya locks normals to their existing values.
Select Mesh Display > Set Vertex Normal >
to set the
Set Vertex Normal Options.
- Harden Edge
-
Manipulates vertex normals to change the appearance of shaded polygons to render with a hardened appearance. Harden Edge sets the Normal angle to 0 degrees, making all selected edges render hard. For more information on hardening edges, see Harden or Soften polygon shading with vertex normals.
Note: User defined (locked) normals are not affected by softening or hardening only in how they are shared at a vertex. Instead, use the Average Normals or Set to Face features to set the values. - Soften Edge
-
Manipulates vertex normals to change the appearance of shaded polygons to render with a softened appearance. Soften Edge sets the Normal angle to 180 degrees, making all selected edges render soft. For more information on softening edges, see Harden or Soften polygon shading with vertex normals.
Note: User defined (locked) normals are not affected by softening or hardening only in how they are shared at a vertex. Instead, use the Average Normals or Set to Face features to set the values. - Soften/Harden Edge
- Lets you manipulate the shaded appearance of polygons by specifying an angle value for the normals. For more information, see Harden or Soften polygon shading with vertex normals.
- Method
- Determines how edges are softened/hardened. Options include:
- Angle: Harden any angles greater than the current value. All others are rendered soft.
- Texture Borders Harden all edges along a texture border. All others are rendered soft. :
- Lock Normals
-
Locks vertex normals. Normals have a direct effect on the appearance of shaded polygons. You can modify their appearance by first unlocking, editing the normals, and then locking them.
To change the X, Y, or Z values for normals, you need to unlock the normals using Mesh Display > Unlock Normals. The normal values you specify (or if you use the default values) are fixed for each normal associated with the vertex or vertex/face component. This means that if you change a vertex position, normals do not change position.
- Unlock Normals
- Unlocks vertex normals. Normals have a direct affect on the appearance of shaded polygons. You can modify their appearance by first unlocking, editing the normals, and then locking them. Use this option to unlock locked normals.
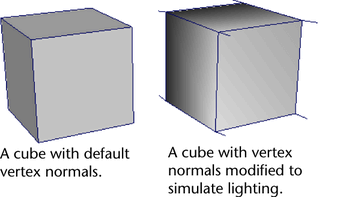
- Vertex Normal Edit Tool
-
Lets you adjust the user-defined normal of a vertex (or several selected vertices) using a manipulator. For example, you can make sharp edges appear smoother or adjust the lighting on a polygonal object by modifying the direction of the vertex normal.
Editing the vertex normal with this tool overrides the existing Maya normals for the mesh and locks the user-defined normal you set. You can unlock the user-defined normal using Mesh Display > Unlock Normals.
 Note: Editing normals with face/vertex components can cause new hard edges, any unlocked neighboring normals might move in the process. Lock any neighboring normals you want to remain unaffected prior to editing.
Select Mesh Display > Vertex Normal Edit Tool >
to set the
Vertex Normal Edit Tool Options.
Vertex Colors
- Apply Color
- Adds or removes color per vertex (CPV) information on the selected vertices of a polygonal mesh.
Select Mesh Display > Apply Color >
to set the
Apply Color Options.
- Paint Vertex Color Tool
- Lets you apply color-per-vertex information on a polygon mesh by painting directly on the mesh using either your mouse or a tablet with stylus.
Select Mesh Display > Paint Vertex Color Tool >
to set the
Paint Vertex Tool Options.
Vertex Color Sets
- Create Empty Set
- Creates an empty color set for color per vertex work. For more information, see
Create and edit color sets.
Select Mesh Display > Create Empty Set >
to set the
Create Empty Color Set Options.
- Delete Current Set
- Removes an existing color set that you specify. For more information, see Create and edit color sets.
- Rename Current Set
- Renames an existing color set. For more information, see Create and edit color sets.
- Modify Current Set
- Assigns a polyColorMod node downstream from the selected color set so you can apply global color modifications to the color set for either HSV color space or RGBA color channel basis. An option for this also exists in the Color Set Editor. For more information, see Color Set Editor.
- Set Keyframe for Vertex Color
- Lets you set animation keyframes for color-per-vertex attributes.
- Color Set Editor
- Lets you manage the color sets for any texture and prelighting work you have done.
Select Mesh Display > Color Set Editor >
to set the
Color Set Editor Options.
Vertex Bake Sets
- Prelight (Maya)
-
The Prelight feature calculates and then stores the shading and lighting color information from the rendered appearance of a polygon mesh directly on the color per vertex information for the mesh. This is also referred to as “baking” the lighting. It is also possible to export the prelighting information that is produced as a texture map.
Select Mesh Display > Prelight (Maya) >
to set the
Prelight Options.
- Assign New Set
-
Creates a new vertex bake set and assigns selected objects to it so that you can create light maps.
- Assign Existing Set
-
Assigns selected objects to existing bake-sets. A list of existing bake-sets is displayed in the drop-down list for selection.
- Edit Assigned Set
-
Displays the Attribute Editor with the currently assigned bake set tab displayed so you can edit any bake set attributes.
Display Attributes
- Toggle Display Colors Attribute
-
Toggle Display Colors Attribute turns the Display Colors attribute (located in the Mesh Component Display tab of the shape node) on or off for the currently selected polygon mesh.
Turning on the Display Colors attribute lets you view the color per vertex information as well as any assigned shaders on a polygonal mesh when the display is set to shaded mode. The default Display colors setting for any object is off until color per vertex information is applied.
If you do not want to view color per vertex information for any new polygon objects in your scene while viewing in shaded mode, turn Toggle Display Colors Attribute off.
- Color Material Channel
-
The Color Material Channel option determines the interaction between existing material channels and the vertex colors you assign. For all options other than None, lighting affects the object's shading.
Select Mesh Display > Color Material Channel to select one of the Color Material Channel Options.
- Material Blend Setting
-
Specifies how the Color Material Channel blends color-per-vertex (CPV) values with the assigned shading material.
Select Mesh Display > Material Blend Setting to select one of the Material Blend Setting Options.
- Per Instance Sharing
- Select Shared Instances
- Highlights all of the instances in your scene that share the color set family with the selected instance.
- Share Instances
- Lets you share the color set of one instance with other instances. Select the instance with the color set to be shared followed by the other instances.