
Create and Schedule Reports
Create customized reports based on available templates to generate data relevant to your project needs. Schedule reports to run them automatically on a regular cadence.
In this topic, you can learn how to:
Create Reports
To create a report:
Click Reports from the left navigation to open the Reports tool.
Click Create report and select a report template to start with.
In the Details view, complete the following fields:
Title - Enter a title for the report.
File format - Choose a PDF or Excel report file format. Certain reports only offer one report format.
Save to Files - Toggle on to automatically save the report to a desired folder in the Files tool. Click Select folder to choose the folder in Files where you'd like export the report.
Tip: You can choose to save a report that is generated more than once as a new version or as a new file.
Filter - Use filters to limit the data that appears in the report. The filters vary by report type. Click
 to add more filters and further refine the data included in the report.
Group - Group report items by a specific attribute. Currently, the grouping option is available in the Issue Summary report, Issue Status Summary report, Takeoff Inventory, and in most Cost reports.
Sort - Choose the data to sort the report by and the direction of the sort. Click
 to add more sorting criteria to better organize your report.
Options - Choose which options you'd like to include in your report. See Report Configuration Options for more details.

Click Run report to create the report and generate the data.
You can save the report as a template for future use. To just run the report, choose the No, just run the report one time option. To save the report as a template, choose the Yes option and enter a template title.
Click Run and save.
Depending on the settings configured by a project administrator, you will:
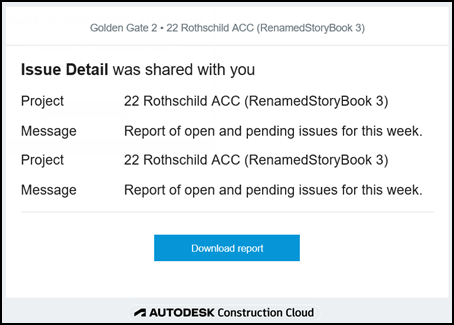
- Receive an email with a link to download your generated report,
or
- Receive an email with an attachment containing the report.
Report Configuration Options
The options for the different report types are detailed in the following table:
| Report type | Options |
|---|---|
| Assets detail | Cover page Table of contents References File links Photos |
| Assigned items by company | Default/Compact layout Cover page Table of contents File links Photos Other references Comments |
| Form detail | Cover page Table of contents Photos |
| Issue detail | Default/compact layout Cover page Table of contents Sheet overview File links Photos Other references Comments Custom fields |
| Issue status summary | Cover page |
| Issue summary | Cover page Table of contents |
| Issues on sheets BETA | Cover page Table of contents Photos |
| RFI detail | Cover page Table of contents Photos References Activity log Comments |
| RFI summary | Cover page Table of contents |
| Submittal item detail | Cover page Table of contents Photos References |
| Submittal item summary | Cover page Table of contents |
| Submittal item status summary | Cover page |
| Takeoff Inventory | Cover page Cost data Takeoff instances |
| Takeoff Type Inventory | Cover page Hide grouping rows |
Customize Report Data
When creating some reports, you can customize the data that you want to show in the report in the Fields section, including or excluding available fields. You can also control the order of those fields.
You can customize data for the following reports:
- Assigned Items by Company Report
- Cost Reports
- Issue Detail Report
- RFI Summary Report
- Submittal Item Summary Report
- Takeoff Reports
- Budget Project Overview Report
Schedule Reports
Project administrators and project members can schedule reports to run them automatically on a regular cadence.
Click Reports on the left navigation panel to open the Reports tool.
Switch to the Templates tab.
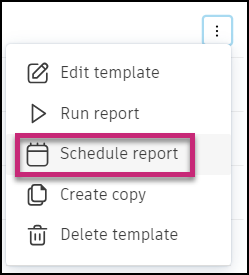
Click the More menu
 on the right side of the template that you want to schedule and choose Schedule report
  .
.
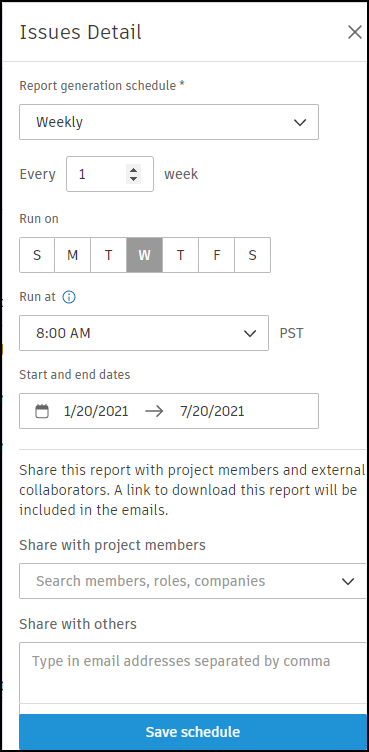
Define the cadence for the report schedule. The cadence consists of the period, the frequency, and the day.
Periods include:
- Weekly
- Monthly
The frequency defines how often the report is run. For example, the frequency could be every two weeks or every three months. Depending on the period selected, the day is defined in terms of the day of the week or the day of the month.
Choose the time that the report should run, based on the local time zone of the project.
Click the calendar icon to set the start and end dates for the report.
Click the Share with project members drop-down list to select project members, roles, or companies to share the report with. Selected members will receive an email containing a link to download the report.
Enter an email address to share the report with non-project members.
Add a message if necessary to include in the scheduled report.
Click Save schedule.
To edit your schedule:
- On the Templates tab, click the More menu next the desired report.
- Click Edit schedule.
- Adjust the schedule as needed.
- Click Update schedule.
- On the Templates tab, click the More menu