
Model Browser
You can control the visibility of elements or exclude them from your model with the Model Browser.
Access Model Browser
Open a 3D file.
Select the 3D tab.
Select a model.
Click
 on the left panel to open the model browser.
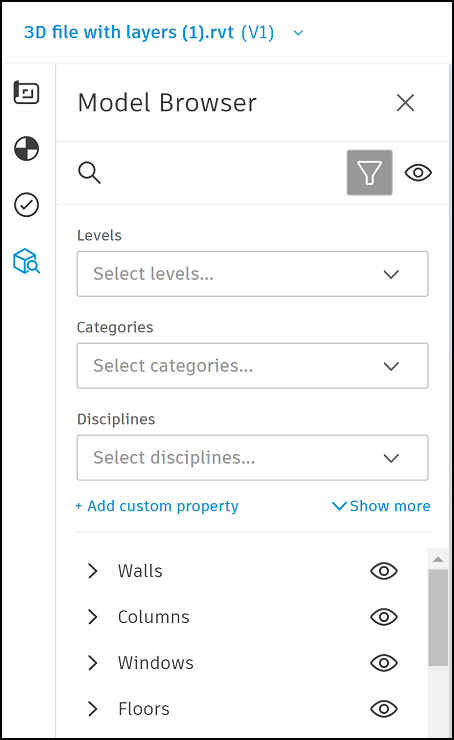
Filter Models
Use model filters to exclude elements from models based on any model object property. You can use default basic filters, or configure advanced filters using complex rules. This can help you to focus on specific design elements or areas of interest for model reviews and issue resolution, to better communicate with your team, and to contextualize the project more easily.
Basic Filters
There are four categories of default filters which support RVT, IFC, and DWG files:
| Filter | RVT properties | IFC properties | DWG properties |
|---|---|---|---|
| Levels | Constraints/Level | Element/IfcSpatialContainer | -- |
| Constraints/Base Constraint | -- | -- | |
| Constraints/Base Level | -- | -- | |
| Constraints/Top Constraint | -- | -- | |
| Constraints/Top Level | -- | -- | |
| Constraint/Schedule Level | -- | -- | |
| Constraint/ Reference Level | -- | -- | |
| Systems/Assembly | Identity Data/Assembly Description | Identity Data (IFC Type)/Assembly Description | Region 1 Data/Assembly |
| Identity Data/Assembly code | Identity Data/Assembly code | -- | |
| Rooms | Other/Room Name | Element/Room Bounding | N/A |
| Other/Room Number | -- | -- | |
| Category | __category__/_RC (Revit Category) | Element/Category | General/ Layer |
| -- | Element/IfcClass | -- |
If you are working on an RVT, IFC, or DWG file:
- Select a default filter
Select elements in the filter.
Hide all filters by clicking the filter icon or clear all filters by clicking the X in the filter panel
 .
.
Add and reorder filters
You can add custom filters in addition to the default filters. If the file type you're working on doesn't support the default filters, you can also add custom filters.
- Select Add custom property.
- Drag to reorder any filters that are already added.
- Select any listed filter to add, or use the search to refine your options.
- Click Update.
You can now access these filters from the filter panel. Click Show more to view all filters if you have more than three added.
Advanced Filters
If the basic filters don't meet your needs, you can create custom rule-based filters where each consists of a property, operator, and a value.
Create and Apply Advanced Filters
Click the drop-downs below to see details about rule-based filters:
Property
Choose from the properties in your models. Property options in this drop-down will depend on the file types you have loaded into the viewer. Supported types of properties include text, number, and boolean properties. See the following table which maps common names for properties to the actual property names in RVT, IFC, and DWG files.
| Common names for properties | RVT property | IFC property | DWG property |
|---|---|---|---|
| Category | Internal/Category | Element/IfcClass | General/Layer |
| Assembly | Identity Data/Assembly Description | N/A | N/A |
| Family | Internal/Family Name | N/A | N/A |
| Type | Identity/Family Type | Element/Ifc Name | N/A |
Operator
The operators you can choose depend on the selected property's type:
| Property | Operator | Description | |
|---|---|---|---|
| Text | Is / is not | Is is used to match a property to a specific value and is not where it doesn't match. Select values from the Value drop-down list. Selecting multiple values will filter for objects that meet any one of those values. | |
| Contains / does not contain |
The entered value is checked against the parameter value | ||
| Starts with: |
Determines whether a property starts with a specific text string. This operator is useful for filtering large sets of data where members want to focus on a specific subset of records | ||
| Is empty / is not empty: | Check whether a property has a value or not. The is empty operator returns true if the property doesn't have a value, and the is not empty operator returns true if the property has a value. Sometimes, "space values" (for example, blank or null values) are considered values for these operators, so they would still be considered not empty. | ||
| Numeric | Equals / not equals (= or ≠) | Compare two values and determine if they are the same (equals) or different (not equals). | |
| Greater than / less than (< or >) | Compare two values and determine if the first value is larger (greater than) or smaller (less than) than the second value. | ||
| Greater than or equal to / less than or equal to (≤ or ≥) | Determine if the first value is larger than or equal to (greater than or equal to) or smaller than or equal to (less than or equal to) the second value. | ||
| Is empty / is not empty | Check whether a property has a value or not. Is empty returns true if the property does not have a value, and is not empty returns true if the property has a value. Sometimes, "space values" (for example, blank or null values) are considered values for these operators, so they would still be considered not empty. | ||
| Boolean | Is true |
The Is true boolean filter operator is used to retrieve objects that have a true value in a boolean field. When this filter is applied, it will only include records where the boolean field is set to true. | |
| Is false |
The Is false boolean filter operator is used to retrieve objects that have a false value in a boolean field. When this filter is applied, it will only include records where the boolean field is set to false. | ||
| Is null | The Is null boolean filter operator is used to retrieve objects where a particular field does not have any value or is empty (null). This filter is helpful when you want to find objects that lack a value in a specific field. |
Value
The value field is the part of the rule that specifies the criteria or parameter against which the filter will be applied. This field can contain various types of values, depending on the specific property being filtered. For numeric values, use the same units as the selected property units. Only 256 characters are allowed for fields without drop-down values.
To create an advanced filter:
Click Add a rule under Advanced filters.

Create your first rule part defining a property, operator, and value.
You can extend the first rule part by clicking + and adding another rule part as required. Two or more rule parts added together create a filter rule. Continue to add more rule parts as required.
Multiple filter rules can be built and joined by a logical operator (and/or). The logical operator will determine whether a model object must pass all rule part conditions or one set of filter conditions to be displayed.
Click Add a rule to join your filter rule to another.
Choose between and/or. This selection will be applied to all filter rules in this view.
Once a logical operator is selected between the first and second filter rule, the same operator will be applied by default to subsequent filter rules. Keep this in mind as you build out your filter rules.
Note: You can only create a maximum of 100 rule parts and filter rules for a single view.
Example use for advanced filters
Suppose you want to create a viewpoint focused on the columns and ducts in a structural model.
In the property field, search for Category and choose Internal/Category.
Note: This property comes from the categories in Revit. For an IFC or other file format, see the table above for useful properties to filter by.Keep the operator as Is and choose the value Revit Structural columns.
Note: To avoid the Revit prefix on values, use the property Internal/Category Name instead.Click Add a rule.
Set the joining operator to Or so that the filter can find both structural columns and ducts.

Use property Internal/Category again, with the operator Is and the value Revit Ducts.

You now have a view of the structural columns and ducts in your model.

Remove Filters
To remove all advanced filters and the value from basic filters, click the X icon at the top of the Model browser panel, or use the reset option in the viewer.
![]()
Delete any rule from the advanced filters by using the trash icon. If it is the only rule part in the filter rule, the rule part and its filter rule will both be removed.
Show or Hide Elements
While filters exclude elements from your model, you can choose to control the visibility of elements by using Show and Hide.
The elements are displayed under the model filters as shown in the following example:
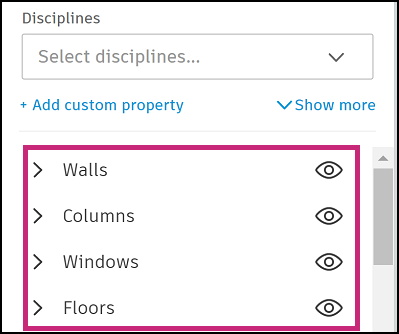
Select the ![]() next to an element to show or hide it.
next to an element to show or hide it.
You can also select the icon at the top of the panel to show or hide all elements:
![]()