
Adding Keyframes
You can add keyframes at any point in your animation curves. There are three methods of adding keyframes:
- Add a single keyframe to the selected channel(s) at the current position.
- Interactively add keyframes to any point on the selected curves. There must be at least one keyframe on a channel before you can interactively add keyframes.
- Set keyframes automatically when you adjust a parameter in any menu. For example, set up an animation directly in the Colour menu and then fine-tune the animation curve in the Animation Curves window.
To add a keyframe:
In the Channel hierarchy, select the channel to which you want to add a keyframe.
Move the positioner to the frame you wish to mark as a keyframe.
Click Add.
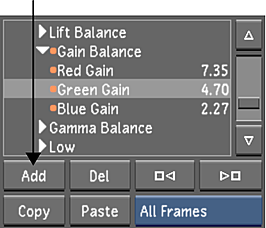
When you add a keyframe to a channel, an orange indicator appears to the left of the channel in the Channel hierarchy.
Set the channel value as needed by dragging the keyframe.
Once you add keyframes to a shot, blue markers appears in the Shot timebar indicating the location of the keyframes.
To add multiple keyframes interactively:
You must explicitly add one keyframe using the Add button or Autokey before you can add keyframes interactively in Add mode.
Display the Animation controls.
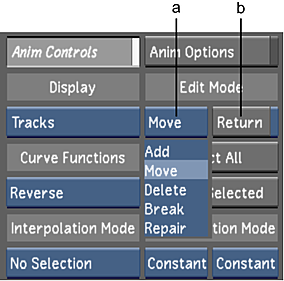
(a) Edit Mode option box (b) Return toggle button
In the Channel hierarchy, select the channel to which you want to interactively add keyframes.
In the Animation controls, select Add in the Edit Mode option box.
Move the mouse cursor over the animation curve.
Keyframes appear as you approach each frame.
Click the animation curve to add a keyframe at that frame.
Note:The new keyframe is automatically set to Bezier interpolation.Once you add keyframes to a shot, markers appears in the Shot timebar indicating the location of the keyframes.
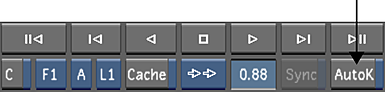
To add keyframes in Autokey mode:
Enable AutoK.
 Note:Autokey is available from all menus in Lustre.
Access the tool you want to use to create the animation. For example, in the Main menu, click Colour, and then click Grading.
Move the Shot timebar to the frame where you want to add a keyframe.
Adjust the colour parameters.
A keyframe is added automatically to the channels you modified.
Move to another frame and adjust the colour parameters and set another keyframe.
Keep adjusting colour as needed.
Once you have added keyframes to a shot, blue markers appears in the Shot timebar indicating the location of the keyframes.