
The Control Collector tab is one of the Attribute Editor tabs used in the creation of an ML Deformer.
Control Collectors let you configure and organize the attributes (controls) that influence or drive the complex deformations that the ML Deformer will approximate. Also, you can set up a separate Control Collector to specify the attributes that should be manipulated during Pose Generation to create a set of example poses that you can use to train the ML Deformer. Setting a separate Control Collector is useful when you want to use a Matrix Converter for the controls but want to generate poses as well.
For information on how to create an ML Deformer, see Create an ML Deformer and Create an ML Deformer using separate Target geometry.
To switch to the Control Collector tab in the Attribute Editor when you have added an ML Deformer to an object:
- Click the
Select Control Input
 icon.
icon.
- Expand the Control Values menu, and choose Select, Create, or Assign Control Collector.
You can also create and assign different Control Collectors in the ML Deformer tab in the Control Values menu.
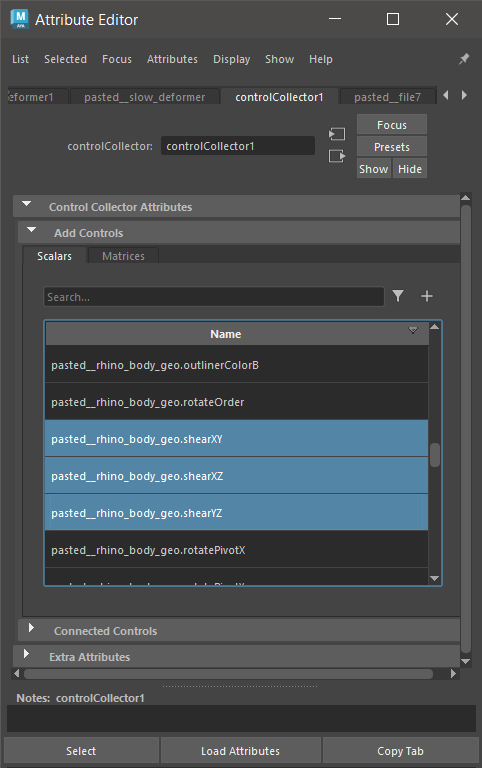
The Attribute Editor Control Collector tab
Add Controls list
The Add Controls list displays every attribute on the selected Node that could be a potential control for the deformation.
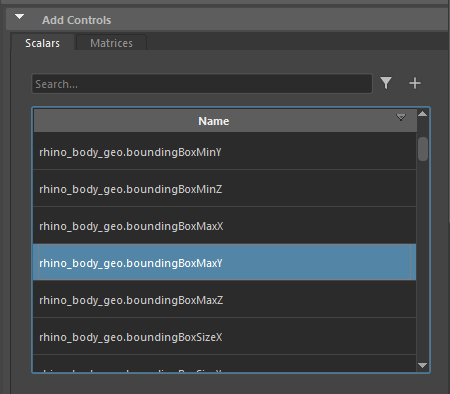
controls attributes have two tabs: Scalar and Matrix. Scalar attributes are typically animated floating-point values that influence the complex deformation being approximated, for example, the Start/End angles of a Twist deformer.
Matrix attributes are typically used for transforms/joints, and allow for the translation, rotation, and scale values to be extracted. Through this mechanism, rotations can be converted into representations that are more suitable for machine learning such as Quaternion, or Double/Triple Axis. Using these alternate representations for rotations can produce better results than using the individual rotation components being assigned as Scalar attributes.
Scalars tab
- Available Controls field
- Use the Available controls field to search for attributes by name. You can use wildcards to filter your search.
- Available Controls filter

- Use the Available Controls filter to narrow down the available attributes by type.
- Add Controls

- Adds selected controls to the Connected Controls list. You can also add controls by right-clicking and choosing Add Selected or Add All from the contextual menu.
- Name
- Click to select attributes to add to the connected controls.
Ctrl or
Shift + click to select multiple attributes and click
Add Controls
or right-click and choose
Add Selected or
Add All from the contextual menu.
Matrices tab
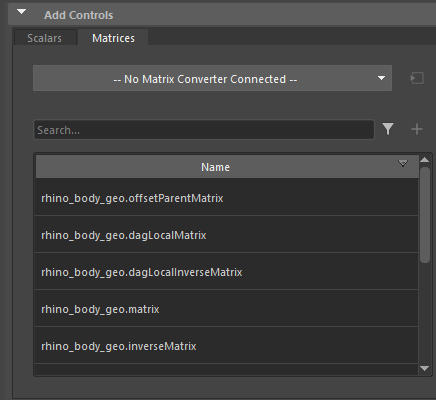
We recommend using the Matrices tab settings anytime that you have a deep joint hierarchy or transforms driving the deformation, as the matrix data can be used to extract and convert rotations into a format more suitable for machine learning.
- Matrix Converter Connection drop down
-
- Click this button to expose options where you can Create, Select, Edit, or Delete a custom Matrix Converter node, that can be used on attributes selected in the Matrices list. Click Create to open the Matrix Converter Options dialog where you can create a Converter and choose which transforms to extract, and the format to represent rotations with.
- Available Matrices field
- Use the Available Matrices field to list attribute names. You can use wildcards to filter your search.
- Available Matrices filter
- Use the Available Controls Filter to narrow down the available attributes by type.
- Add Controls
- Adds selected controls to the Connected Controls list.
- Name
- Click to select attributes to add to the connected controls.
Ctrl or
Shift + click to select multiple attributes and click
Add Controls
.
- Matrix Conversion
- Use the menu to select from existing matrix converter nodes, or create one. Matrix converter nodes allow the extraction of rotation, scale, and translation components from matrices. Rotations can be converted into alternate formats that may be more suitable for machine learning.
Connected Controls list
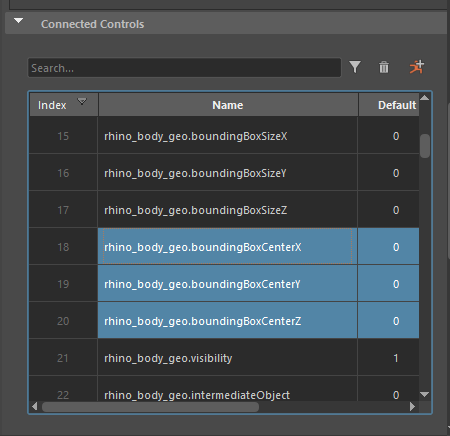

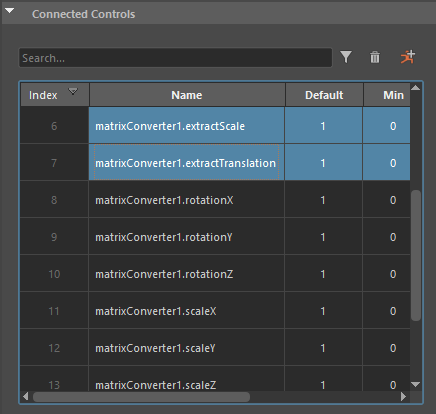
The Connected Controls list, with Scalars (left) and Matrices (right)
- Search field
- Enter the first few letters of an attribute name to locate an attribute. You can use wildcards such as "left_*" to help you.
- Filter

- Click to expand a list where you can selectively choose which attributes to view.
- Remove Selected

- Click to remove any selected controls from the Connected Controls list.
- Generate Poses

- Click to generates random poses in the Time Slider, using the settings found in Pose Generation Settings, further in this topic.
- Index
- The position of the attribute in the array.
- Name
- The name of the Connected Control attributes.
- Default/Min/ Max
- These values are used during Pose Generation. When a control is randomized for Pose Generation, a value is chosen between the Min and Max values. Depending on Outsider Mode is set, when a control is not randomized for Pose Generation, it is given the default value instead.
- All three values can be adjusted in this section.
Connected Controls contextual menu
The following options appear when you right-click a cell in the Connected Controls list.
- Edit
- Lets you edit the Default, Min, and Max values.
- Select Node
- Selects and highlights the corresponding node in the Viewport, Outliner, and Node Editor.
- Select Converter Node
- Selects the Matrix Converter node that should be used for one or more corresponding selected matrix attributes.
- Add Matrix Converter
- Use this menu to select from existing matrix converter nodes, or to create a new node to associate with the selected Matrix attributes. Matrix Converter nodes allow for the extraction of rotation, scale, and translation components from matrices. Rotations can be converted into alternate formats that may be more suitable for machine learning.
- Remove Selected/Remove All
- Removes the selected attributes from the list. Use Remove All to remove every attribute listed in the Connected Controls list.
- Expand Converters
-
Expand Converters option
- Lets you display controls connected to the matrix converters. Use this when you want to view the list of all controls used by a control collector/ML deformer. You may need to resize the Attribure Editor to view all the columns.
- Set Current Value from Limit
- Sets the value of the corresponding attribute to the Default, Min, or Max values.
- Set Limit from Current Value
- Sets the Default, Min, or Max values from the current value of the corresponding attribute.
- Set Limits from Values in Frame Range...
- Opens a dialog box where you can set limits based on a Time Range.
-
- Time Range
- Choose from:
- All: Bases the limits from the whole animation.
- Selection:
- Start/End: Activates the Start and End for you set a custom frame range.
- Time Slider: Bases the Time Range on what is currently shown on the Time Slider.
- Extend Limits
- Lets you push beyond the specified limit by the amount set in the Extend Limits slider.
- Generate Poses
- Generates random poses in the Time Slider, using the settings found in Pose Generation Settings. These poses provide examples of the effect of the controls on the resulting deformation, which is used to train the machine learning model.
- See Pose Generation Settings, below.
- Control Setup
- Lets you import or export the Controls settings. Below is an example of the exported JSON file format.
-
{ "converters": [{ "inputs": [{ "src_plug": "|joint1|joint2.matrix" }, { "src_plug": "|joint1|joint2|joint3.matrix" } ], "name": "matrixConverter1", "settings": { "extractRotation": true, "extractScale": false, "extractTranslation": false, "rotationConversion": 2, "rotationX": true, "rotationY": true, "rotationZ": true, "scaleX": true, "scaleY": true, "scaleZ": true, "translationX": true, "translationY": true, "translationZ": true }, "type": "matrixConverter" }, { "inputs": [{ "src_plug": "|cluster1Handle.matrix" } ], "name": "matrixConverter2", "settings": { "extractRotation": false, "extractScale": true, "extractTranslation": false, "rotationConversion": 0, "rotationX": true, "rotationY": true, "rotationZ": true, "scaleX": true, "scaleY": true, "scaleZ": true, "translationX": true, "translationY": true, "translationZ": true }, "type": "matrixConverter" } ], "inputs": [{ "src_plug": "matrixConverter1.flatOutput" }, { "src_plug": "matrixConverter2.flatOutput" }, { "default_value": 1.0, "max_value": 1.0, "min_value": 0.0, "src_plug": "cluster1.envelope" } ], "name": "controlCollector1", "type": "controlCollector" } - Refresh
- Updates the list with the most recent changes.
Pose Generation settings
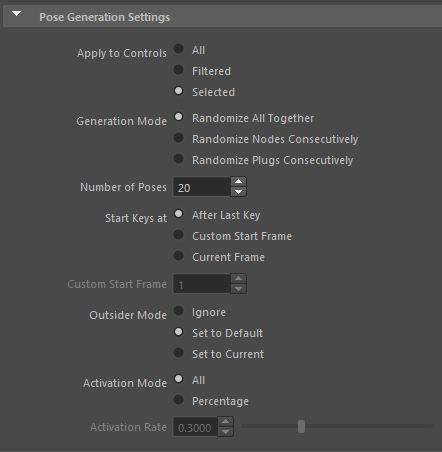
- Apply to Controls
- Pick the method to determine which controls are used for activation in a pose.
- All
- Filtered
- Selected
- Generation Mode
- Choose a Mode for Pose Generation. The following diagram shows generating poses for the 3 selected controls.
- Each box represents a Scalar control
- Colors represent the node the that each control belongs to. Blues are one node, purples are another, and so on.
- Greyed-out controls represent controls that are not active for the poses because they are not selected
- Black dots represent keyed random values, with the offset showing their position on the Time Slider. (See the options in the Number of Poses setting.)
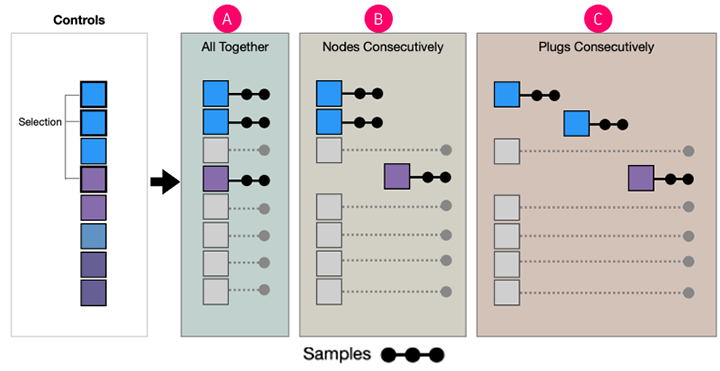
Pose Generation Modes: A. Randomize All Together B. Randomize Nodes Consecutively C. Randomize Plugs Consecutively
-
- Randomize All Together
- The classic method. All chosen controls are used based on activation mode/rate.
- Randomize Nodes Consecutively
- Groups controls by their parent node. Each group will have a set of frames generated for them. Randomize Nodes Consecutively is equivalent to selecting the controls on one node, generating poses, and then doing the same for the next ones.
- Randomize Plugs Consecutively
- One set of frames will be keyed per plug (control). Activation settings are greyed out as each control will be activated for every frame in their group. Randomize Plugs Consecutively is equivalent to selecting each control at a time and generating poses.
- Number of Poses
-
Set how many poses to generate. The number of poses generated in total depends on the which Generation Mode is set in Outsider Mode, because it is per generation group.
-
Using the Pose Generation Modes diagram above, with Number of Poses set to 10, the result would be:
-
A - 1 group of 10 poses.
-
B - 2 groups of 10 poses (20 in total).
-
C - 3 groups of 10 poses (30 in total).
-
- Start Keys at
- Set at which frame Pose Generation begins.
-
- After Last Key
- Since poses are generated by adding keys on every controls param curve, use After Last Key to add the new poses after the last keys to avoid overwriting any existing poses.
- Custom Start Frame
- Enable the Custom Start Frame field to set a frame for the pose generation to begin.
- Current Frame
- Set a frame for the pose generation to begin.
- Custom Start Frame
- Enter the frame number that the pose generation to begin.
- Outsider Mode
- Choose a method to set what happens to controls that aren't activated for a generated pose, for example by selection, generation mode, activation rate, and so on.
-
- Ignore: no keys are created for un-activated controls.
- Set to Default: controls are keyed to the value set as the default.
- Set to Current: controls are keyed as their value at the moment Generate Poses is activated.
- Activation Mode
- Lets you specify the subset of control values.
- Activation is the process in which controls are given new/random values for a particular pose/frame. For example, if you have 100 controls, you don't need all 100 controls to change in every pose. Instead, you want poses where only a subset of the controls are given values (activated). For example, you may want all the controls for the left arm
- This makes it easier to learn the correlation between the control changing, and the effect on the geometry.
-
- All
- Use all poses/frames for activation.
- Percentage
- Lets you use the Activation Rate slider to set a percentage of the Min and Max values to select for randomization (per pose).