
Use this dialog to name and display levels.
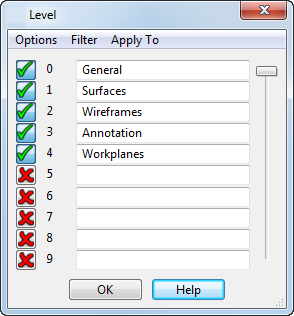
Levels 0-4 are the default levels, which can be edited. PowerShape can handle up to 1000 levels, so it is recommended to leave the default levels in place and create more levels when needed.
Apply to — Use this option to specify where you want to change the levels. For example you might want to have the same model viewed in one window with all objects visible, but in another window with some objects hidden. Select one of the following:
- Model — Change levels in all the windows of the model.
- Window — Change levels in only the selected window of the model.
- View — Change levels in only the selected view of a drawing.
Level — Each level has a number. Visible levels are indicated by
 . Hidden levels are indicated by
 . You can enablea level by clicking
and disable a levelby clicking
. You can type in a new name for a level or edit an existing name.
. You can enablea level by clicking
and disable a levelby clicking
. You can type in a new name for a level or edit an existing name.
If the model is shaded and you enable a level, you can view the model in wireframe mode by pressing the
 button next to the progress bar on the status bar whilst the level is opening.
Options — This menu has three options:
- Set All — Set all levels to be visible (apart from the Cursor level).
- Unset All — Set all levels to be hidden.
- Copy Names — Copy level names from another open model.
Filter — This menu is at the top of the dialog. It controls which levels are shown in the dialog. Each option has a toggle, allowing you to select any of the options:
- Used — Shows only the levels being used in the current PowerShape window.
- Named — Shows only the levels with names, even if your model is not using them.
- On — Shows only the levels that are enabled (that is the levels that are visible).