
You can optimise the solid tree by grouping common features together. For example:
- Right-click the Solid
 icon in the tree to display the context menu.
- Select
Group Features.
The holes are put into two different Hole group features and the pocket features are put into a Pocket group. Each group feature is marked with the
 :
:
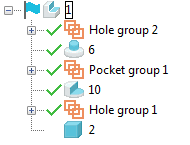
In the example, all the holes next to each other in the solid tree are put in the same group.
Using a Group feature
Each group feature should only contain hole features that do not interact with one another. This allows all the features in the group to be applied in a single operation. Using a group lets you:
- edit the hole features in a group as you normally would. If you edit a hole feature and it then interacts with other features in the group, it is suppressed and an error message is displayed.
- move hole and group features as you normally would by dragging their icons. For example, you can move hole features from one group to another.
- move a group feature inside another group to create a sub-group. If you cannot move a hole feature, it is left where it is.
If you delete a group feature, the hole features are moved up a level in the tree and the group feature icon is removed from the tree.
If you suppress a group feature, all the holes in the group are suppressed.
Editing group features
You can simultaneously modify a group of features of the same type in a solid using the solid feature tree.
To modify a group of features:
- Select a group in the solid feature tree.
- Right-click the selected group and select
Modify from the
Feature context menu.
The dialog for editing multiple features of the same type is displayed (for example, the Edit Solid Fillet dialog).