Tutorial - Hello Weather!
Sticking with tradition for all new programming tasks, we will sketch out the steps to do a very simple "Hello World" pipeline. In this case, we will get the current weather from a web service and write it into a Stream in Tandem so we can see the fluctuation over time.
In this Tutorial, we will be using the standard sample facility that comes with every account: "Snowden Towers Sample Facility". You can use a different facility if you want, but will need to follow the same pattern of steps. Even when using the standard sample facility, what you see on screen will vary slightly from the screenshot images in the tutorial.
Step 1: Set up an APS application
In order to use the Tandem API to write the weather data into the Stream, we will need an API ClientKey and Secret. We do this by creating an application on the APS Developer website: Create an APS app
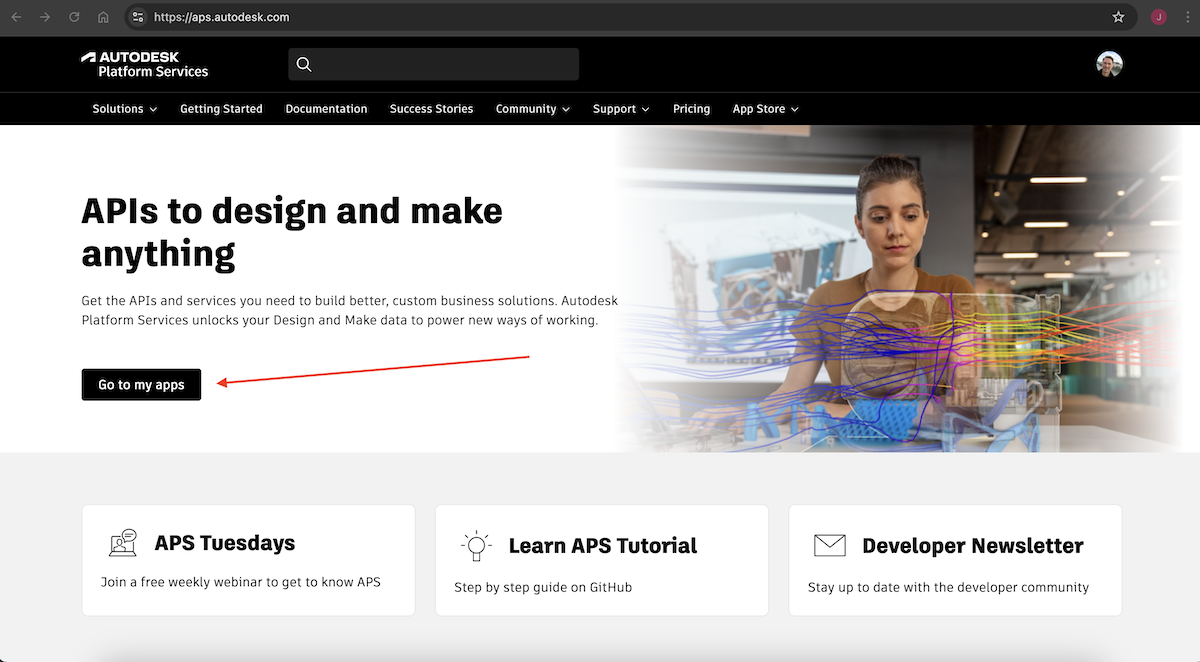
Click on the Go to my Apps button
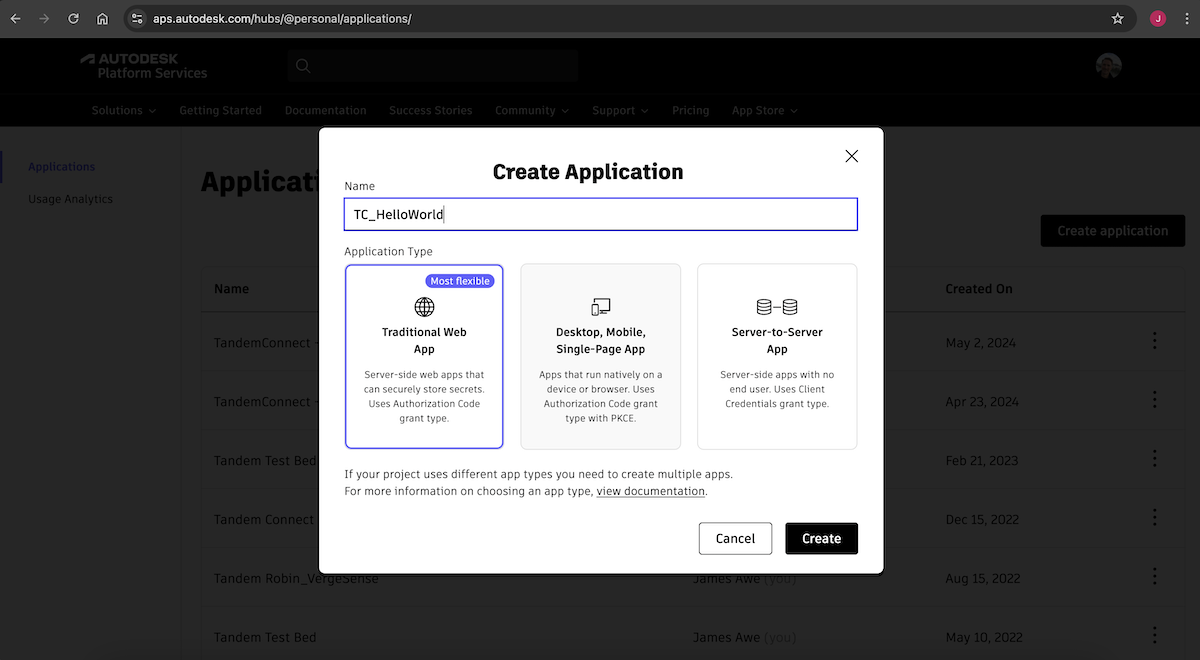
Create a new application
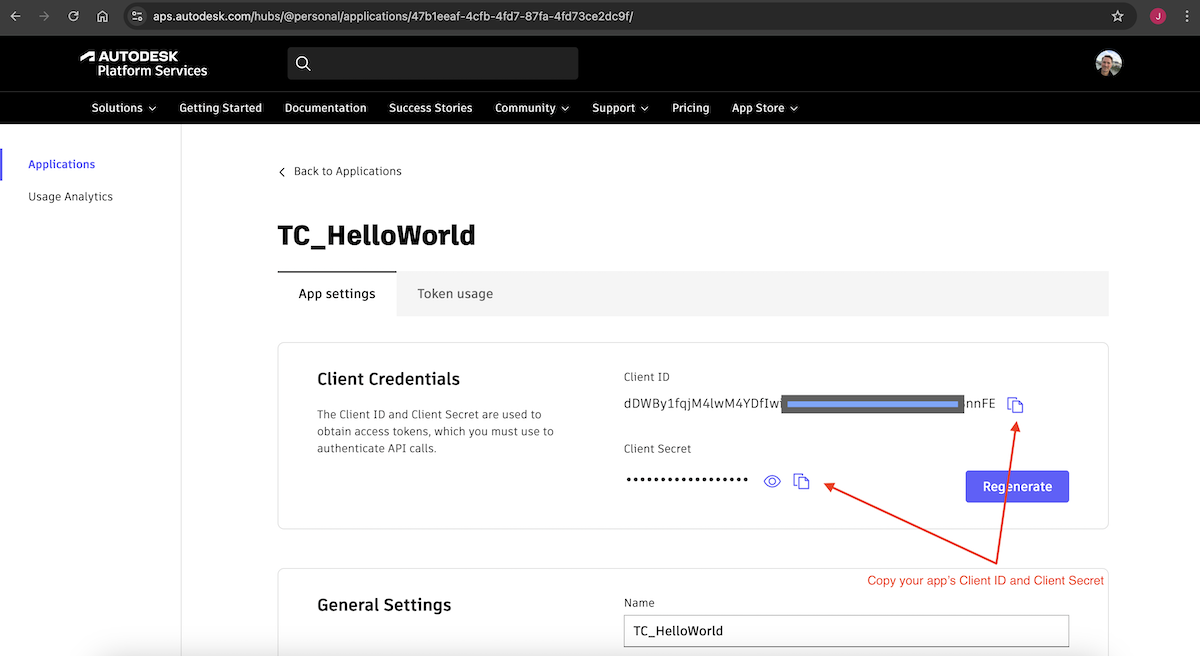
When the application is created it will generate a unique Client ID qand Client Secret. These are like a username and password for your application that you will be using in Tandem Connect. Keep your Client Secret protected, just as you would a password.
There is a Copy button for each that will copy the value to the clipboard. For now, just copy the Client ID.
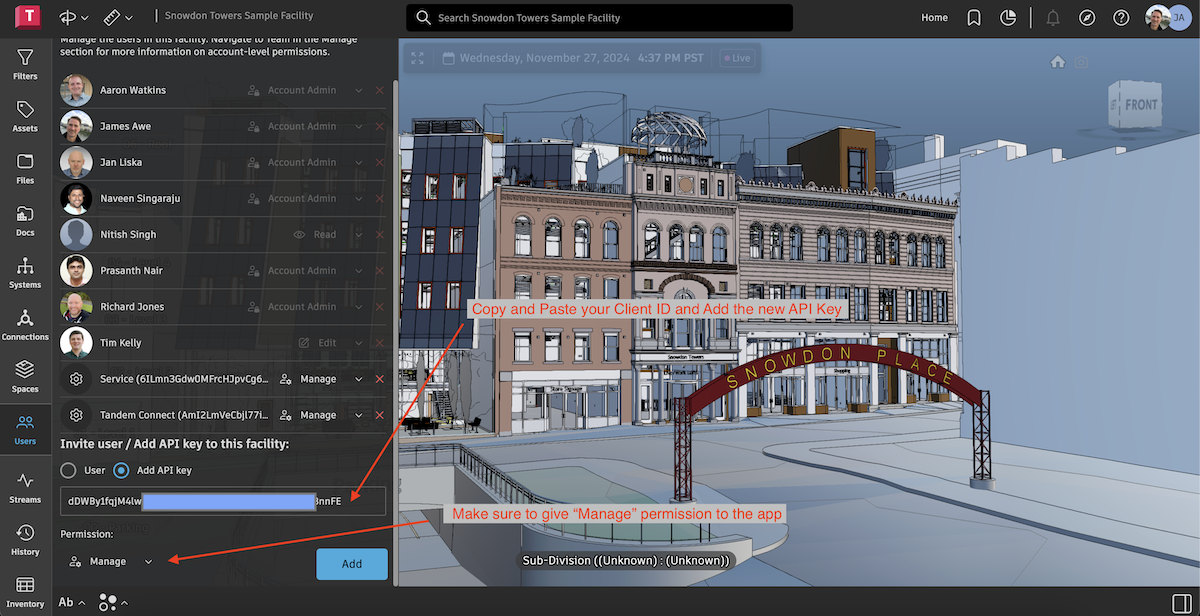
In Tandem, we must authorize our application to have access to our Facility. Load your Faciility and click on the Users tab. Paste in the Client ID and grant it Manage Permission to this Facility.
Step 2: Get an OpenWeather API key
For this exercise, we will be using a free weather service that we will call from Tandem Connect. In order to do that, we need an account and an API key. Create an OpenWeather account
After creating the account, we will have an API Key that we can use to call the weather service.
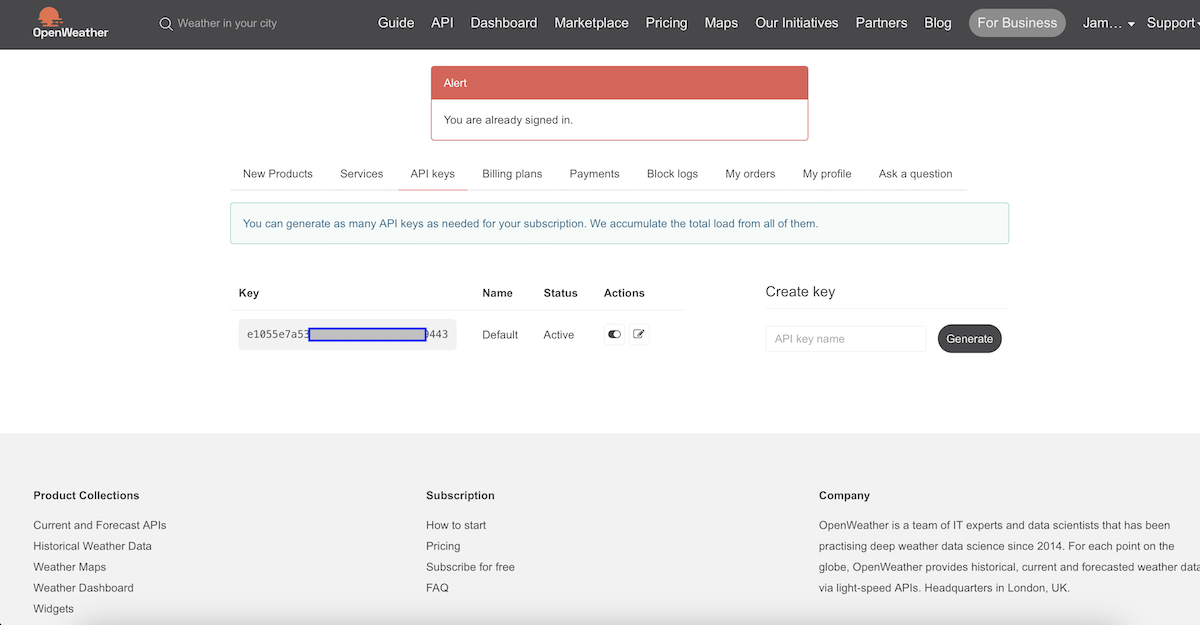
We can now do a simple call to their API via the browser to make sure everything is working as expected. Copy the following into your browser address bar, and replace the {APIKey} (including the braces) with the key issued to you by OpenWeather.
https://api.openweathermap.org/data/2.5/weather?lat=37.77493&lon=-122.4194&units=imperial&exclude=%7Bpart%7D&appid={APIKey}
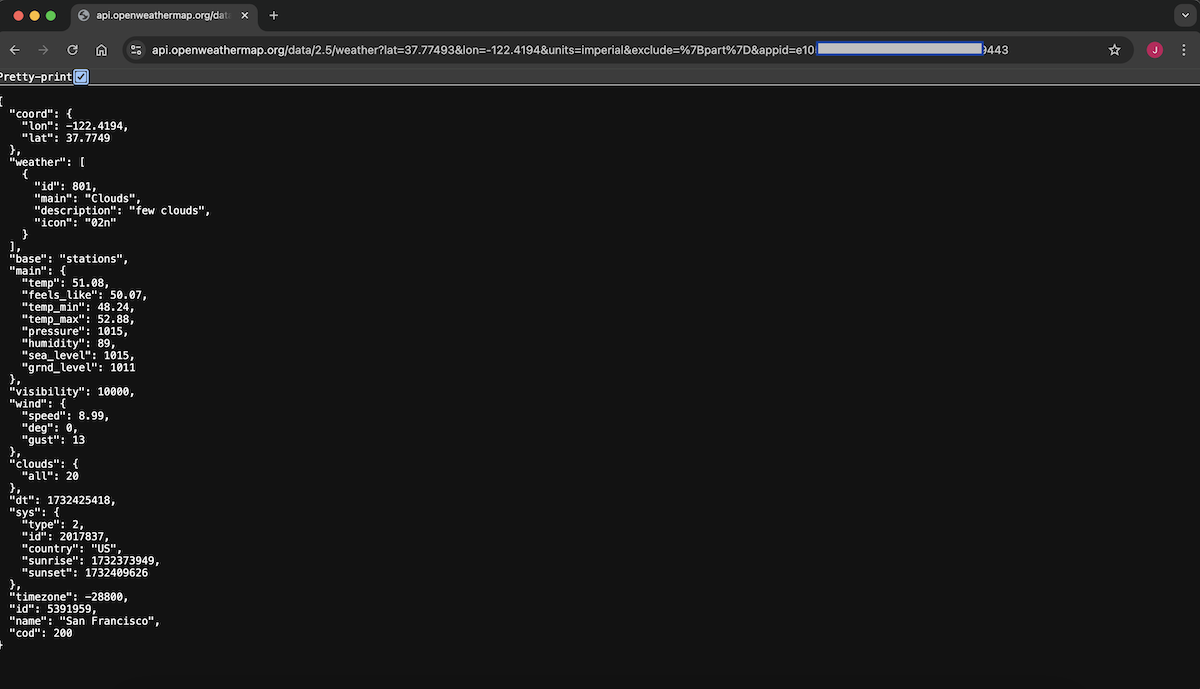
You should see a result like image above. NOTE: you can cange the lat and long arguments to whatever your local location is, and you can change units to imperial if appropriate.
Now that we know we can correctly call the weather service, we can do it from Tandem Connect.
Step 3: Create a new pipeline
Choose the Pipeline Studio module in Tandem Connect and then choose Create a new Pipeline.
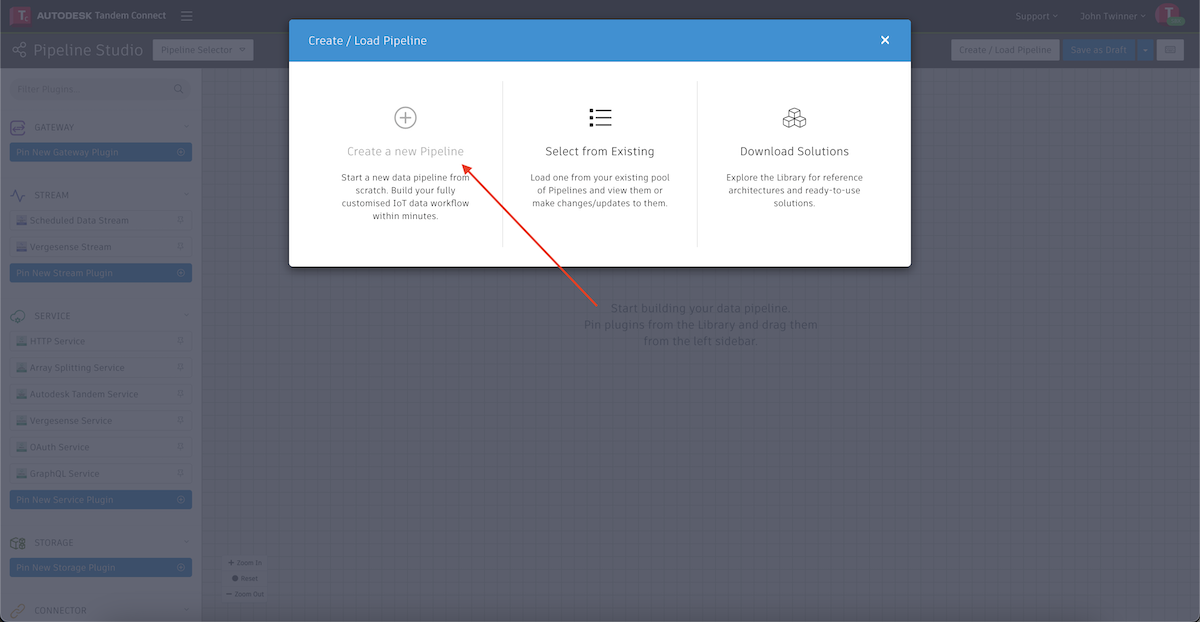
If there are no plugins pinned to the panel on the left, click on the Pin New Stream Plugin button and find the "Scheduled Data Stream" plugin.
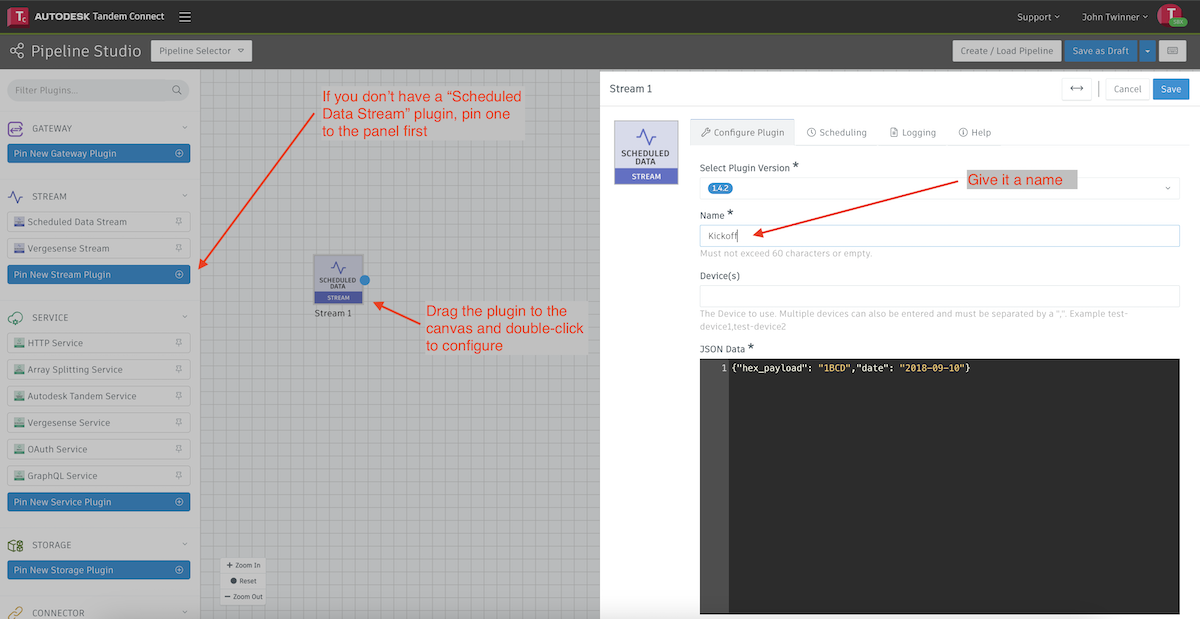
Then drag the plugin to the canvas and double-click it to configure. Give the plugin a name, which will describe it on the canvas.
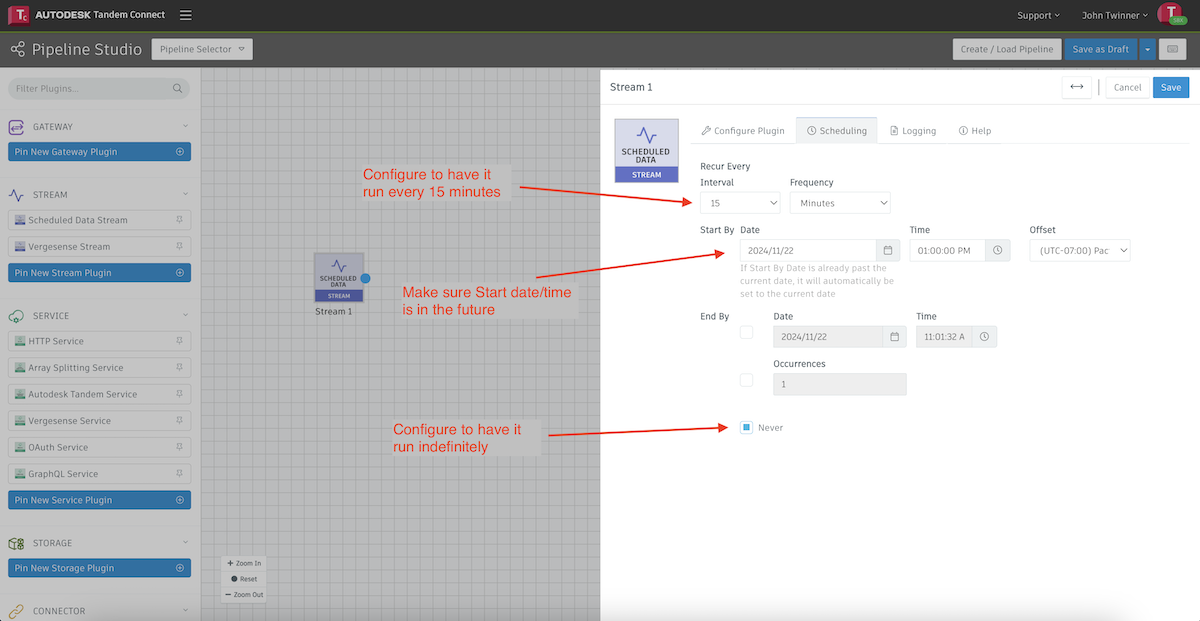
Then click on the Scheduling tab and configure to run at 15 minute intervals. Click the Save button to save our configuration and return to the console.
Next we want to add an HTTP Service plugin that will let us call the OpenWeather API that we tested before in the browser. If it is not already pinned to the plugin panel on the left, click the + and pin it. Then drag one to the canvas and double-click to configure it.
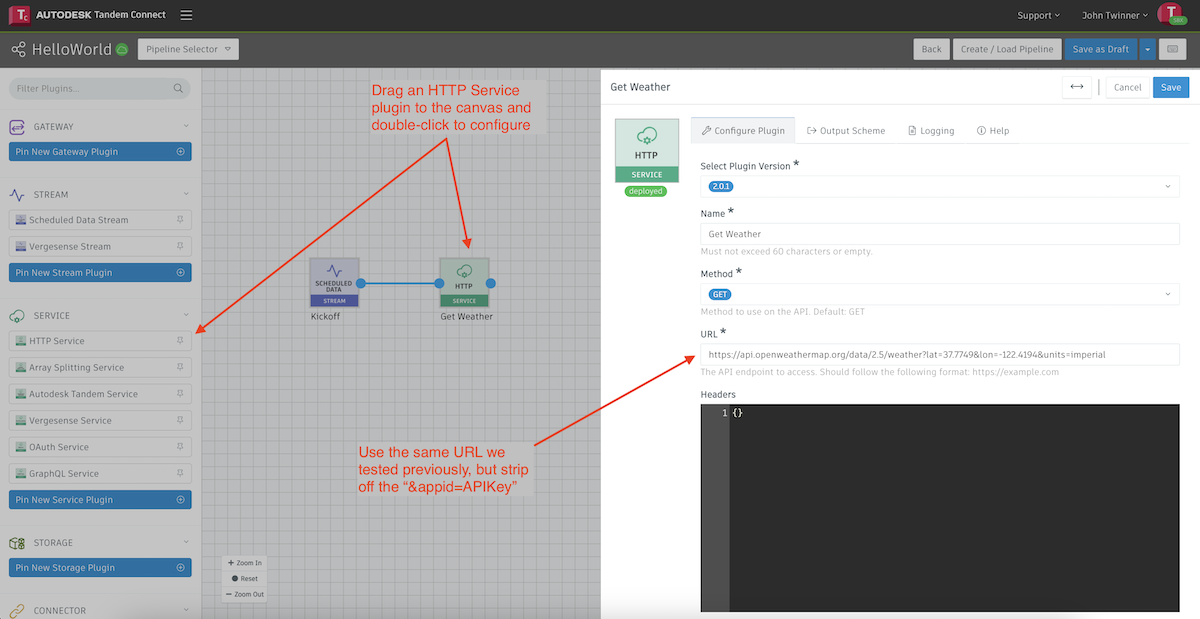
Give it a name and then copy in the URL that we used in our browser test. We will configure the authorization slightly different so that we don't ever expose our APIKey to others. Paste in the URL we used before, but remove the final &appid=xyz
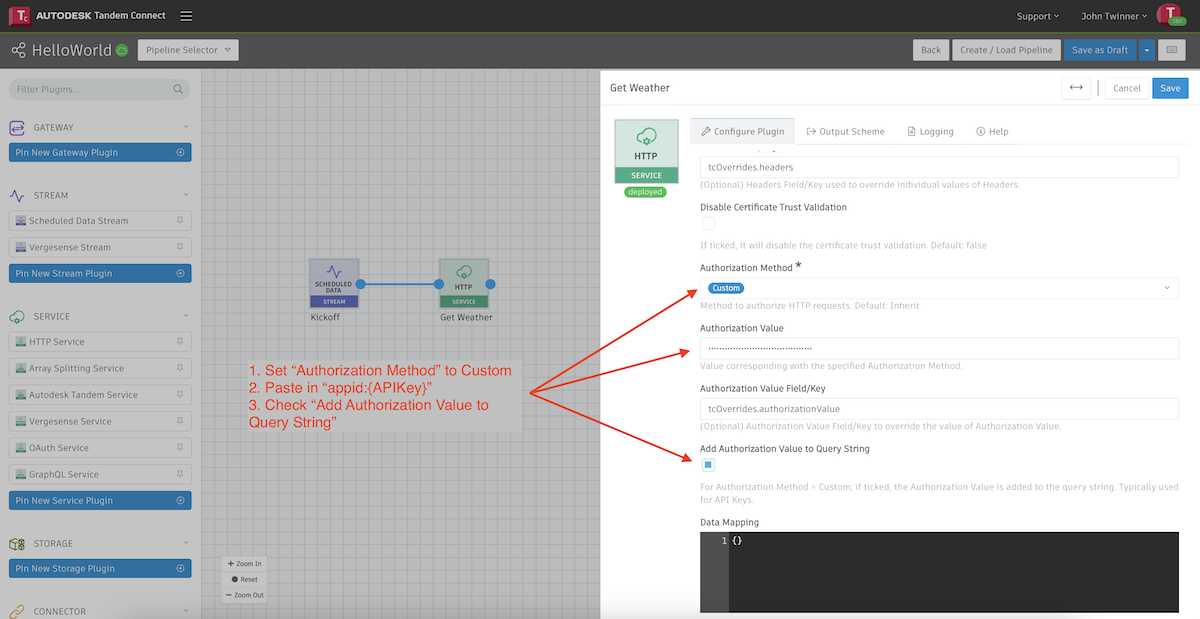
Scroll down to the autorization section and configure as showin in the image above. In the Authorization Value field, we will paste in our APIKey, but formatted as appid:{APIKey}. This is the same as our browser test, but notice that the "=" sign has changed to a ":"
Click the Save button, return to the canvas and connect the two plugins by dragging the blue dot to create a line between them.
Step 4: Deploy and Test the pipeline
We now have a pipeline that should work to call the OpenWeather API every 15 minutes and retrieve the current weather information, but we need to deploy it to the cloud so it can run.
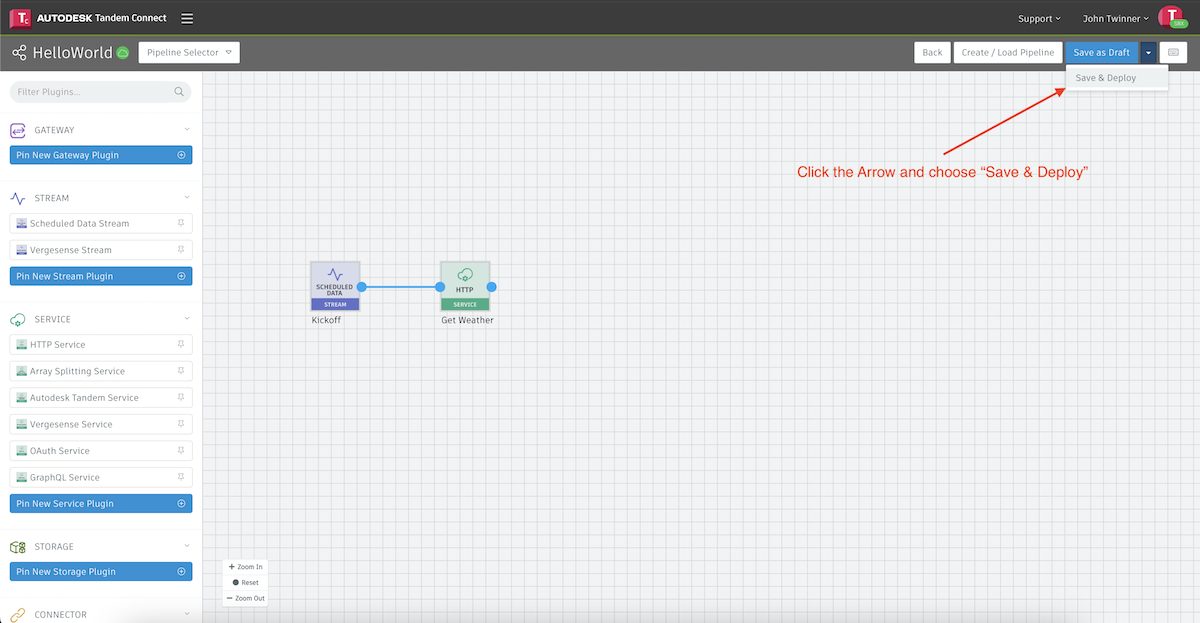
Click the pulldown menu and choose Save and Deploy
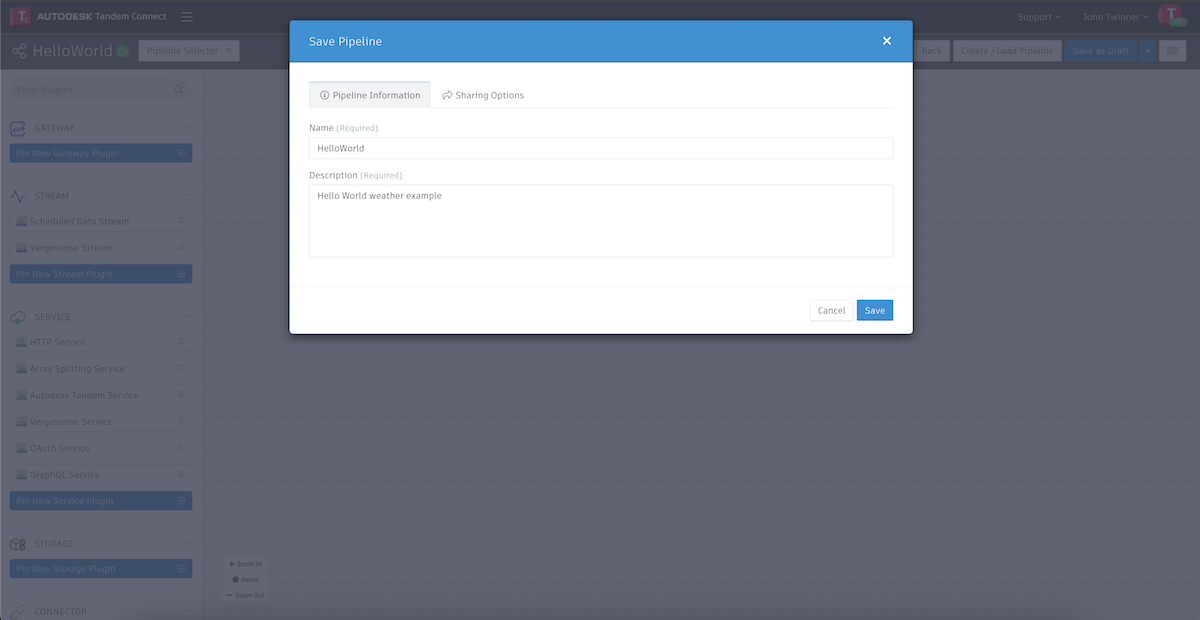
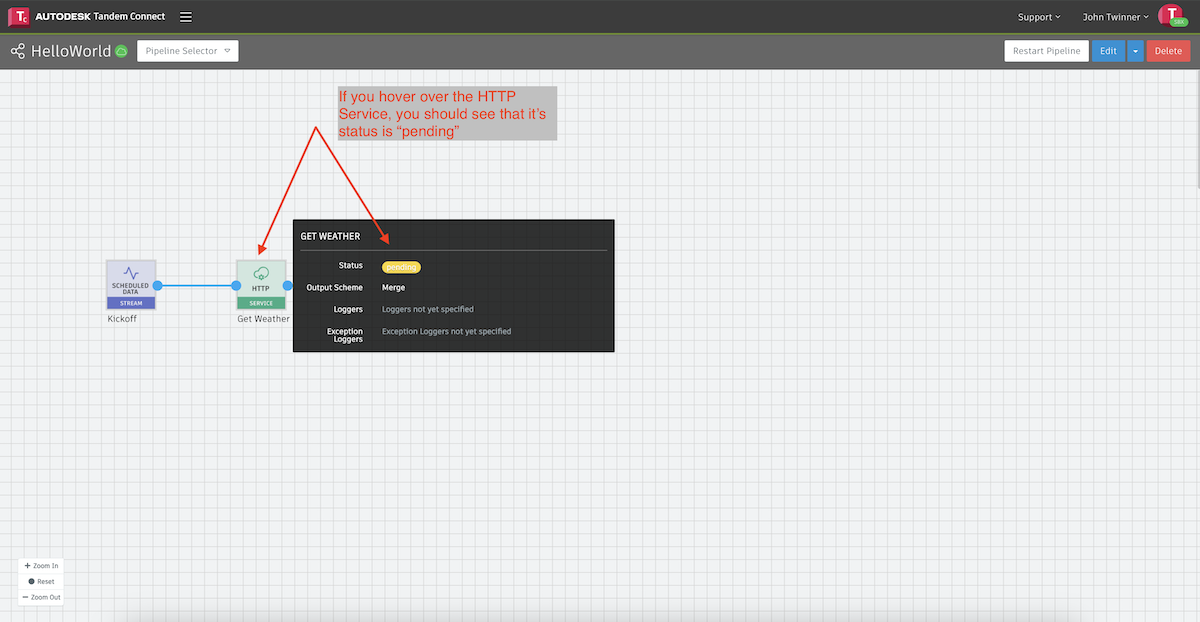
Give the pipeline a Name and Description and choose Save. Assuming there are no errors, it will alert you that it was successfully deployed. However, it may take several minutes to finish the deployment and start the pipeline running.
When we are testing the pipeline, we don't necessarily want to wait 15 minutes (the time we set for our interval). We can manually start the pipeline by double-clicking on the Scheduled Data Stream plugin and choosing the Sync Now button.
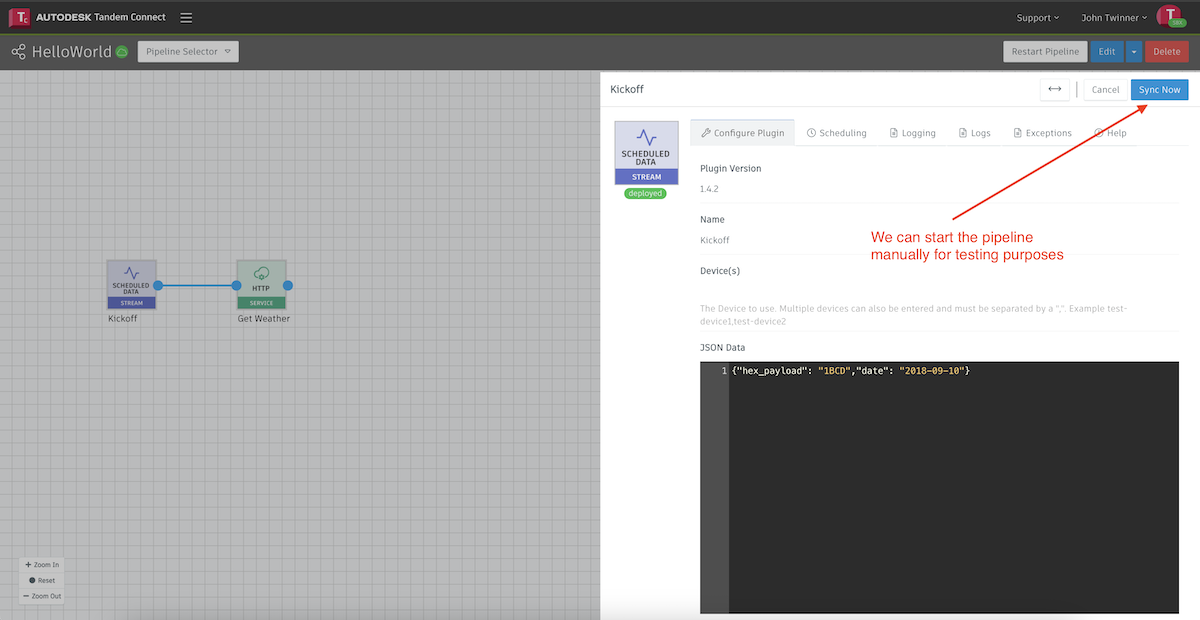
After doing that, choose Cancel to return to the console.
Now we can open up the HTTP Service plugin and look at the Logs tab to see what is happening.
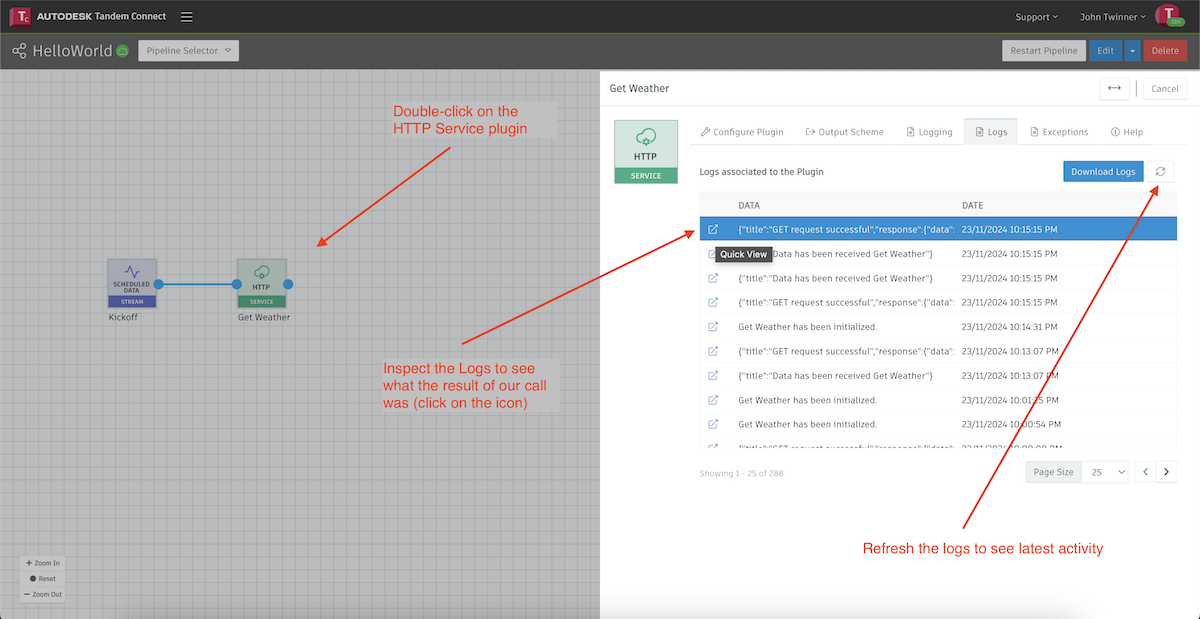
When we inspect the latest log entry, we can see that we correctly got the data from OpenWeather.
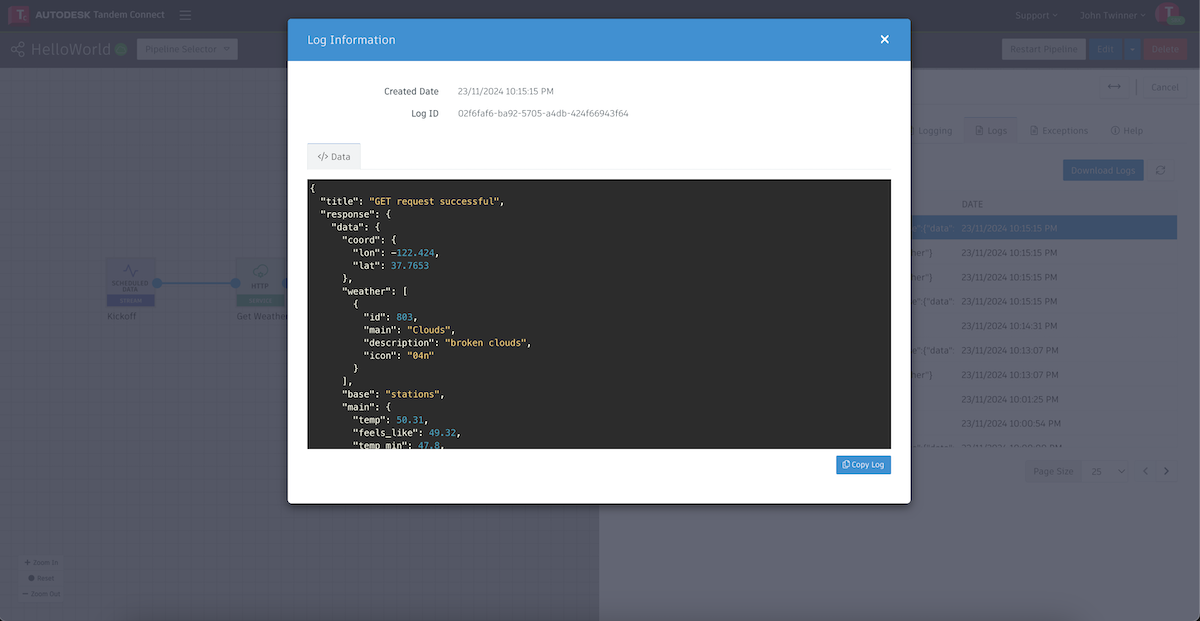
Because we configured the pipeline to run every 15 minutes, we should get a new log entry every 15 minutes. Our pipeline is correctly setup and retrieving the data, but now we need to route it to Tandem for storage in a Stream.
Step 5: Add a Tandem Connector to your pipeline
If you do not yet have a Tandem Connector available in the plugin panel on the left, press the + button and add one.
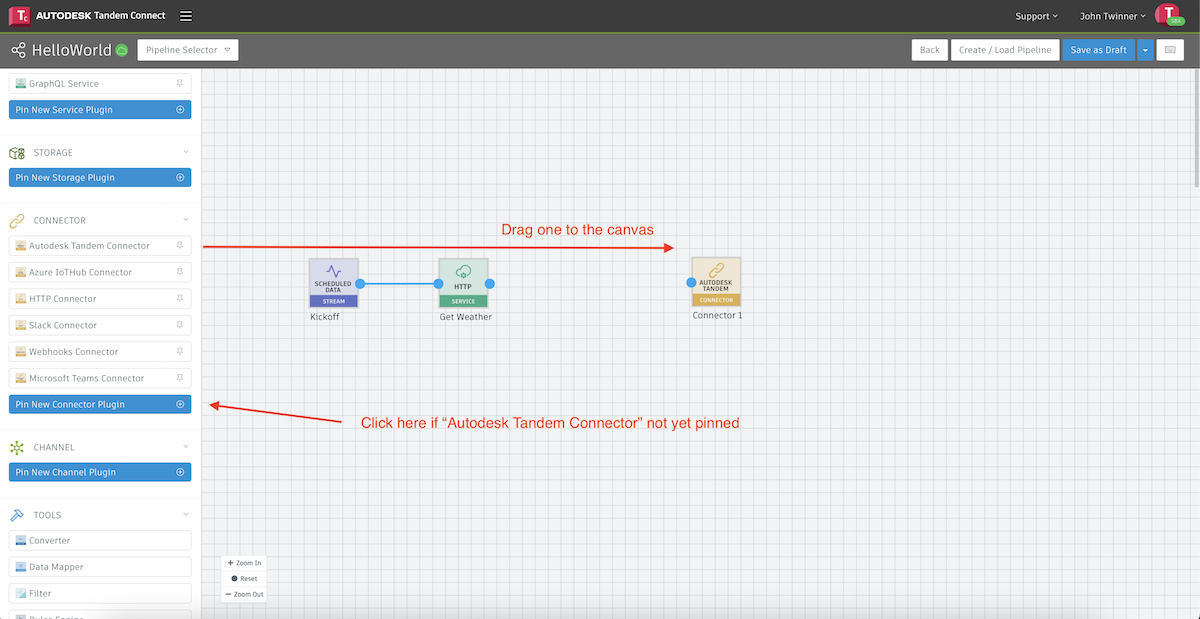
Now double-click on the connector to configure as follows:
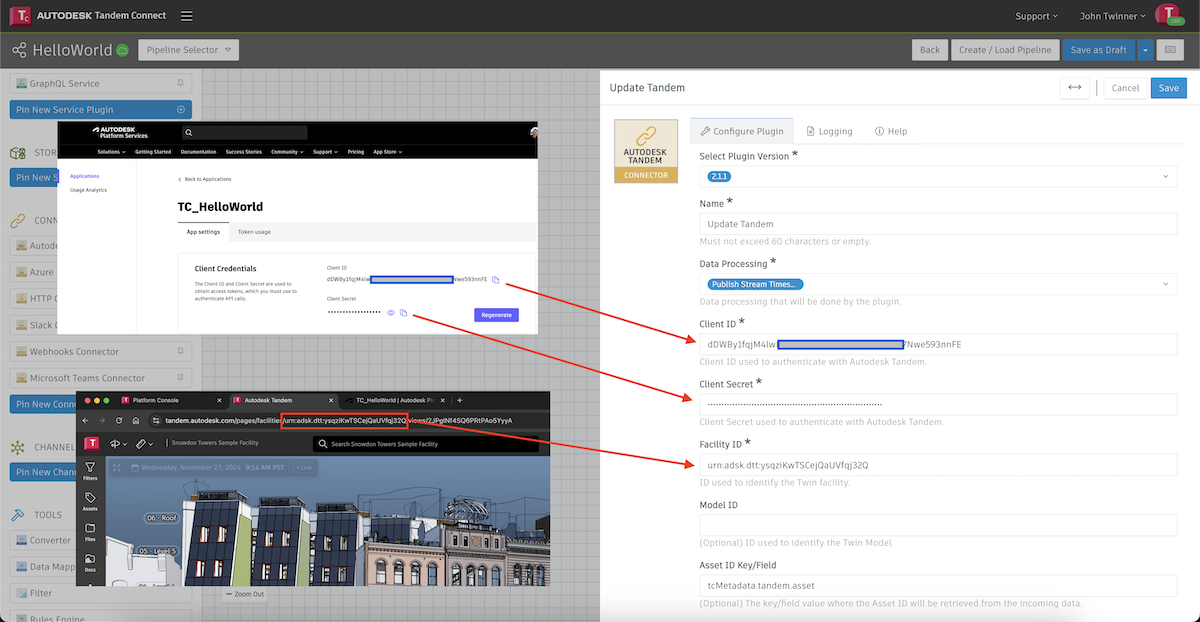
The Client ID and Client Secret come from the APS application we created in Step 1 of this tutorial.
The Facility ID is the URN for the Tandem Facility we want to connect to. You can find this by loading the Facility into Tandem and then looking at the address bar in the browser. Copy the section that begins with "urn:adsk:dtt" and paste that in into the connector configuration.
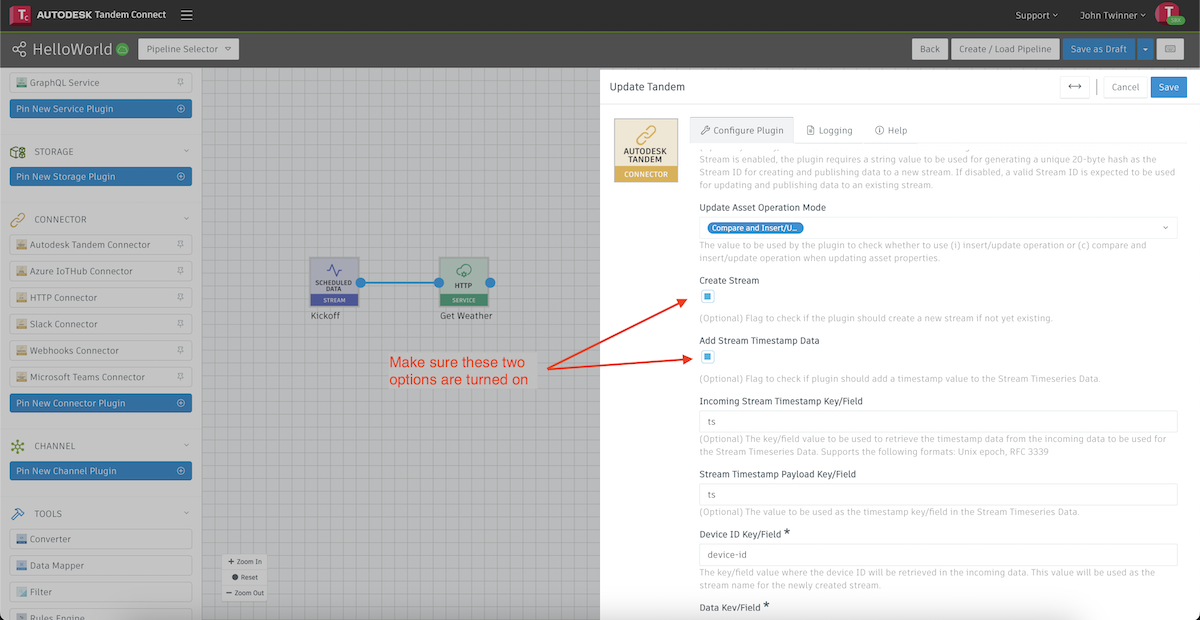
Then scroll down and make sure the two checkboxes shown above are turned on.
Now save the configuration and return to the canvas where we will add a Converter node to the pipeline to prepare the data that we will pass into Tandem.
Step 6: Add a Converter plugin to prep the data
Converter plugins are generic snippets of JavaScript code that can do a wide variety of things. Example use cases:
- Run a calculation on an incoming value before passing it to the next node (e.g., for a temperature conversion)
- Map incoming property names in data to the name expected in the next node (e.g., change "propName1" to "propNameA")
- Add simple if/then/else rules to give your pipeline some logic
- Use for debugging purposes by printing things out to the logs
In our case, we will use it to prep our incoming weather data and get it into a format that will make it easy for the Tandem Connector to process and pass on to Tandem.
We want to give the Stream in Tandem a name (via the "device-id"), and we want to map the incoming data to the property names expected in Tandem.
Scroll down to the bottom of the plugins panel and find a Converter plugin. Drag it to the canvas between our weather service and Tandem plugins.
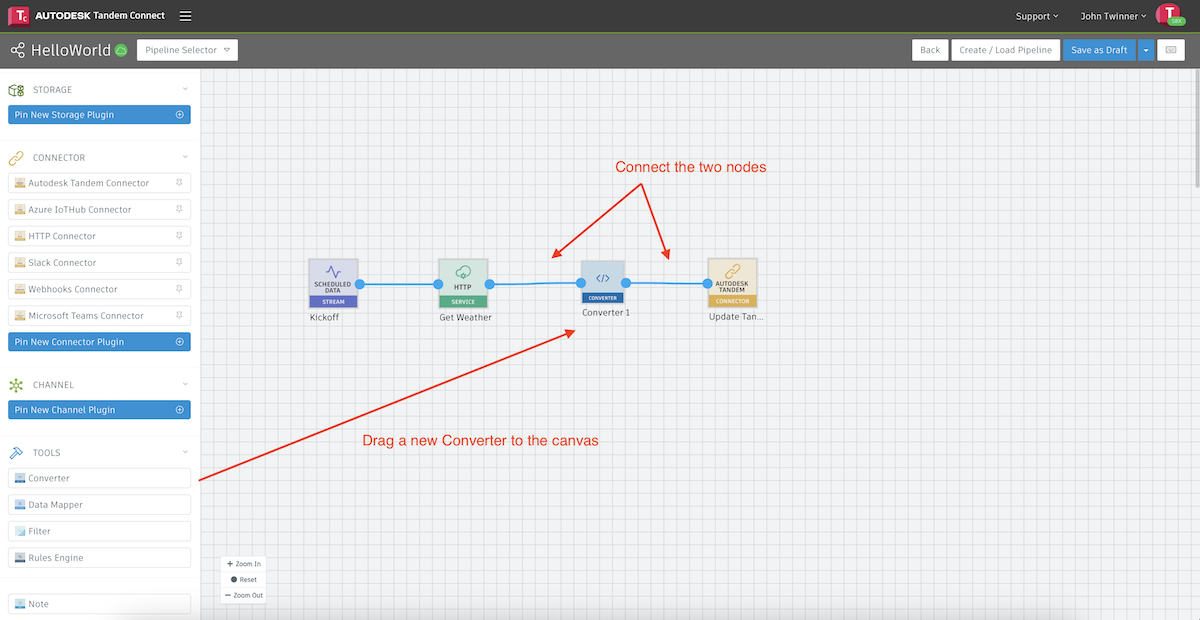
Now drag the blue dot on each side to connect it to the pipeline.
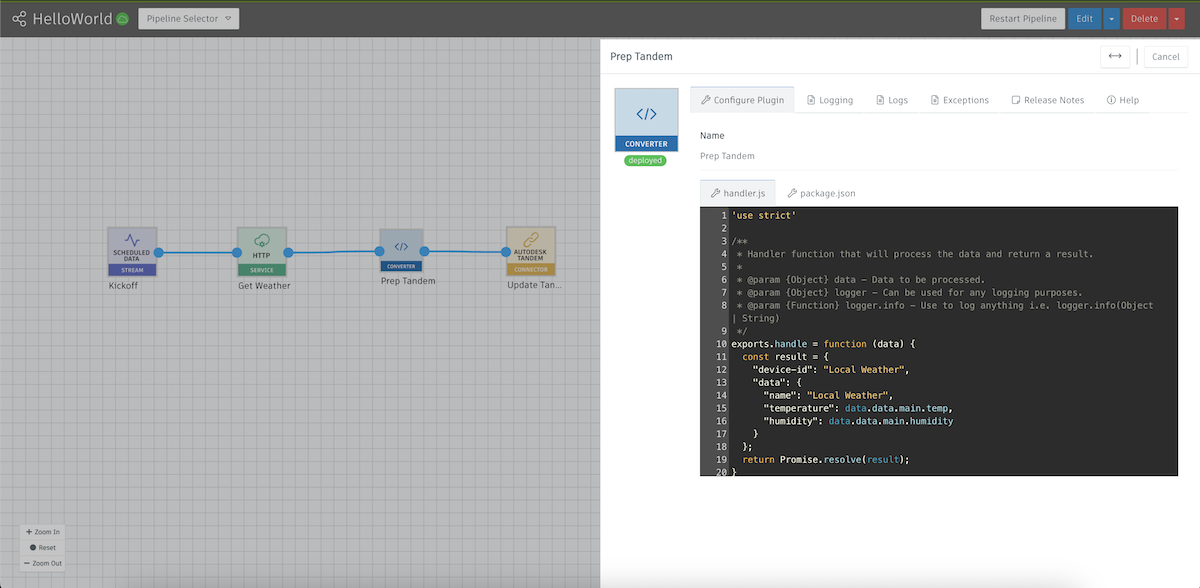
Double-click on the Converter and we will edit as follows (you can copy and paste the following code):
'use strict'

/**
 * Handler function that will process the data and return a result.
 *
 * @param {Object} data - Data to be processed.
 * @param {Object} logger - Can be used for any logging purposes.
 * @param {Function} logger.info - Use to log anything i.e. logger.info(Object | String)
 */
exports.handle = function (data) {
  const result = {
    "device-id": "Local Weather",
    "data": {
      "name": "Local Weather",
      "temperature": data.data.main.temp,
      "humidity": data.data.main.humidity
    }
  };
  return Promise.resolve(result);
}
Next, Save and Deploy the changes we made and the pipeline will run again. As in Step 4, we could manually force the pipeline to run by clicking Sync Now in the "Scheduled Data Stream" node once it's deployed, or we can simply wait until the next 15 minute interval.
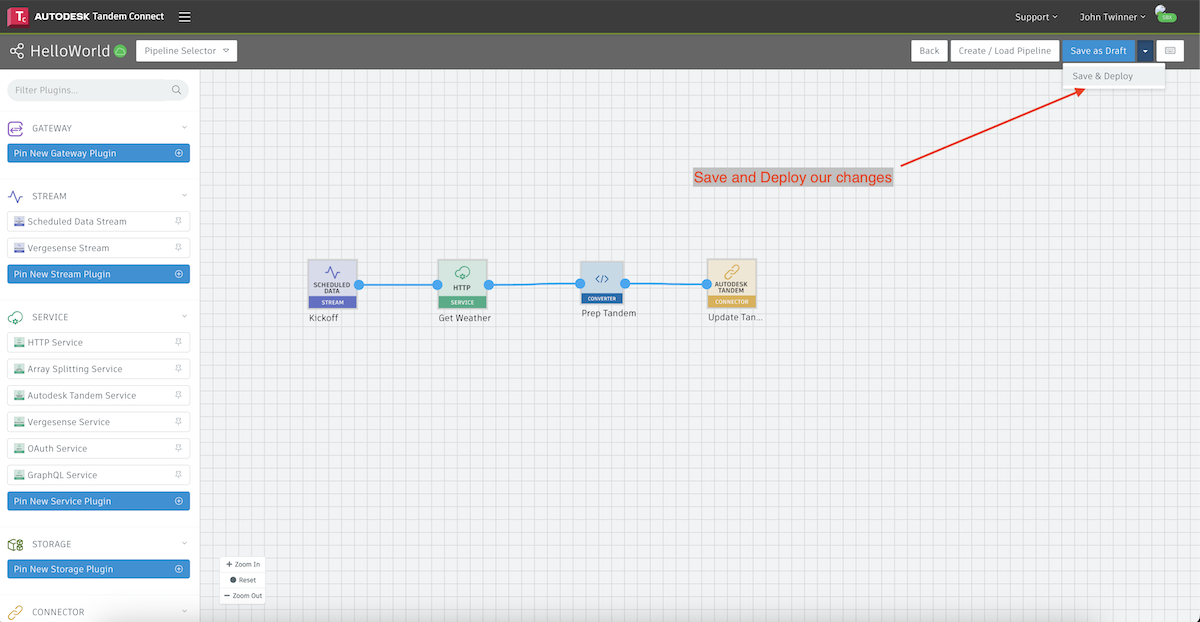
At this point, our pipeline is complete and will retrieve the weather data from OpenWeather, get it in the right format via our converter, and pass it into a Tandem stream. However, we still have one step left to make the mapping between the incoming data and the long-term storage in the stream.
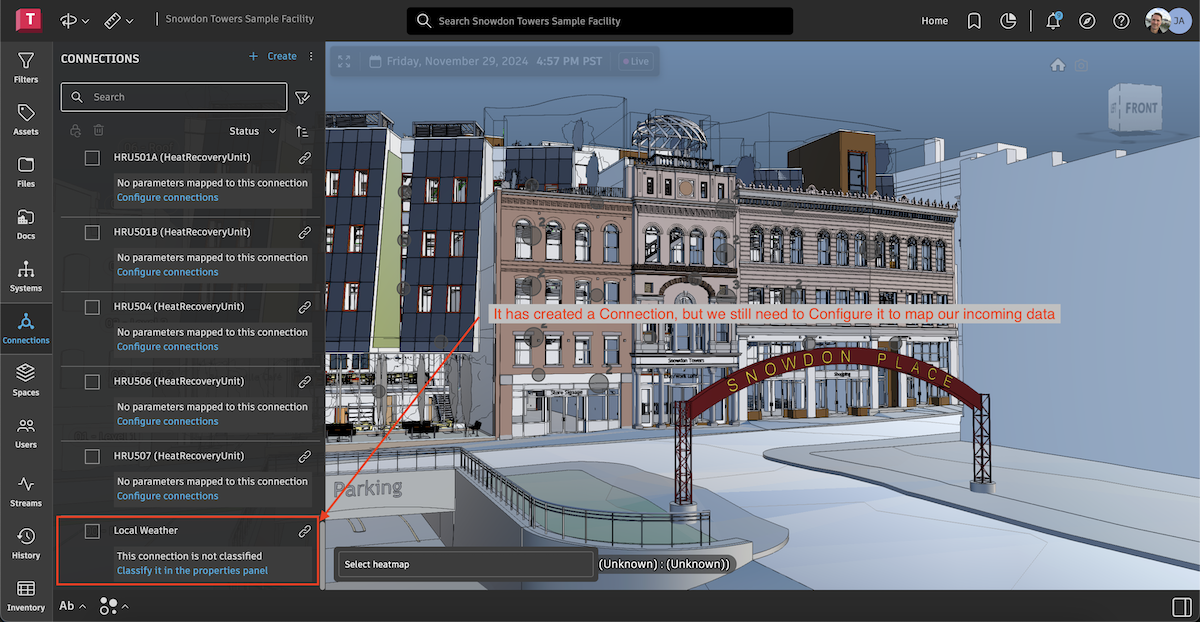
If we go back to Tandem and click on the Connections tab, we should see our new Connection called Local Weather. In the next step we will classify the connection and configure the mapping of incoming data to parameters in Tandem.
Step 7: Configure the Stream in Tandem to receive the data
Streams in Tandem are responsible for storing the sensor data in long-term storage. In order to make that connection from Tandem Connect, we need to define Parameters in Tandem to recieve the incoming data.
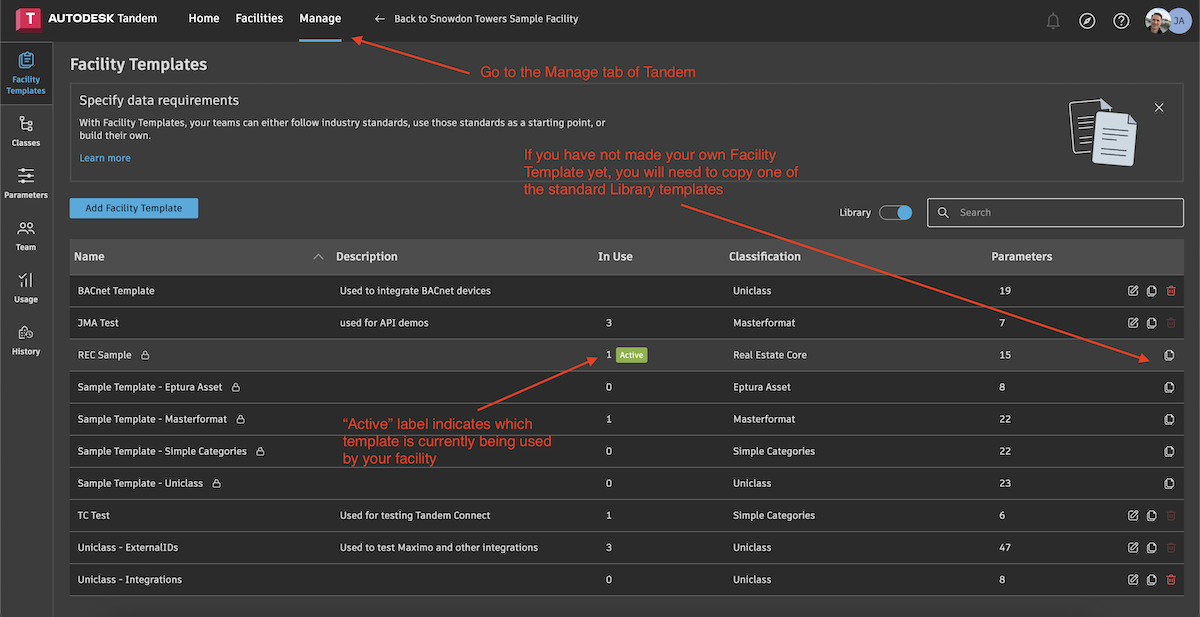
Go to the Manage section of Tandem and click on the Facility Templates tab on the left. You can see what your active template is for the Facility we are trying to connect to.
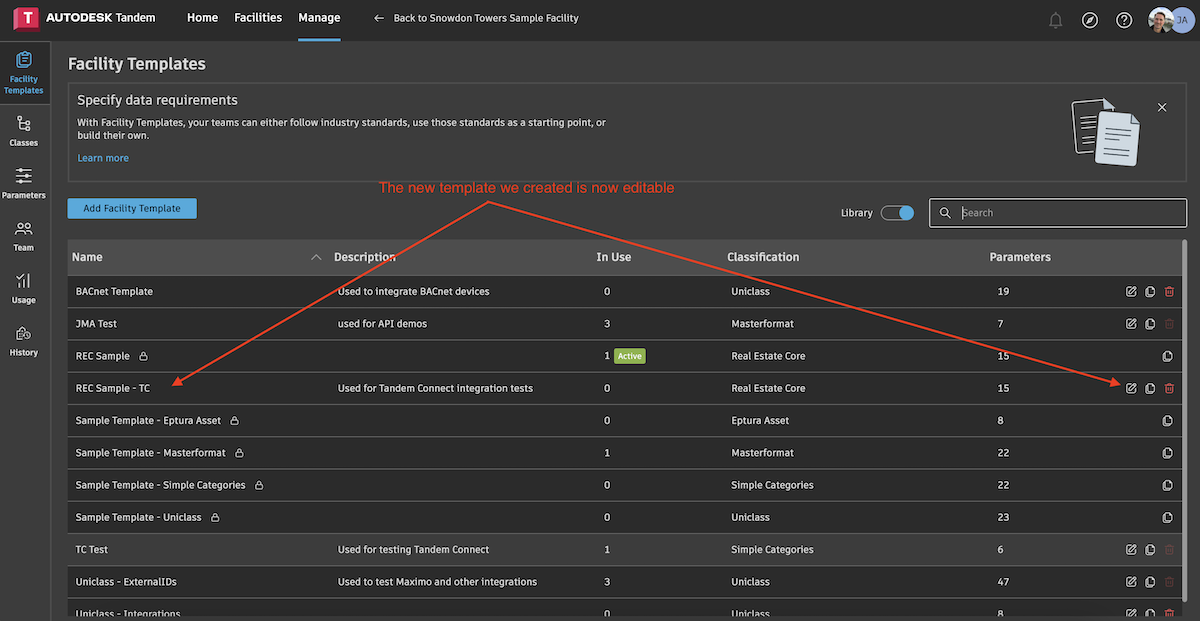
If you have already created your own Facilty Template, you should see a pencil icon on the right. If not, you will first have to copy the Facility Template that came from the standard library so that we can make edits to it.
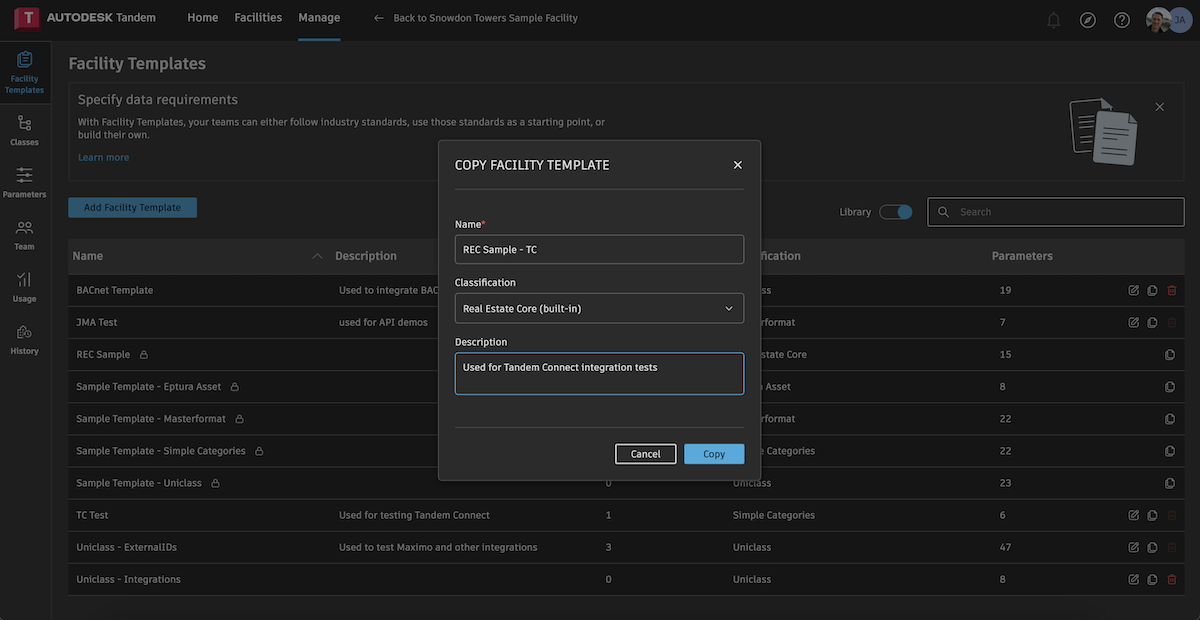
Now we should have a new one that we just created and is editable.
Navigate to the Georeference classification so we can add parameters to recieve the incoming data from the weather service.
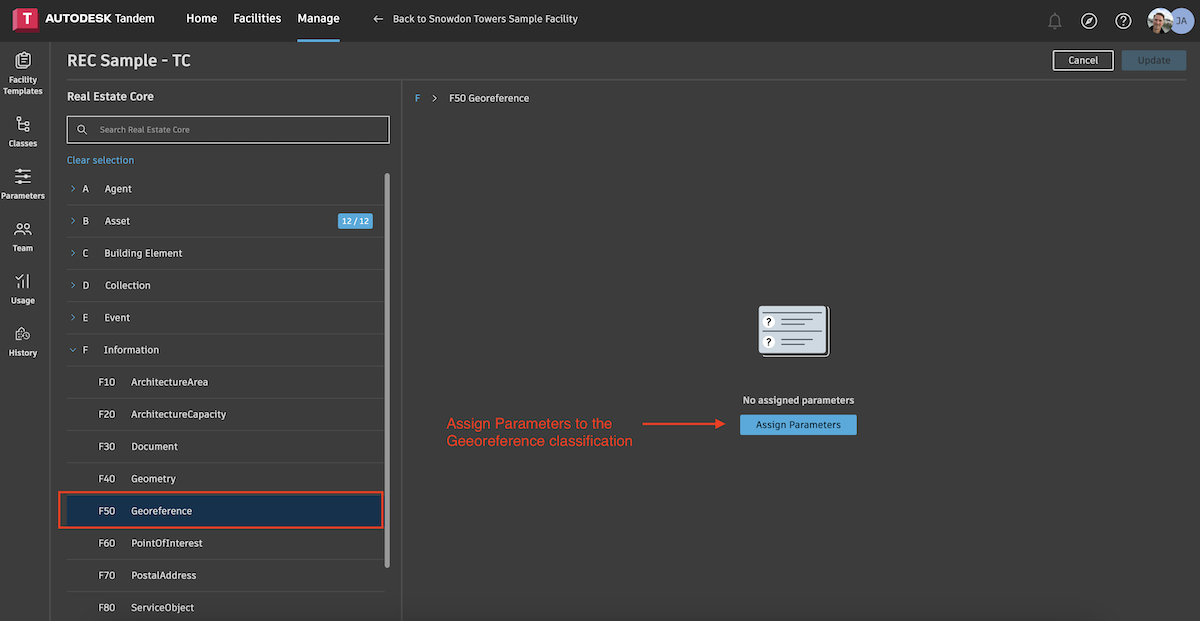
Next, we will add two Parameters to the Georeference classification. This will mean that any asset or stream we tag in the model with this classification will have these two Parameters assigned to it.
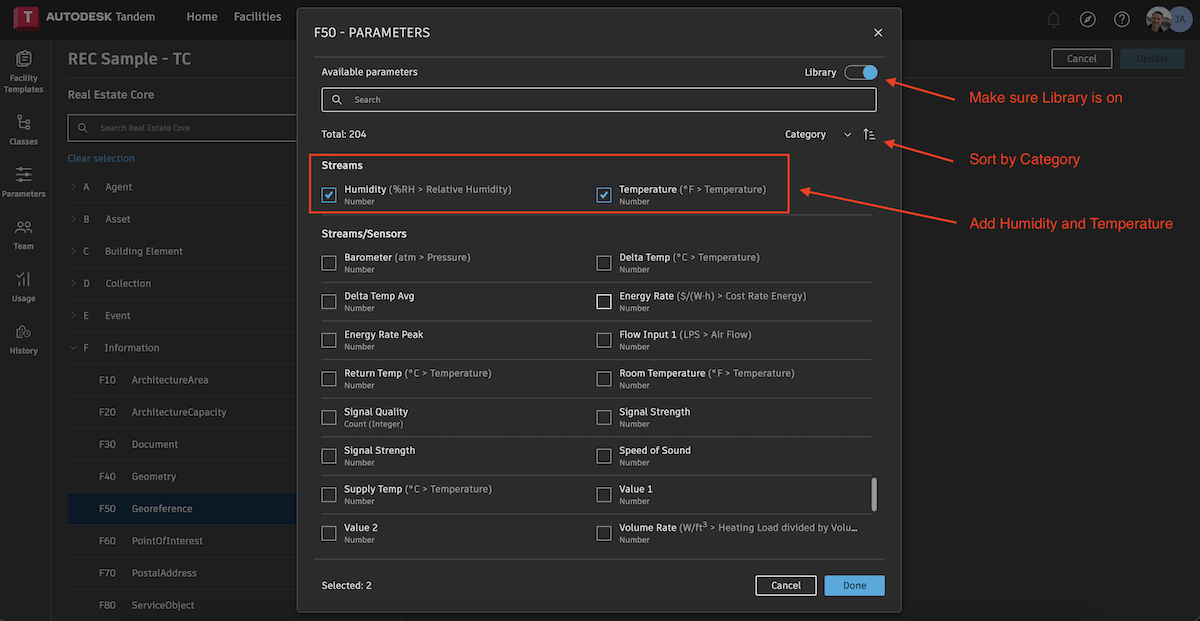
Switch on the Library so that we have access to the two standard parameters. Then sort by Category so we can easily find them. Scroll down to the Streams section and choose our two Parameters.
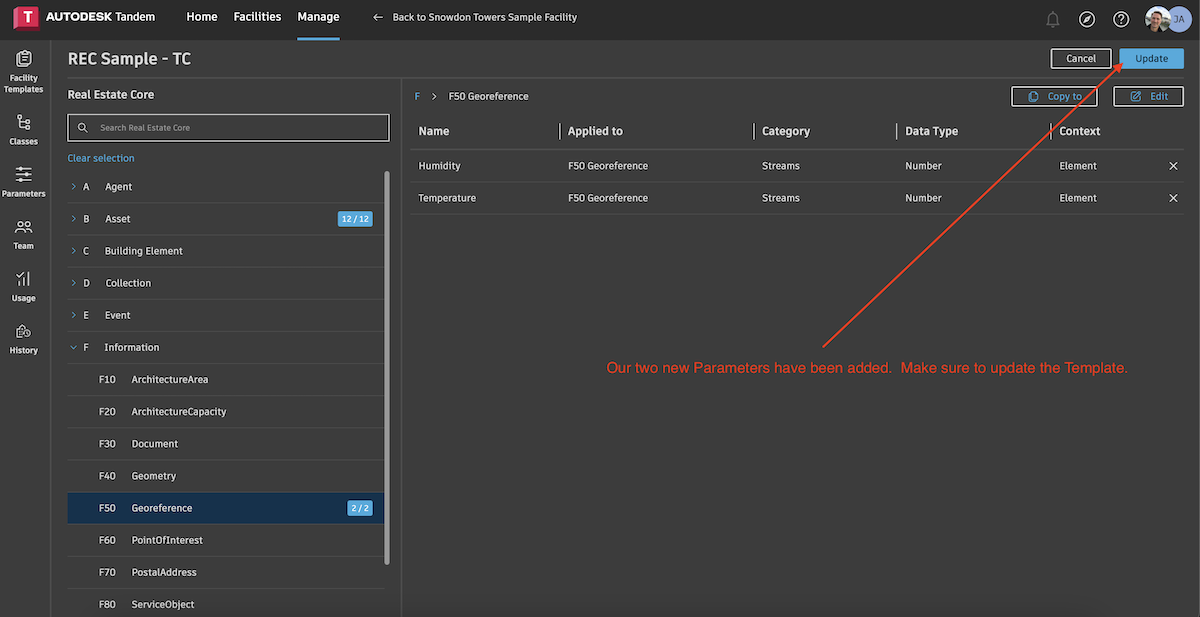
Our two parameters have been addded, but don't forget to update the template.
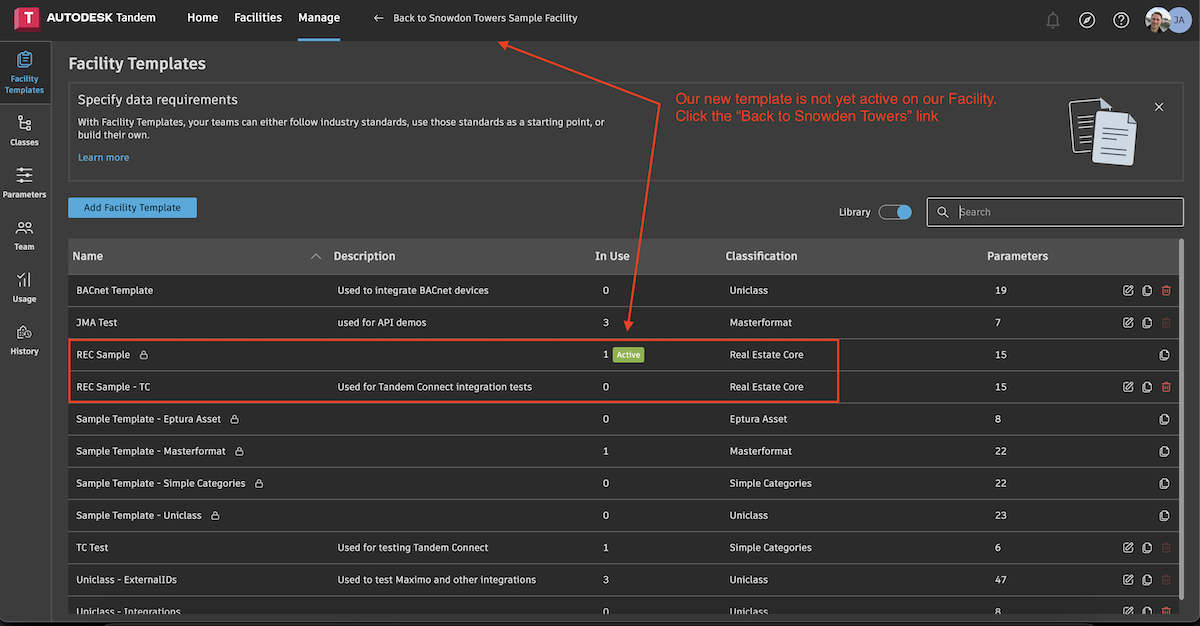
At this stage, we've added our two parameters to our new copy of the template, but our Facility is still referencing the original template. We need to return to the Facility and re-assign the template to the new one.
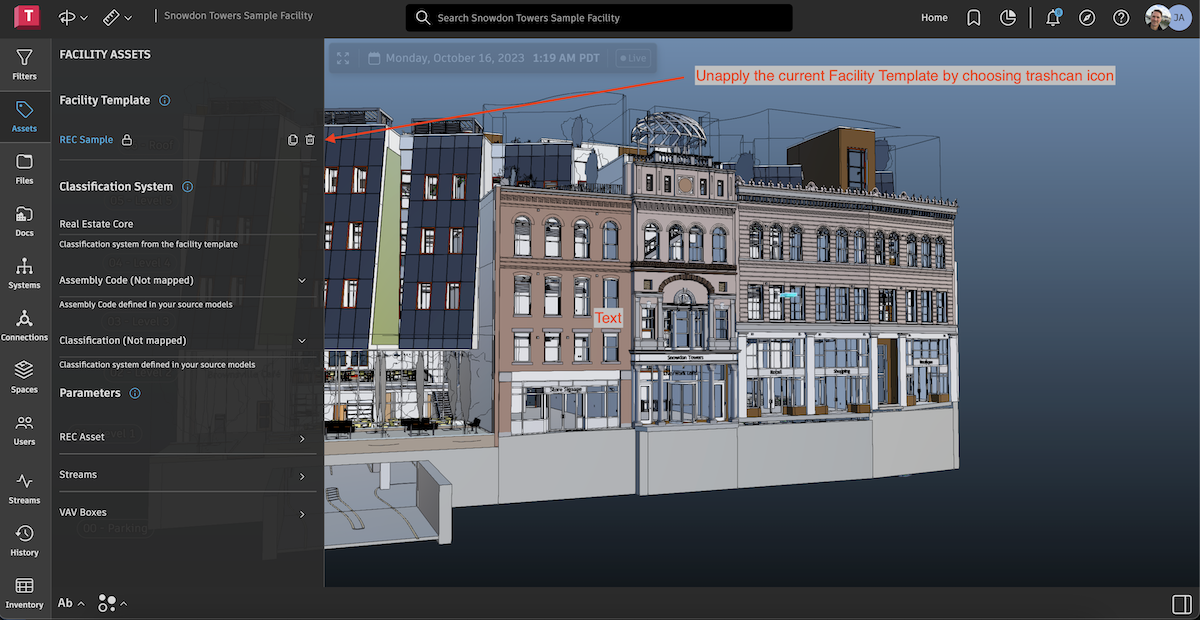
Go to the Assets tab and remove the existing template assignment by choosing the trashcan icon.
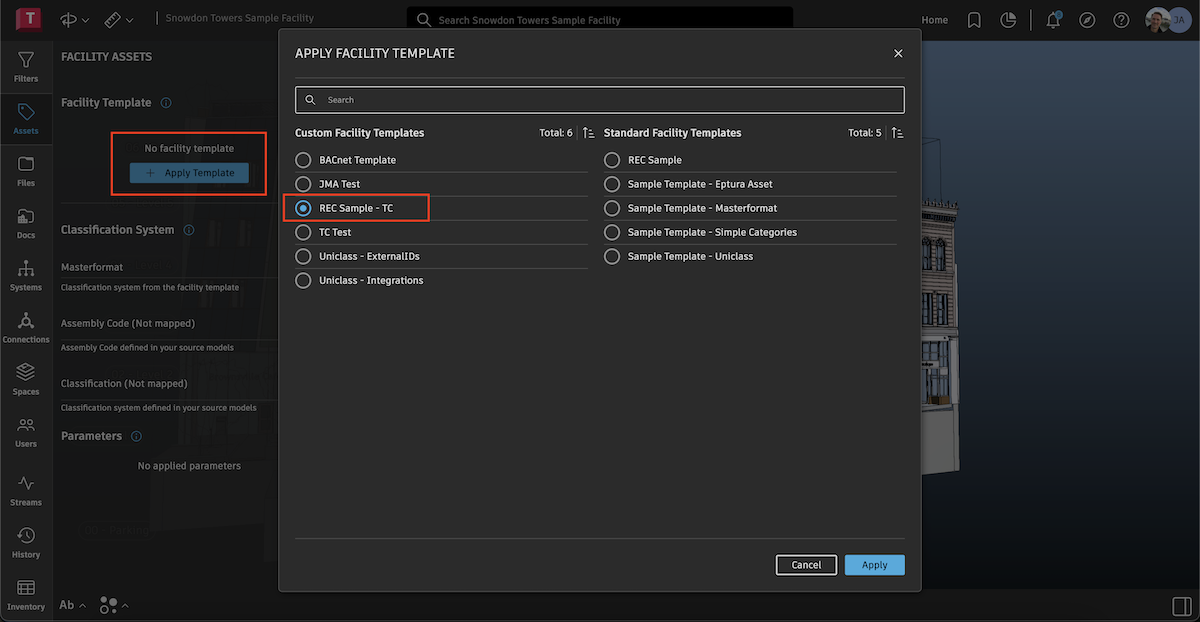
Then add our new template back as the active template for this facility.
Now we will classify the connection to the Georeference (the one we added out Parameters to).
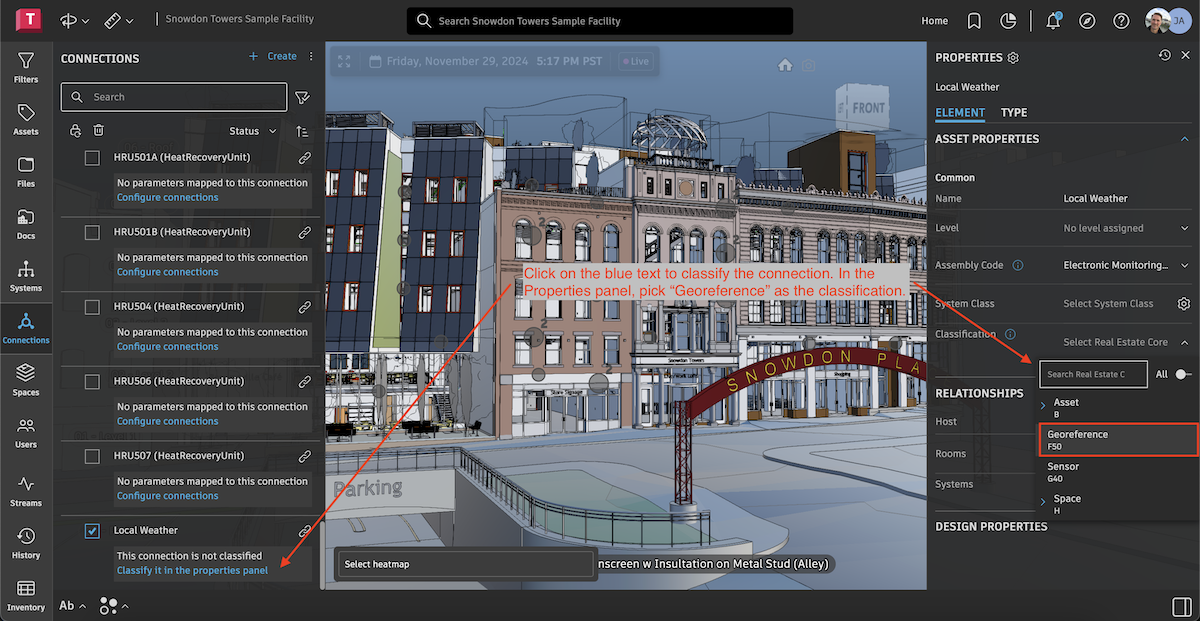
Choose the blue text on our connection and it will select it and bring up the Properties panel. Click the drop down list for Classification and select "Georeference".
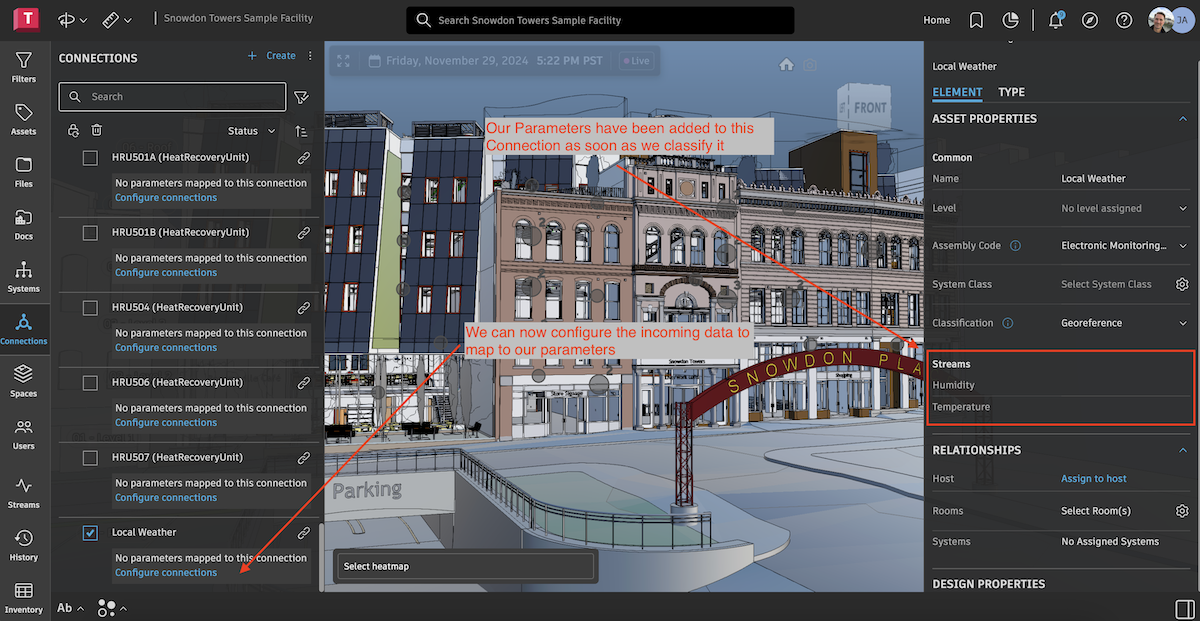
As soon as we make that classification assignment, we should see our two parameters show up in the Properties panel. And now we are allowed to configure the connection to recieve the incoming data. Click on the blue text in the connection to bring up the configuration dialog.
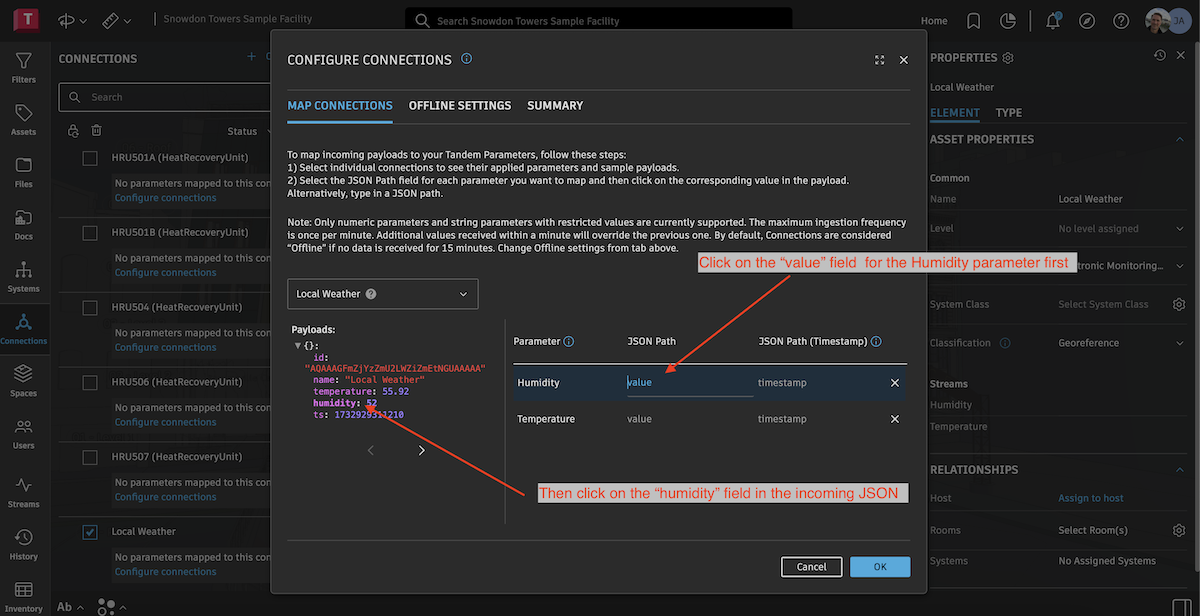
The configuration dialog allows you to map incoming JSON data from our pipeline into Parameters attached to the connection.
First, click the field name in the list of parameters on the right. It will highlight to show it is ready to be mapped. Then click the field name in the JSON structure on the left.
Do the same for the temperature field and the timestamp (ts) field.
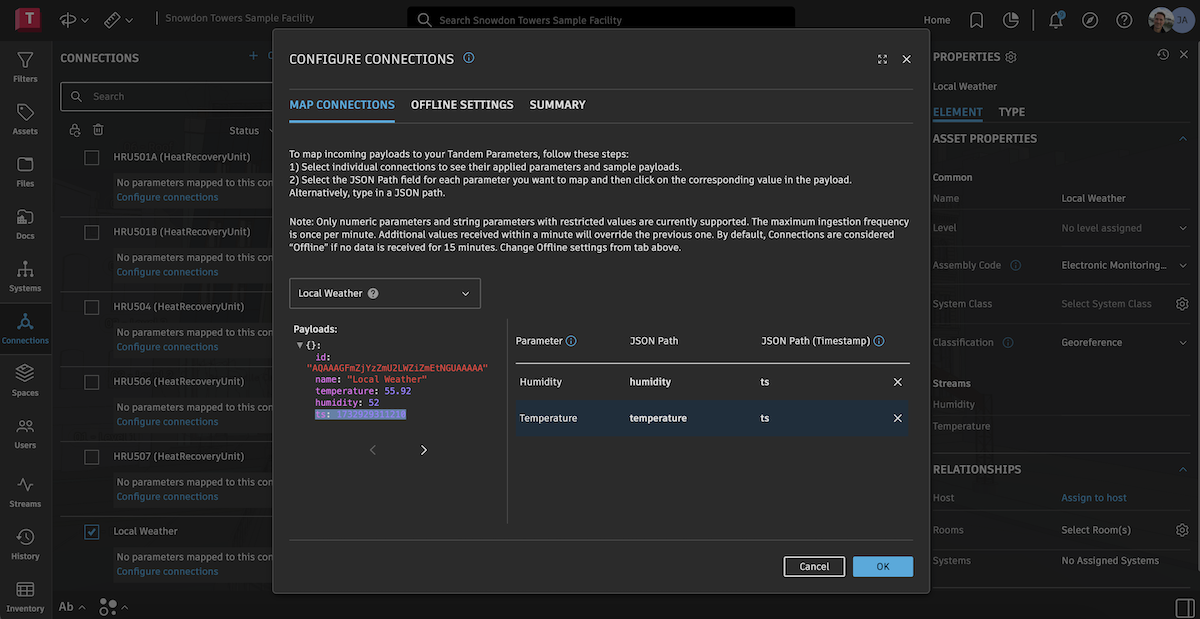
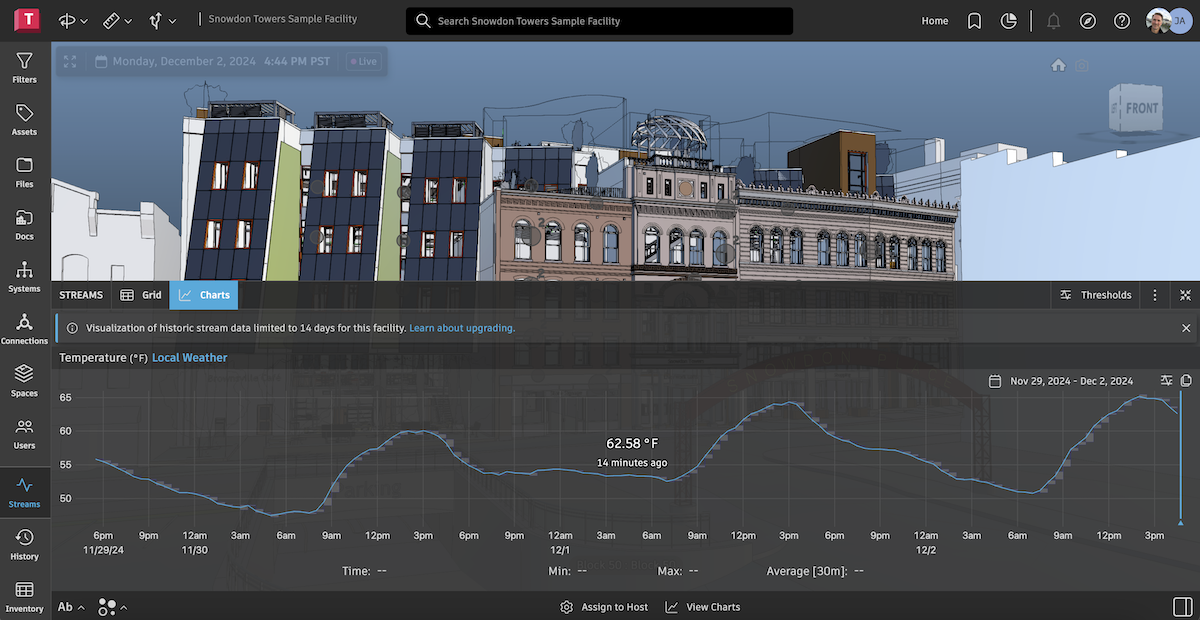
Once you complete the mapping and click OK, we should see our values coming into the Stream.
After a few days of collecting data, it would look something like the image below.
