
Working with Joints and Meshes
FBX files containing skeletons, joints, and skinned meshes can be imported into VRED. There are a few limitations:
- Only meshes and the Linear Blend skinning method (Maya: Classic Linear) are supported.
- A single mesh vertex can be influenced by a maximum of 4 joints. If a vertex is influenced by more, the 4 most influential joints are chosen and their weights normalized.
- At most, 1024 joints for AMD and NVIDIA GPUs and 256 joints for Intel GPUs can influence a mesh.
- Unshare is only partially supported. We don't recommend unsharing multiple clones of the same mesh at the same time.
- Only skin data from polygon meshes can be imported. NURBS skinned geometry is not supported.
Click here to view the Joint Import video.
Why Use FBX Files
FBX is the recommended exchange format between Maya and VRED, as it is superior to .ma and .mb. When using .ma and .mb files, not everything in the scene may be supported, so a lot of Maya data that cannot be loaded into VRED. Therefore, .ma and .mb files should be avoided and FBX files used.
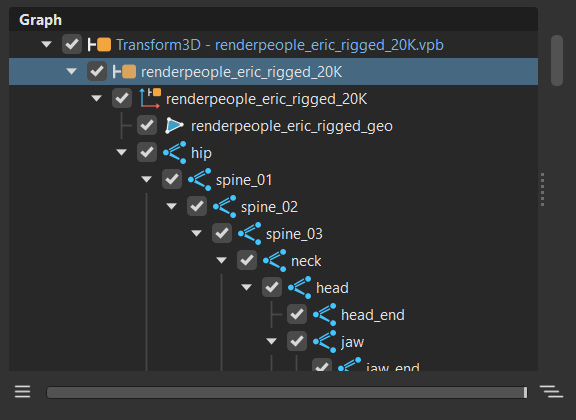
How to Import Joints and Skinned Meshes
When importing a skinned mesh, joint hierarchy is shown in the Scenegraph. Only individual joints can be modified and animated.
- In the Menu Bar, select File > Import, locate a file with joints and/or meshes, and click Open.
- In Import File(s), disable Center in Origin and Put onto the Ground. These compute and apply a translation for the imported node, affecting the mesh, which can lead to misalignment of the skeleton and mesh.
- Enable any other import options and click Import.
Which Operations Skip Skinned Meshes
The following operations skip skinned meshes:
- Merge Geometry
- Normal/Tangent/Binormal Recalculation
- Decore
- Subdivisions
- Light Baking Subdivisions
- Split/Unsplit Geometry
- Octree calculation
- Flush transformations (also skipped on Joint nodes)
How to View Joints
To turn joint visibility on in the Viewport, select View > Show Joints.
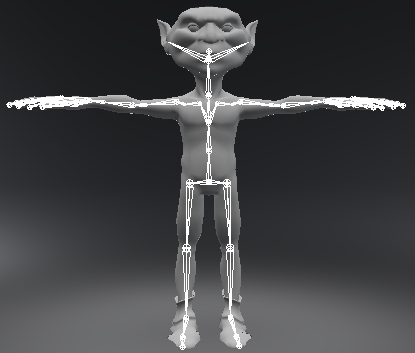
To view joint hierarchy, open the Scenegraph by selecting Scene > Scenegraph. Joint nodes are represented by  .
.
How to Use Duplicate/Cut/Paste/Delete with Joints and Meshes
- If you Duplicating/Cut/Paste only a mesh, the skinning information will be detached.
- If you Duplicating/Cut/Paste a mesh and joint, the hierarchy will adjust the duplicate's joint references in the skinning information, so it refers to the joint hierarchy duplicate.
- If you only Delete or Cut the joint hierarchy, this permanently removes the mesh's skinning information.
How to Transform Skinned Meshes
To move a skinned mesh to a certain position in the scene, move the skeleton. Since the mesh is bound to the skeleton, it will automatically move with the skeleton. If you transform joint nodes, the mesh will become deformed, resulting in the mesh and joints becoming misaligned. This is why the transformation of the mesh must NOT be changed. So, if you wanted move the entire mesh to a different position, as mentioned above, select the skeleton at the root joint node, then move it.
When transforming geometry with a skinned mesh, if both are selected, the geometry is transformed twice. Why this happens is because the transform is being applied once to the group (geometry and rig) and again to the geometry directly.