Inspect Surface strategy
This feature is part of an extension. Extensions are a flexible way to access additional capabilities in Fusion. Learn more.
The Inspect Surface ![]() strategy creates a probing operation to perform surface inspection of complex, free-form parts through a user-defined probe path. Surface inspection results can be imported from a machine-generated results file or imported in real-time using a live connection between Fusion and the CNC machine. Analysis of the results lets you check whether the part is in or out of tolerance.
strategy creates a probing operation to perform surface inspection of complex, free-form parts through a user-defined probe path. Surface inspection results can be imported from a machine-generated results file or imported in real-time using a live connection between Fusion and the CNC machine. Analysis of the results lets you check whether the part is in or out of tolerance.
Surface inspection streamlines the manufacturing process by helping to identify problem areas, and decide if any rework is needed, earlier in the process. It can also reduce the need to move parts between a CNC machine and a separate measuring device, such as a coordinate measuring machine (CMM).

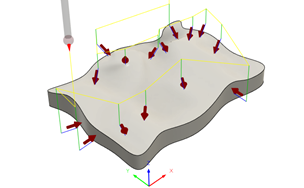
Example of an Inspect Surface operation.
The Upper Tolerance and Lower Tolerance values in the Inspect dialog define a tolerance band, which is the acceptable range of deviation. If the deviation of a point from its nominal is above the maximum limit, or below the minimum limit, the point is considered out of tolerance.