Manual inspection
Manual inspection is a process where you create an inspection plan for manufactured parts, and then record measurement data directly in Fusion using a manual measuring instrument (such as a caliper, micrometer, or height gauge).

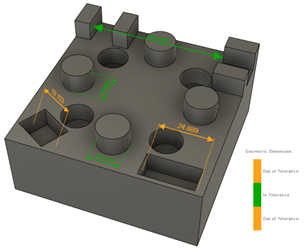
Colored measured values for a recorded manual inspection.
Creating a manual inspection
When creating a manual inspection, you can choose to measure critical dimensions of features. You pick features directly from the model on the canvas and set tolerances to define the allowable variations from the nominal values.
Currently supported measurements include:
 Diameter of a hole or boss
 Distance between two parallel, flat surfaces
 Distance between the center of two holes or bosses
 Minimum distance and
  maximum distance between two holes or bosses
 Distance between a flat surface and the center of a hole or boss
 Minimum distance and
  maximum distance between a flat surface and a hole or boss
 Distance between two points
In addition, you can include checks in the inspection plan that are not directly associated with features on the model. For example, you can include a simple pass/fail check ![]() , or a user-defined action for when you want the inspector to record their observations
, or a user-defined action for when you want the inspector to record their observations ![]() .
.
Recording a manual inspection
When recording a manual inspection, if you are using a connected measuring instrument that outputs text, the instrument sends the measurement data directly to Fusion. If you are using a simpler, more traditional instrument, you can type the measured values using your computer's keyboard.
When Fusion receives the data, it calculates the deviations between the nominal and measured values and works out the error beyond the set tolerance.
Fusion summarizes the recorded measurements and observations in tabular form. Optionally, save the results as an inspection report to create a PDF file on the Fusion web client or on your local computer. You can then share the inspection report with all your stakeholders.