Display a tool during simulation
In the Browser, select the setup or the individual operations you want to simulate.
Tip: Hold theCtrlkey to multiselect operations.On the Manufacture workspace toolbar, click Actions > Simulate with Machine
 or Actions > Simulate
  .
.A dialog is displayed, and the Simulation contextual environment opens, replacing all the tabs in the Manufacture workspace.
If the tool is not displayed, on the Simulation contextual environment’s toolbar, click:
 Tool > Holder to show all of the tool, that is the tool’s holder, shaft, and flute.
 Tool > Shaft to show the tool’s shaft and flute.
 Tool > Flute to show only the tool’s flute.
 Tool > Hide Tool to hide the tool’s holder, shaft, and flute.
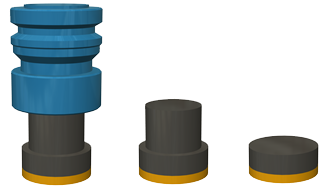
Examples of when Holder (left), Shaft (center), and Flute (right) are selected. When Flute is selected, the neck of the tool from the top of the flute to the shoulder is also displayed. The neck is displayed in gray and the flute is displayed in yellow.
Note: If you are simulating a non-milling tool, such as a turning tool, a cutting tool, or a probe, use the Holder, Shaft, and Flute options to show and hide equivalent portions of the non-milling tool.
(Optional) Use the options in the dialog to further control the visibility of the tool:
- To make the tool see-through, select the Transparent checkbox.
- To show a red dot to indicate the tip of the tool, select the Programmed Point checkbox.
Use the player controls and timeline to navigate the simulation.
Use the other options on the toolbar and in the dialog to control the visibility of the machine, toolpaths, and stock during the simulation, and to check for simulation issues and view the NC code.