
A sample network was built up previously and this will be used to demonstrate the use of water quality modelling.
This stage of the lesson assumes that a treatment chemical is to be added to one of the boreholes (KBH_2) at a fixed rate of 10 mg/litre. The control data is adjusted for that node and a water quality simulation is run.
- Choose Open model group from the File menu. In the list of objects click to the left of 'Tutorial', click 'WQ' and then Open.
- Open the 'Newtown WQ' network.
- Open the WQ Base Control to associate it with the network.
- Zoom in on the area around borehole KBH_2.
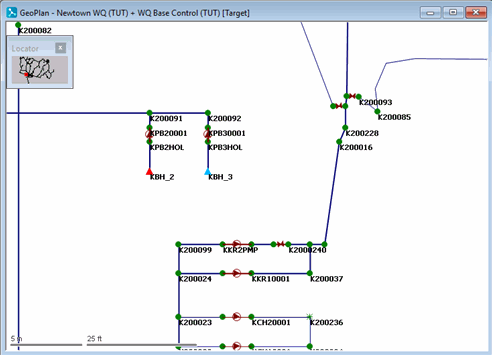
- Zoom in on the area around borehole KBH_2.
- Add a treatment chemical at the borehole:
- Select the
 (Properties) tool and click KBH_2 to display the borehole's properties.
The properties sheet shows that initially there is no water quality data for the node.
(Properties) tool and click KBH_2 to display the borehole's properties.
The properties sheet shows that initially there is no water quality data for the node.
- In the Water Quality section, add an
Initial Concentration of 10 mg/l.
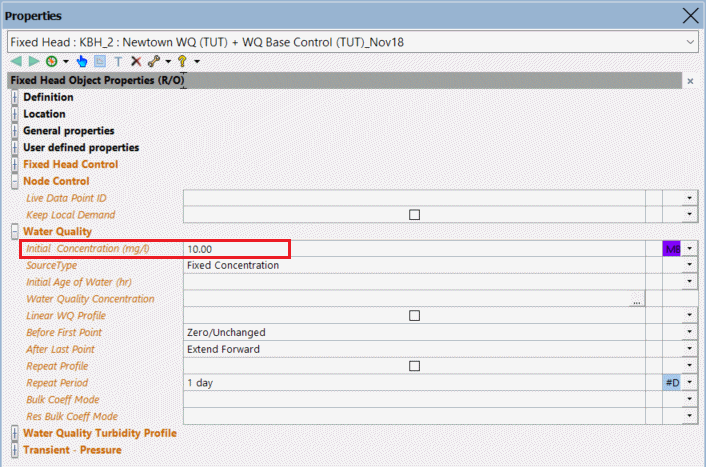
- This level of chemical will now be added to all water pumped from the borehole.
- Select the
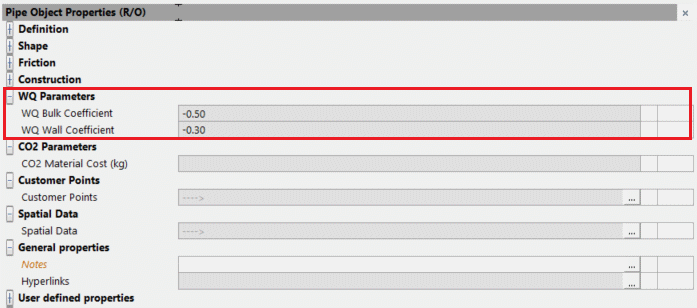
- Display the properties for a pipe. The properties sheet includes two water quality parameters, the default values for which have been derived from research.
The bulk coefficient is a reaction rate parameter used to calculate the change in concentration of a substance as it reacts with material in the bulk flow. The bulk coefficient has a negative value if the concentration of the substance grows over time, and a positive value if the concentration decays over time.The wall coefficient is a reaction rate parameter used to calculate the change in concentration of a substance as it reacts with material along the pipe walls. The wall coefficient has a positive value if the concentration of the substance grows in time, and a negative value if the concentration decays in time.
- Commit the WQ Base Control data, commenting appropriately. Close the GeoPlan view.
- Create a run using the new data:
- Right-click the Newtown Control Simulations group and select New | Run.
- Enter a Run Title of 'WQ Run 1'.
- Drag the 'Newtown WQ' icon into the Network box, the 'WQ Base Control_1' control object into the Control box and the Profiles demand diagram icon into the Demand Diagram box.
- Change the Start date and time to 1 October 1998 00:00 and the End date and time to 2 October 1998 00:00.
- Set the Timestep to 5, the Maximum Iterations to 50 and the Computational Accuracy to 1 l/s.
- Specify the water quality parameters:
- Select Water Quality from the Run Type drop-down list. The Water Quality Options dialog is displayed.
- Set the Trace Node to KBH_2.
- Leave the
Stagnant Water Flow Threshold as 0 and the
Water Quality Timestep as 0.
There is an option to drag in a Solute Data item. This can be used if the default values are not suitable.
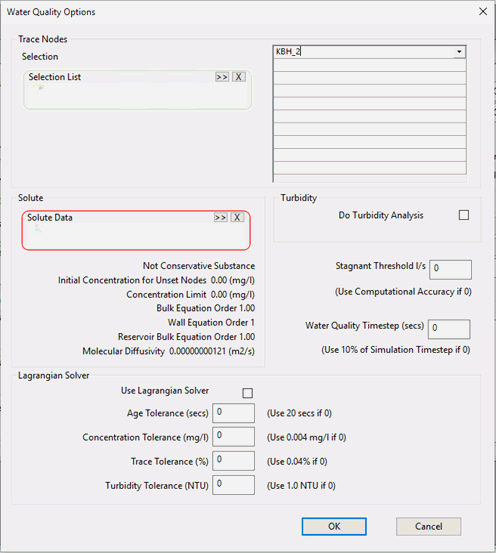
- Click OK.
- Run the simulation:
- Click Run Simulations.
- When the simulation is complete, close the Output window.
- Close the GeoPlan view.
The next stage investigates graphs of the simulation data and demonstrates the use of a water quality theme.
 Back to flowchart
Water quality graphs
Back to flowchart
Water quality graphs