
The sample network is used to demonstrate the use of UPC.
If you want to work with the prepared example data, load the Final Newtown (Final Version) Model Group. For instructions on how to load the database, see Opening the Example Database.
The lesson will control pump KCH2PMP from the level in reservoir CRES2. At present, the control data associated with the pump determines when the pump is switched on or off. The first stage is to deactivate the pump, so that a UPC scenario can be set up to take over its control.
- Choose Open model group from the File menu. In the list of objects click to the left of 'Tutorial', click 'UPC' and then Open.
- Display the effect of the pump on the reservoir as currently configured:
- Drag 'UPC Run 1' (in Run Group) to the InfoWorks WS Pro background.
- Click the Re-Run Simulations button.
- Wait for the simulation to complete.
- Open the simulation from 'UPC Run 1' in Run Group (Simulation is called 'UPC Base Control').
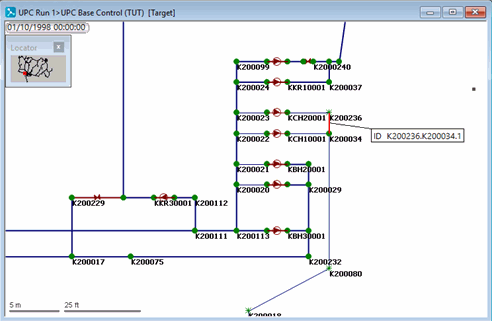
- Zoom in on the pump station.
- Use the
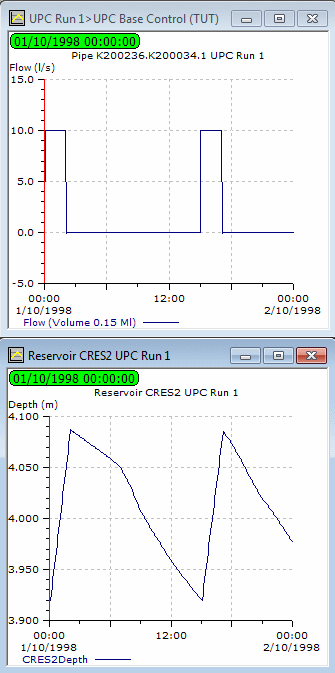
 (Graph) button to display a graph of flow through K200236.K200034.1 (the pipe out of pump KCH2PMP).
- Display a graph of depth for CRES2.
- Minimise the GeoPlan.
- Tile the views horizontally.
The graphs show that the pump is switched on and off as the level in the reservoir reaches the specified values.
- Close the GeoPlan and graph views.
- Open the 'Newtown UPC' network.
- Open the 'UPC Base Control' control data item to associate it with the network.
- Change the control settings for the pump:
- Zoom in on the pump stations.
- Select the
 (Properties) tool and click KCH2PMP.KCH20001.1 to display the pump's properties.
The properties sheet shows that the pump is initially in standby mode and contains the levels at which the pump is switched on and off.
(Properties) tool and click KCH2PMP.KCH20001.1 to display the pump's properties.
The properties sheet shows that the pump is initially in standby mode and contains the levels at which the pump is switched on and off.
- In the Pump Control Data page, change the
Pump Initial Status to
Not Available.
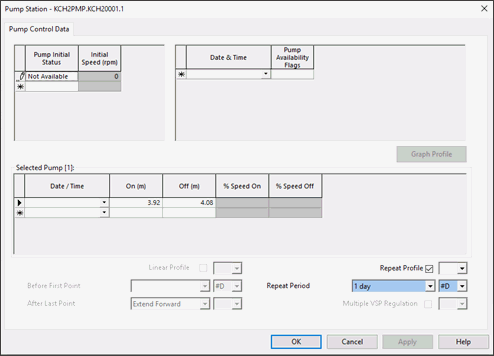
- Click OK. The pump is now permanently switched off.
- Commit the UPC Base Control_1 control data, commenting on the new status. Close the GeoPlan view.
- Run a simulation with the new data:
- Open the 'UPC Run 1' run.
- In the Run Title box, change the title to 'KCH2PMP Off'.
- Drag the 'Newtown UPC' network into the Network box.
- Drag the 'UPC Base Control_1' control data item into the Control box.
- Click Run Simulations.
- When the simulation is complete, close the Output window.
- View the simulation results:
- Open the simulation from the 'KCH2PMP Off' run.
- Use the
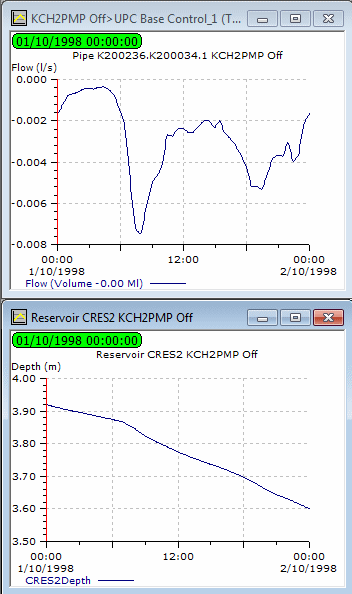
(Graph) button to display a graph of Flow for K200236.K200034.1 and Depth for CRES2.
- Minimise the GeoPlan.
- Tile the views horizontally.
The graphs now show that the pump is switched off throughout the simulation and the level in the reservoir declines steadily over the course of the simulation.
- Close the GeoPlan and graph views.
The next stage creates a UPC scenario to operate the pump and manage the reservoir level.
 Back to flowchart