
- To open the Snap Align Objects rollout, select from the main menu.
Set these options to control the behavior of object snap alignment. See also Snap one object to another.
Point to Point, 2 Points to 2 Points, 3 Points to 3 Points
Snap objects together at one, two, or three points.
Move
The move options.
- Object
-
Apply the transformation to the object itself.
- Parent
-
Apply the transformation to the object’s parent.
- Grandparent
-
Apply the transformation to the object two levels up in the scene hierarchy.
Snap Type
Only appears in Snap 2 points to 2 points. You click two pairs of points on the two objects to align them. This option controls what Maya does when the pairs of points are different distances.
- Left
-
Snaps the first and third points you click, and aligns the second and fourth points in the same direction as the first and third.
- Middle
-
Snaps the second and fourth points, aligns the first and third in the same direction.
- Right
-
Snaps the midpoint of the first and third points to the midpoint of the second and fourth, and aligns the other matching points in the same direction.
Align Objects Options
These options control how objects align in space when you use the . See also Align objects.
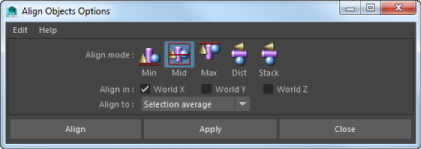
Align Mode
Select from one of five different alignment modes according to the objects’ bounding boxes.
- Min
-
Aligns objects with the side closest to 0.
- Mid
-
Aligns centers.
- Max
-
Aligns objects with the side farthest from 0.
- Dist
-
Distributes objects evenly along the total distance between them.
- Stack
-
Lines the objects up so there is no distance between their sides.
- Align In
-
Select an axis or multiple axes in which to align the selected objects. For example, to align tops/bottoms turn on World Y.
Align to
You can use this drop-down list to specify how to align objects in the Min, Mid, and Max modes. This drop-down list does not apply to the Dist (Distribute) or Stack modes.
- Selection Average
-
Uses the average minimum, middle, or maximum value of the objects’ bounding boxes as the alignment reference.
- Last Selected Object
-
Uses the minimum, middle, or maximum value of the bounding box of the key object as the alignment reference. This object is highlighted in green.
Position Along Curve
Repositions a selection of objects evenly along a curve.
- Draw a curve in the scene to indicate the path along which you want the objects to be positioned (Alternately you can duplicate or use an existing curve in the scene).
- Select the objects you want to have evenly positioned as well as the path curve and then select Modify > Snap Align Objects > Position Along Curve.
Note: If the objects you are positioning do not appear evenly spaced along the curve, you can try rebuilding the NURBS curve using Curves > Rebuild (Modeling menu set) so that the curve has a Uniform parameterization and a parameter range between 0 and 1.
Since Position Along Curve uses the curve’s parameterization to determine the spacing of objects along it, rebuilding the curve in this manner will improve the results.
Objects are positioned based on the location of their pivot point. If you have repositioned the pivot point for an object it may appear along the curve in an unexpected position relative to the curve.