
Generate part copies and give each copy a unique label from a list
Jump to:
What is it?
Lists automate the labeling process. They supply both the text to name the part copies in the project tree as well the text to add to the part surface. You can load a list from a CSV file, or prepare it in Netfabb directly.
TopWhich method to choose?
Either method is better suited to different purposes.
| Create the list inside Netfabb | Load a CSV |
|---|---|
|
The naming pattern is fixed to the original part's name, any naming prefix and suffix defined in the settings, and a unique appendix per part. Note: In the list dialog's table, the
key column is the naming appendix, and the
value is the text used in generating the actual label.
|
|
|
The naming appendix is a running number whose start value and increment you define when setting up the list. Example:
Tensile Test Part (labeled) 2 Tensile Test Part (labeled) 4 Tensile Test Part (labeled) 6 |
The naming appendix is either a value from a column in the CSV file … Example:
Tensile Test Part (labeled) Main copy
Tensile Test Part (labeled) Lab copy
Tensile Test Part (labeled) Archive copy
… or, by default, a running number derived from the line number in the CSV: Example:
Tensile Test Part (labeled) 1 Tensile Test Part (labeled) 2 Tensile Test Part (labeled) 3 |
|
The label text is generated from an optional prefix, a configurable running number, and an optional suffix. Example:
SN:NC114-2 ASTM D636 SN:NC114-4 ASTM D636 SN:NC114-6 ASTM D636 |
The label text is taken entirely from the CSV file's column. Example:
Main copy Lab copy Archive copy |
To use list labeling
- Select the part to be labeled.
- Click .
- Load or generate the list.
- Choose a build type from the drop-down menu.
- Optional: For a particular spacing and arrangement of the part copies, check Advanced arrangement. This calls a dialog later to make the necessary adjustments. Otherwise, the copies are placed in
- Click Apply to create the text label.
- Click Yes to remove the old part or No to keep the old part and the newly labeled part.
- Optional: If
Advanced arrangement was checked, the arrangement dialog now appears where spacing and arrangement can be adjusted. Effectively, this defines "slots" in buildroom space where any individually labeled copy may be placed. Click
Arrange to accept the values, or click
Cancel to return to step 6.
Caution: Using a combination of values that results in fewer arrangement "slots" than what was defined through the list also reduces the amount of copies actually generated, any remaining copies are dropped.
| Add to part | Add to part (inverted) | Subtract from part | Subtract from part (inverted) |
|---|---|---|---|
|
Makes the label stand out from the part. 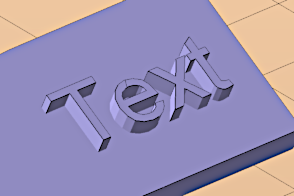
|
Makes the label stand out from the part, and mirrors the text. 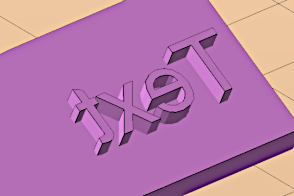
|
Sinks the label into the part surface. 
|
Sinks the label into the part surface, and mirrors the text 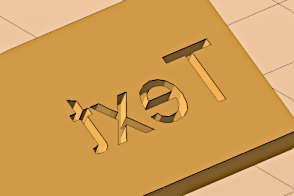
|
To load a CSV file
- In the context view, click
 Load CSV file.
- Browse for the CSV file to import.
- Use the Column for key drop-down menu to select which column to use for generating the respective part copy's name in the project tree.
- Use the Column for value drop-down menu to select which column to use for generating the text label on the part.
- Click OK to accept the list into the labeling dialog.
If the data in the CSV file is not recognized as expected and imported, make adjustments until the data becomes available properly.
| Separator and Quote Character |
Match the characters used in the CSV file to have the columns and cells detected correctly. |
| Trim spaces |
This removes leading and trailing whitespace characters from cell values. |
| First row contains header |
Use this to ignore the first row. |
To generate a list
If a CSV file containing a list of labels is unavailable or not required, a simple list with running increments can be defined within Netfabb.
- In the context view, click
 Generate list.
- Make adjustments to the list generation fields, if necessary.
- Click Generate.
| Manage settings |
Store and recall settings for dialog. See dedicated help article on settings management for more detail. |
| Prefix |
Text that appears at the beginning of each label |
| Suffix |
Text that appears at the end of each label |
| Start |
Offsets the numerical list to this value |
| Count |
How many list items to generate |
| Step |
The numerical increment between list items |
| Digits |
The number of digits to use for the numerical part. The value is padded with leading zeros if necessary. |
| Example |
Shows a preview of the list to be generated |
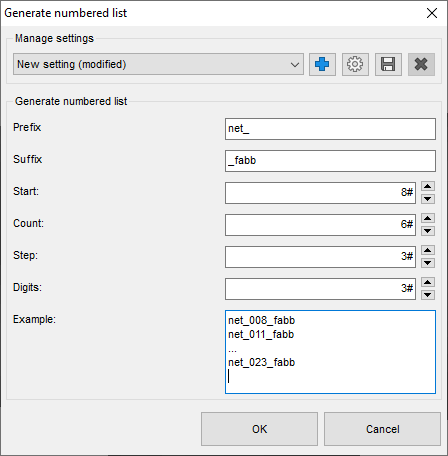
An example for setting up a list generation
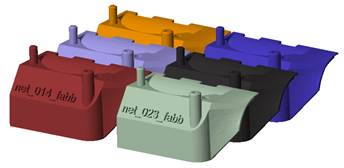
The labeled parts as generated using the example.