
If you enabled the Rasterize Automatically check box in the volume data of your 3S Generator, the part is already rasterized and a gridded fragment is added to the project tree. If you have added more than one set of volume data, you can create several different fragmented parts.
Initially, a transparent preview of the part is displayed. If you click on a volume data or a fragment in the project tree, the grid cells of the parts are displayed (the basic fragment is automatically labeled Part and contains the whole grid).
To rasterize a part
- Click the Volume Data (or one of its sub-components) in the 3S Executor.
- Click
Rasterize Part in the tabsheet.
Tip: You can also right-click Volume Data and choose Rasterize Part.
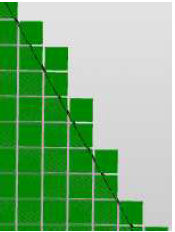
The volume data of the 3S Generator is used for the gridding. The grid cells in contact with the part become the first fragment. Since the grid cells are box shaped, they may extend beyond the boundary of the part.
Initially, the rasterized part consists of one big fragment. This fragment can be split into smaller fragments in several ways. The fragments can then be filled with different structure cells to generate a very differentiated structured part.
If you adjust the fragmentation and click Rasterize Part, the rasterization of the part is renewed. Again, all grid cells in touch with the part are assigned to a new fragment labeled Part. All changes to the fragmentation you have made up to this point are overwritten by the new fragment, if they lie within the part.