
Manually specify clusters for support actions to generate structures on
Areas of contiguous triangles that are relevant for support generation are called clusters. During manual work, they are defined in one of two ways:
- Let Netfabb analyze the mesh and mark areas of triangles based on their angle and surrounding, qualifying triangles
- Specify areas on the surface directly
Jump to:
- To define clusters for support through cluster detection
- To define clusters for support through manual marking
- Next steps
To define clusters for support through cluster detection
Tip: To learn more about cluster detection, in particular to the meaning of critical and non-critical angles, refer to the
Support Editor Reference.
- In the support editor's context view, select the first tab, Analysis.
- Optionally: Select a new direction that cluster detection considers as "down" without actually rotating the part:
- From the menu, choose
Cluster >
 Mark cluster manually.
- Open the
Cluster > Mark cluster manually submenu and choose
Pick cluster normal
- Click a spot on the part surface to specify the "new" direction of "down".
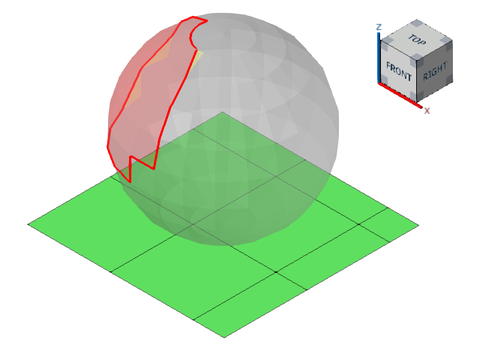
This sphere was assigned a custom direction for cluster detection in preparation for supporting it from the side
- From the menu, choose
Cluster >
- Adjust the Cluster detection sliders to meet your printing needs.
This updates the detected triangle groups instantly.
TopTo define clusters for support through manual marking
Manual support specification comes in two flavors:
- Manual drawing using a brush control. Observes critical and non-critical angle on the Analysis tab of the context view.
- Flood-fill of surface sections defined by staying within a certain angle between adjacent triangles
- Open the
Cluster > Mark cluster manually submenu and choose the selection mode, a brush control or a surface flood fill. The choice of selection mode is persistent. It is saved persistently at closing (not just leaving) of the current support editor instances.
- Use the mouse to draw over the model and mark triangles. Marked triangles form clusters.
- To unmark triangles, hold the
Ctrl key while drawing over triangles to be unmarked. To clear all marking, choose
Cluster > Mark cluster manually >
 Clear manual clusters.
- To change the size of the marking brush, change View tab from the context view and then adjust the value Brush size on the Analysis tab, or use Ctrl+Scrollwheel.
- To avoid the brush fill bleeding into perforations or around sharp edges, use the
Edge threshold control. This parameter is always measured from the vertical, or whichever angle is defined as the vertical by
Cluster > Mark cluster manually >
 Pick cluster normal.
Next steps
Once a cluster is set up, use the commands from its right-click context menu to have Netfabb generate supports on its area.
Top