
Substance Attributes
Material Editor > Create/Convert > Create Material > Substance
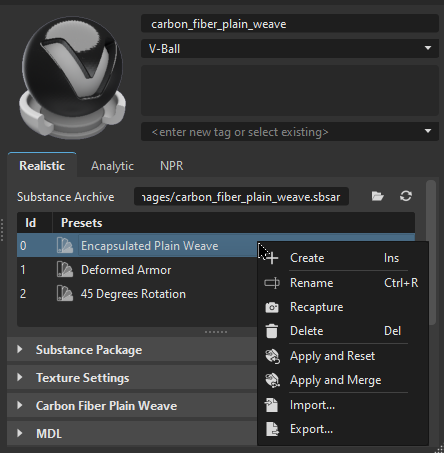
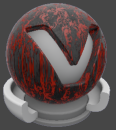
The Substance Attributes
The top of the Substance Attributes displays a Material Preview and the following additional information:
Substance Archive - Provides the name and location of the Substance (.sbsar file).
 Load - Opens the Load Substance Archive dialog for locating a Substance. By default, it opens to the last opened directory.
 Reload - Reloads the Substance archive file.Important:
Any previous changes made to the material are lost, including presets.
Id - Identifies the listed presets using a numeric value.
Presets - Displays the name of the listed Substance presets.
- Double-click LMB to apply the preset.
- Double-click MMB to apply the preset AND set the default output size.
Right-click to access a context menu with options for creating, renaming, recapturing, and deleting Substance preset textures. Use other options to apply and reset or merge, as well as to import or export a Substance preset.
Substance Parameters
This next section houses parameters. Most substances will have Substance Package, Texture Settings, Bump, Displacement, Raytracing, and Common parameter categories, along with their own unique categories of parameters. However, some of these may not exist for a given Substance and there may be some unique to it.
Channels
Here is a list of the supported Substance output channels:
- Base Color (Required)
- Roughness (Required)
- Metallic (Required)
- Normal (Optional) - VRED expects the normal texture to be generated in DirectX normal format (i.e., +X = right and +Y = down).
- Height (Optional)
- Emissive (Optional)
- Opacity (Optional)
- Specular Level (Optional)
- Ambient Occlusion (Optional)
- Anisotropy Level and Anisotropy Angle (Optional) - For anisotropic reflections on the material. VRED uses the anisotropy angle for a clockwise rotation.
As of VRED 2025.2, use Adobe Substance SBSAR materials that use the Metallic Roughness - Coated workflow. This means that the following additional output channels are supported and can be combined with the above already supported channels.
- Coat Opacity (Optional)
- Coat Roughness (Optional)
- Coat Color (Optional)
- Coat Normal (Optional)
- Coat Specular Level (Optional)
- Coat IOR (numerical output only, no texture) (Optional)
And as of VRED 2025.2, the following Substance workflows are supported:
- Metallic Roughness
- Metallic Roughness - Anisotropy
- Metallic Roughness - Coated
Here is a list of Texture Channels that are not easily found in VRED:
Normal is found in Bump (Bump Intensity). Tangent-space Normal mapping is used. Bump Intensity is set to 1.0 by default to enable normals. When Bump Intensity is set to 0.0, Normal mapping is disabled. It controls how high the bumps display on a surface. Higher values make the surface appear bumpier. Negative values will invert the bump effect.
Height is found in Displacement. By default, Displacement mapping is disabled (Displacement Height is set to 0). To displace the geometry, based on the content of the height texture, set Displacement Height to a value greater than 0. The Displacement Offset defines the texture values used to extrude (values larger than Offset) or indent (values smaller than Offset) the geometry.
Height is also found in Bump (Parallax Intensity + Bump Type). Instead of using Displacement mapping, a method called Parallax Mapping is used to create the impression of a displaced surface.
Parallax mapping is faster than real displacement mapping; however, it does not generate the correct silhouettes and might display artifacts. By default, Parallax Mapping is disabled (Parallax Intensity is set to 0.0). Bump Type controls use the Parallax Mapping method. For example, the Bump Type, Bump Mapping, enables standard Parallax Mapping and Displacement Mapping enables Parallax Occlusion Mapping.
Emissive is found in Incandescence. If a material has an emissive texture, the Incandescence Intensity will be set to 1.0 by default.
Opacity is found in Transparency. The Use Cutout option will be enabled by default.
Substance Package
The following list is comprised of parameters we feel are notable:
Graph - Specifies the graph used by the Substance. Each graph can change the look and makeup of a Substance. Click the drop-down and select a graph.
- Reset - Resets the current selected graph to its default parameters. However, any VRED material setting changes made to Texture Settings, Bump, Incandescence, Displacement, Transparency, Raytracing, or Common will remain. See Resetting a Graph in Working with Substances.
Output Size - Sets the rendering output resolution for each Substance material. For a Substance that contains multiple materials, you can set some materials to a lower resolution, and others to a higher one. Doing this, enables you to control memory usage and reduce rendering time. Use the Lock feature to lock in the output size.
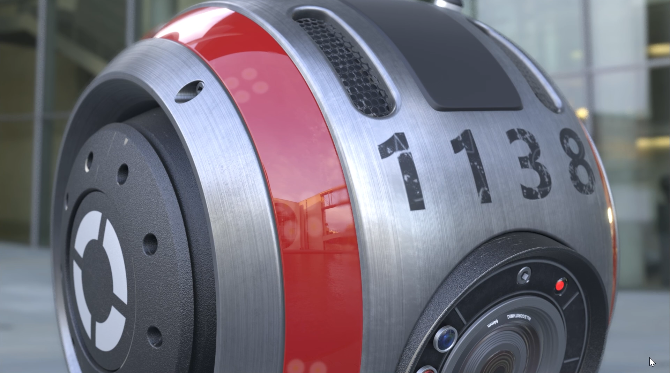
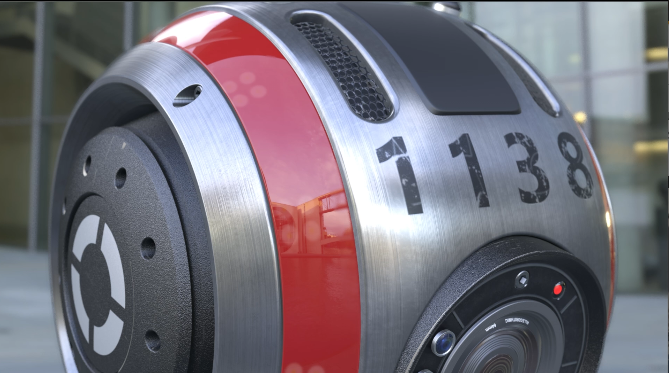
Random Seed - Randomizes the texture patterns within the Substance, based on the numeric value entered.

For the first image, Random Seed = 0. For the second, it is 30. Notice the difference in the texture pattern.
Environment Material
These attributes only appear when a Substance Environment is selected.
| 2021.3 Results | 2022 Results |
|---|---|
 |
 |
Environment - Indicates the HDR used for the environment and improves the HDR environment sampling making realtime scenes look even more realistic.
- Loads an HDR. Clicking with the left mouse button opens a standard file dialog. Clicking with the right mouse button opens a special image file browser dialog.
 Saves the HDR.
- Reloads the HDR. To ensure you are using the most up-to-date HDR, click to load the latest version.
Glossy Quality - Defines the quality for the precomputed (pre-filterd) glossy image-based lighting (IBL) by using the set sample amount per pixel. Use these to control sampling values for environment map pre-computations for more accurate results.
Higher values provide better quality, but require longer pre-calculation time. It's also used for the precomputed raytracing mode, but not full global illumination.
Tip:Higher values provide better quality, but require longer pre-calculation time.
Choose from:
- Custom - Uses the values entered. The higher the value, the better the visual quality. The lower the value, the faster the computations.
- Low - Uses 256 samples.
- Medium - Uses 512 samples.
- High - Uses 1024 samples.
- Ultra High - Uses 2048 samples.
Environment Geometry - Selects the geometrical form for the current Substance environment.
- Custom: Loads an external geometry file.
- Dome
- Sphere
- Cube
Is Visible - Sets the light source to on, by default. Controls the visibility of the Substance environment within the render view. A hidden, but activated Substance environment furthermore influences all scene-contained objects, regarding their look and appearance.
Flip Inside Out - Flips the normals of the Substance environment.
Shadow Plane Visible - Enables or disables the shadow plane on the ground.
Shadows and Illumination
These attributes only appear when a Substance Environment is selected.
Shadow Lightsources - Sets the number of explicit light sources. There are 256 light sources available.
Use Lightsources Only - When selected, only the shadow lightsources used for the environment are used for illumination. At least one lightsource must be entered in the Shadow Lightsources option for results. In the Raytracing Settings tab, set Illumination to Full Sphere to get illumination from the floor.
Material Shadow Intensity - Sets how dark or intense the material shadows cast are and their color.
Ground Shadow Intensity - Sets how dark or intense the ground shadows cast are and their color.
Map Filter Radius - Sets the radius used for filtering the shadow map lookup in rasterization.
Map Resolution - Sets the quality of rasterization shadow maps. Higher values increase the quality.
Color Correction
These attributes only appear when a Substance Environment is selected.
Exposure - Sets the HDR-Image’s exposure level. The higher the exposure level, the longer the series of shutter cycles which are used to calculate the image’s light intensity.
Whitebalance - Sets the camera's white balancing color temperature. Lower values balance the camera to a lower color temperature and therefore create cooler (bluish) colors. A higher value balances the camera to a higher color temperature and produces a warmer (yellowish) color.
Hue-Shift - Shifts all colors in the HDR-Image uniformly through the hue color range.
Contrast - Separates the light and dark color values further from each other.
Brightness - Raises the color value of the whole HDR-Image.
Saturation - Sets the HDR-Image’s saturation.
Reflected Saturation - Sets the HDR-Image’s saturation when the HDR-Image reflects in any surface.
Transformation
These attributes only appear when a Substance Environment is selected.
The source of spherical projection of the Substance Environment Material can be set with transformation parameters.
Environment Size - Sets the radius of the Substance Environment Material’s projection sphere. The projection sphere must enclose all objects using a material having this Sphere Environment Material as environment shader assigned. All objects that are outside the projection sphere using a Truelight Material with this Substance Environment Material as input channel, are not rendered properly.
Center X, Y, Z - Defines the projection sphere’s center position.
Get from Object - Sets the projection sphere’s center. To center the projection pivot automatically, select an object and press Get Center. The selected object center is now used as projection spheres pivot.
Rotate X, Y, Z - Sets the Substance Environment Material’s orientation.
Scale X, Y, Z - Sets the Substance Environment Material’s size. With the scale value, the image projection can be stretched and squashed on any axis.
Raytracing Settings
These attributes only appear when a Substance Environment is selected and only take effect in Raytracing Mode.
Is Visible in Reflections - Sets the visibility.
Use as Lightsource - Uses the HDR ALS light source. Only supported in FullGI illumination mode.
Use Accurate Geometry - When selected, uses the accurate geometry. This option is unselected by default. If unselected, all diffuse and glossy reflection calculations are based on the virtual sphere of the environment. Selecting this option, the real environment geometry is used for more accurate diffuse and glossy illumination in Precomputed+IBL and Full Global Illumination Mode. (At the cost of a 20–25% performance hit compared to default finite sphere environment.)
Note:This option is only supported for diffuse and glossy environment reflections.
Emit Caustics - Activates/deactivates Emit Caustics. Allows the HDR to emit caustics. Only supported in FullGI illumination mode with caustics.
Material ID - Sets the ID of the material.
Illumination - Offers the following options:
Upper Hemisphere - Emits light only from the top half of the sphere.
Full Sphere - Emits light from the whole sphere.
Override IBL Sampling Quality - If enabled, the setting overrides the global IBL Sampling quality for sampling the environment map.
Interactive Quality - Overrides the global sampling quality for reflections and refractions for interactive rendering
Still Frame Quality - Overrides the global sampling quality for reflections and refractions for still frame rendering.
Texture Settings
The following are a list of the parameters:
Mapping Type - Sets how the Substance is mapped onto your geometry. Choose from UV, Planar, and Triplanar. Use this in combination with other Texture Settings such as Repeat Mode UV, and Texture Size to adjust your Substance to the geometry.
Repeat Mode UV - Sets the repeat mode of the texture.
Texture Size - Enter the width and height of the texture in millimeters. Only available with the mapping type - UV and Use Texture Size selected or with the mapping type - Triplanar.
Projection Center - Only for Planar mappings. Sets the projection center for planar texture projection in object space.
Projection Orientation - Only for Planar mappings. Sets the projection orientation in U and V for planar texture projection in object space.
Projection Size - Only for Planar mappings. Sets the projection size in X, Y, and Z for planar texture projection in object space. the Z-coordinate can be used to limit the depth range of the projections.
Keep Aspect Ratio - Only for Planar mappings. Locks the aspect ratio of the texture projection, when changing scale or projection angle, via the UI or manipulator.
Rotate - Only for Planar mappings. Changes the orientation of the texture.
Consider Face Normal - Only for Planar mappings with Repeat Mode set to Decal. Sets whether the planar projection should be done on one side of the geometry or both.
Manipulate - Only for Planar mappings. Activates or deactivates the interactive texture manipulator in the render window. Something must be selected in the Scenegraph and only one material in the Material Editor.
Fit Size - Only for Planar mappings. Adjusts the projection size to that of the selected object in the Scenegraph. A valid selection in the Scenegraph is required.
Object Center - Only for Planar mappings. Adjusts the projection center to that of the selected object in the Scenegraph. A valid selection in the Scenegraph is required.
Edge Blend - Only for Triplanar mappings. Sets the range for overlapping areas of the triplanar projection.
Uniform Repeat - Only for Triplanar mappings. - Synchronizes the repetition value for all projection axes.
Use Infinite Tiling - Only for Triplanar mappings. - Removes repetition artifacts from tiled, seamless textures.
Grid Size - Only for Planar mappings. - Sets the sample grid size (m x m) per unit UV-rectangle. A finer grid (larger value) will average out larger scale details and the resulting texture will look more uniform.
Contrast - Only for Planar mappings. - Sets the weight of the variance-preserving operation. May need to be lowered to remove excessive color clamping at the cost of blurring.
Max Rotation - Only for Planar mappings. - Sets the maximum value texture samples can be rotated.
Hue Weight - Only for Planar mappings. - Sets the weight of the random hue shift of each sample.
Saturation Weight - Only for Planar mappings. - Sets the weight of the random saturation shift of each sample.
Value Weight - Only for Planar mappings. - Sets the weight of the random value shift of each sample.
X Repeat UV - Only for UV mappings. Sets the UV repeat factors for the x-axis of the triplanar texture projection.
X Offset UV - Only for UV mappings. Sets the UV offset for the x-axis of the triplanar texture projection.
X Rotate - Only for UV mappings. Sets the rotation value for the x-axis texture coordinates of the triplanar texture projection.
Y Repeat UV - Only for UV mappings. Sets the UV repeat factors for the y-axis of the triplanar texture projection.
Y Offset UV - Only for UV mappings. Sets the UV offset for the y-axis of the triplanar texture projection.
Y Rotate - Only for UV mappings. Sets the rotation value for the y-axis texture coordinates of the triplanar texture projection.
Z Repeat UV - Only for UV mappings. Sets the UV repeat factors for the z-axis of the triplanar texture projection.
Z Offset UV - Only for UV mappings. Sets the UV offset for the z-axis of the triplanar texture projection.
Z Rotate - Only for UV mappings. Sets the rotation value for the z-axis texture coordinates of the triplanar texture projection.
Bump
The following are a list of the parameters:
Parallax Intensity - Controls the degree of motion parallax applied to the substance.
Bump Intensity - Controls how high the bumps display on a surface. Higher values make the surface appear bumpier. Negative values will invert the bump effect.
Bump Type - Applies the chosen mapping setting to the substance, either bump or displacement mapping.
Use Infinite Tiling - Removes repetition artifacts from tiled, seamless textures.
Grid Size - Sets the sample grid size (m x m) per unit UV-rectangle. A finer grid (larger value) will average out larger scale details and the resulting texture will look more uniform.
Contrast - Sets the weight of the variance-preserving operation. May need to be lowered to remove excessive color clamping at the cost of blurring.
Max Rotation - Sets the maximum value texture samples can be rotated.
Hue Weight - Sets the weight of the random hue shift of each sample.
Saturation Weight - Sets the weight of the random saturation shift of each sample.
Value Weight - Sets the weight of the random value shift of each sample.
Transparency
- Use Cutout Transparency - Retains the state of a reloaded Substance material and does not reset it to the default. Use for objects with parts that are fully opaque and fully transparent, like grills or vents.
Displacement
In OpenGL displacement mapping with transparent materials does not work when Depth Peeling is enabled or when Object Sorting is used in conjunction with the Depth Only Pass.
The following is a list of the parameters:
Displacement Height - Defines the scaling factor of values for the displacement.
Displacement Offset - Defines the offset of the displacement. Allows you to set the value of the zero plane in the texture. Values below the zero plane displace inside the geometry and values above the zero plane displace outside the geometry.
Use Accurate Silhouettes in OpenGL - Allows you to calculate the displacement in OpenGL like in raytracing mode. Selecting it may drastically reduce the performance.
Raytracing
The following are a list of the parameters:
Material ID - Sets the ID of the material.
Line Tube Radius - Sets the radius of tubes used to render lines in raytracing (given in object space).
Use Local Environment - Calculates the diffuse and glossy reflections from the environment assigned to this substance in all illumination modes.
Ignore Photon Map - Uses path tracing on this material even when photon mapping is turned on.
Override Illumination Mode - Overrides the global illumination modes for interactive or still frame rendering.
Override IBL Sampling Quality - Overrides the global IBL sampling quality for sampling the environment map during interactive or still frame rendering.
Override Reflection/Refraction Sampling Quality - Overrides the global sampling quality for reflections and refractions during interactive or still frame rendering.
Override Trace Depth - Overrides the global set trace depth modes for interactive or still frame rendering.
Rounded Edges
For more information on how to use the rounded edges parameters, see Rounded Edges.
Mode - Sets how edges are smoothed. There are four options:
Off - No edge rounding; therefore, all other parameters are disabled.
Same Geometry - Only rounds edges belonging to the same geometry or shell.
Same Material - Only rounds edges between objects with the same material.
Same Group - Only rounds edges between materials with the same group ID. This can be useful for an eyeball and lid, where there are different materials, yet you want a smooth edge between them to catch the highlight.
Group - Available only when the Mode, Same Group, is chosen. Sets the group ID for smoothing.
Type - Sets the type of edges rounded. There are three options:
Convex & Concave - Both convex and concave edges are rounded.
Convex only - Only convex edges are rounded. This speeds up calculations when there are only convex edges.
Concave only - Only concave edges are rounded. This speeds up calculations when there are only concave edges.
Radius - Sets the radius for rounded edges in world space.
Chamfer - Gives the edge a more chamfered appearance, instead of a perfectly round shape.
Angle Limit - Limits the rounding effect to edges with an angle above the given limit. If the angle between the current shading normal and adjoining faces is less than the angle limit, the edge is not smoothed.
Use this limit to avoid the effect on edges already smoothed by the interpolation of the shading normals.
Quality - Sets the number of rays used to evaluate the nearest edges. Each quality level represents a multiple of 4 samples for estimating either convex or concave edges.
A quality level of 1 will trace 4 rays to estimate convex edges and 4 rays to estimate concave edges. At quality level 1, the effect is also only evaluated for non-distributed rays, not rays originating from diffuse or glossy brdfs. At higher quality levels, the effect is evaluated for one additional bounce.
Common
Occlusion Color - Sets the color of the pre-calculated ambient occlusion.
Occlusion Intensity - Sets the Substance's pre-calculated ambient occlusion intensity.
Sort Key - Only supported in OpenGL mode. Changes the order in which transparent materials are rendered in OpenGL. Transparent surfaces with the same sort key are sorted back to front.
Environment - Use the context menu to set the HDR image used for reflections on this material. The HDR image of the assigned environment is used for diffuse, glossy, and specular reflections on this material in rasterization rendering. Different materials can have different environments assigned to get different lighting effects. In Raytracing, the handling of the environment depends on the active illumination mode.
Lighting Mode - Defines the light model to be used for the Substance. There are five different lighting models.
IBL + Indirect + Direct Lights - The Substance is affected by the HDR image, by the pre-calculated or interactive Global Illumination rendering and by the direct light sources placed in the scene.
IBL + Indirect - The Substance is affected by the HDR image and by the pre-calculated or interactive Global Illumination rendering.
IBL + Direct Lights - The Substance is affected by the HDR image and the direct light sources placed in the scene.
IBL - Only the HDR image affects the Substance.
Direct Lights - Only direct light sources placed in the scene affect the Substance.
Variable Rate Shading - This is an OpenGL-specific rendering feature. Use for content adaptive variable rate shading (shading rate per material). Enable either via Foveated HMD rendering or Visualization > Realtime Antialiasing > Variable Rate Shading.
For materials with fine patterns that are prone to the moiré effect, such as carbon or HMI textures with thin lines that appear aliased, use a supersampling shading rate (2 Samples, 4 Samples, or 8 Samples).
If you are looking for better performance, use the coarse shading rates (1 Sample per 4 Pixels/16 Pixels), which have no other purpose than that. Both of these can be used in VR and desktop mode.
E.g., all materials are rendered "normally" with the native shading rate (1 Sample), but the carbon material should be rendered with supersampling (4 Samples).
When using foveated rendering at the same time, the material is always rendered with its custom shading rate. For example, the carbon material is rendered with 4 samples on the whole screen, as well as in the periphery of the foveated area.
Off - Disables content adaptive variable rate shading (VRS).
1 Sample - Native pixel shading. Enables variable rate shading for normal pixel shading, but no visual difference to VRS off.
1 Sample per 4 Pixels - Enables variable rate shading for coarse pixel shading with 1 sample per 4 pixel. Shaders with lower shading qualities are evaluated less often. The result of a material evaluation is used for multiple pixels (e.g., 1 Sample per 4 pixels is a coarse shading with 1 sample per 2x2 pixel block).
1 Sample per 16 Pixels - Enables variable rate shading for coarse pixel shading with 1 sample per 4x4 pixel box.
2 Samples - Enables variable rate shading for supersampled pixel shading with 2 samples per pixel. Materials are evaluated up to 2 times per pixel.
Important:This mode requires Realtime-Antialiasing to be enabled with a minimum corresponding multisampling sample amount.
4 Samples - Enables variable rate shading for supersampled pixel shading with 4 samples per pixel. Materials with higher shading qualities are evaluated up to 4 times per pixel.
Important:This mode requires Realtime-Antialiasing to be enabled with a minimum corresponding multisampling sample amount.
8 Samples - Enables variable rate shading for supersampled pixel shading with 8 samples per pixel. Materials with higher shading qualities are evaluated up to 8 times per pixel.
Important:This mode requires Realtime-Antialiasing to be enabled with a minimum corresponding multisampling sample amount.