The example database is a transportable database, named ICMLive_Examples.icmt. This database is part of the tutorial data which you can download; it is NOT installed with the main application
Opening the transportable database
To open the transportable database:
- Start InfoWorks ICM. For more information see Getting Started.
- From the File menu, choose Open | Open transportable database..
- Browse for the transportable database. This should be located in the ICMLive folder after the tutorial files have been downloaded and unzipped. Select the file (ICMlive_Examples.icmt) and click Open.
- An Explorer window opens with the contents of the transportable database.
- The tutorial data is in the Model group. Click on the
 button adjacent to the Model group database item to expand its content:
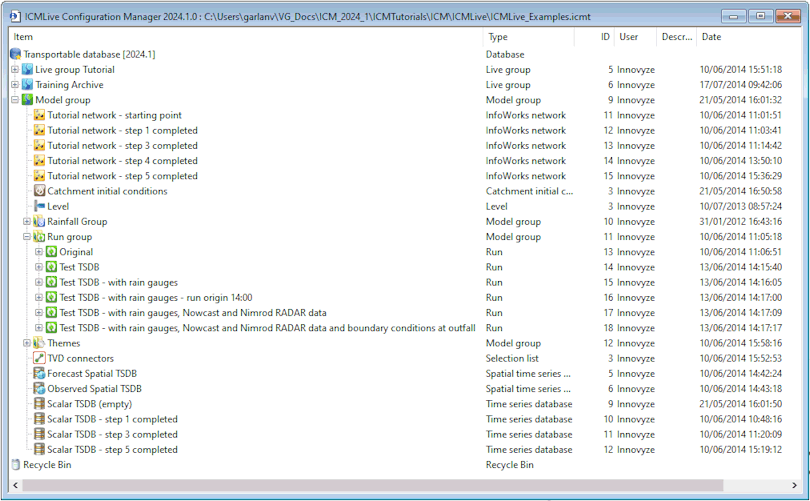
Each network ( ) is a copy of the example data as it should appear at the start of each stage of a tutorial. For example, the
Tutorial network- step 3 completed network contains the network as it is expected to be at the start of
step 4 of the 1D Urban Network Tutorial.
) is a copy of the example data as it should appear at the start of each stage of a tutorial. For example, the
Tutorial network- step 3 completed network contains the network as it is expected to be at the start of
step 4 of the 1D Urban Network Tutorial.
If the network for a particular step is missing (e.g. Tutorial network- step 2 completed network is missing from the transportable database), it is because no changes were made to the network during that step, therefore a previous network can be used to continue the tutorial (in this case, the Tutorial network- step 1 completed network can be used to go through step 4 of the 1D Urban Network Tutorial).
The transportable database also contains the following database objects:
- The
Catchment initial conditions (
 ) Catchment initial conditions object created at
step 1.
) Catchment initial conditions object created at
step 1.
- The
Level (
 ) hydrograph provided by
Innovyze.
) hydrograph provided by
Innovyze.
- The
rainfall Rainfall Event (
 ) inside the
Rainfall Group provided by
Innovyze.
) inside the
Rainfall Group provided by
Innovyze.
- The
Run Group containing the following runs (
 ) :
) :
- The Original Run, with the rainfall simulation which is provided by Innovyze and uses the Tutorial network - starting point Network, the rainfall Rainfall Event and the Level hydrograph.
- The Test TSDB Run, with the Live Data simulation which are created at step 2.
- The Test TSDB - with raingauges Run, with the Live data simulation which are created at step 3.
- The Test TSDB - with raingauges - run origin 14:00 Run, with the Live data simulation which are created at step 3.
- The Test TSDB - with raingauges , Nowcast and Nimrod RADAR data Run, with the Live data simulation which are created at step 4.
- The Test TSDB - with raingauges , Nowcast and Nimrod RADAR data and boundary conditions at outfall Run, with the Live data simulation which are created at step 5.
- The Themes group with the Alerts Tutorial theme. Both are created at step 6a.
- The
TVD Connectors (
 ) Selection List created at
step 6.
) Selection List created at
step 6.
- The
Forecast Spatial TSDB (
 ) Spatial Time Series Database created at
step 4.
) Spatial Time Series Database created at
step 4.
- The
Observed Spatial TSDB () Spatial Time Series Database created at
step 4.
- The following Time Series Database objects:
- The
Scalar TSDB (empty) (
 ) Time Series Database created at
step 1.
) Time Series Database created at
step 1.
- The
Scalar TSDB -step 1 completed () Time Series Database.
- The
Scalar TSDB -step 3 completed () Time Series Database.
- The
Scalar TSDB -step 5 completed () Time Series Database.
- The
Scalar TSDB (empty) (
- The
Live group Tutorial (
 ) Live Group containing the following data:
- The
Training Archive () Live Group created at
step 7.
 ) Alert Definition List created at
 ) Manifest created at
 ) Manifest Deployment created at
You can work with your own version of this database all the way through the tutorials. Alternatively, you can start with the prepared database for any stage.
Working with the prepared data for a particular stage
To work with the prepared data for a particular stage:
- Ensure you have created and / or opened a database.
- Open the transportable database as described here. It opens in an Explorer window.
- Click on the
button to the left of the Model group icon. The Tutorial data appears. If required, click on the
button to the left of the Run Group icon to reveal the individual runs and simulations.
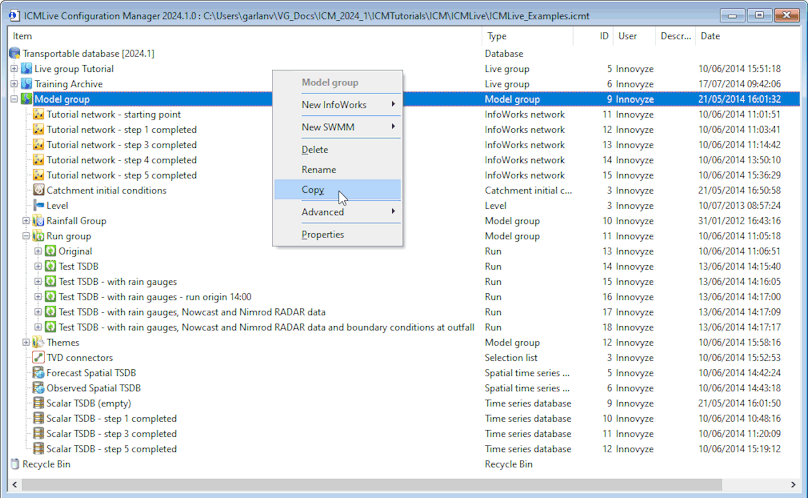
- Right-click on the top level of data you want to copy. For example, you can choose a whole model group (Model group group in our case) or any item in a model group (such as a network, a hydrograph or a simulation). Select Copy from the popup menu.
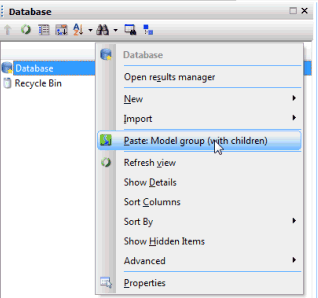
- In the Explorer view for the database to be copied to (your database), right-click on the item that is to contain the copied data and select Paste: nameofitem (with children) from the popup menu.
- If some of the items you are trying to copy are in the destination database, the
Copying of Duplicate Items dialog is displayed.
- Click OK to continue to paste the objects. Items that already exist in the database will be duplicated there and they are identifiable by the exclamation mark (!) that has been appended to the end of their name.
- Click Cancel to abort the paste operation altogether.
- If you are copying simulation results, the
Copying of Simulation Results, Ground Models and Time Series Data dialog is displayed.
- Make sure the Copy Simulation Results box is ticked.
- Select the Yes - all data option in the 'Copy time series data' box.
- Click Continue.
- InfoWorks ICM will copy all items of data at or below the selected level.
You can use the copied data in your database.