
Multi-layer highlights consist of two layers, each of them anisotropic. The highlights are transparent to each other. Where they overlap, the Multi-Layer shader blends their colors.
-

 Material Editor > Standard material > Basic Parameters Rollout (Standard Material) for the Multi-Layer Shader > First Specular Layer and Second Specular Layer groups
Procedures
To increase or decrease the size of a highlight (specular) layer:
- Change the Glossiness value.
The width of the Highlight curves and the highlights in the preview change. At 0% glossiness, the curves are at their maximum width. At 100% glossiness, both curves are extremely narrow.
To increase or decrease the strength of a highlight (specular) layer:
- Change the value of Specular Level.
The intensity of the Highlight curves and the highlights in the preview change. At 0% specular level, there is no highlight. At 100% specular level, the curves are at their maximum height with no overloading. At values greater than 100%, the curves are overloaded: They grow wider, and a wider area is at the maximum highlight intensity.
The shape of the Highlight curves affects the blending between the specular and diffuse color regions of the material. The steeper the curve, the less blending there is and the sharper the edge of the specular highlight.
To adjust the shape (anisotropy) of a highlight (specular) layer:
- Change the value of Anisotropy.
The width of the white highlight curve and the highlights in the preview change. At 0% anisotropy, both highlight curves are the same and the highlight is circular, as in Blinn and Phong shading. At 100% anisotropy, the white highlight curve and the highlights are extremely narrow.
To adjust the orientation of a highlight (specular) layer:
- Change the value of Orientation.
Highlights in the preview show the change in orientation. The display of the highlight curve does not change.
Interface
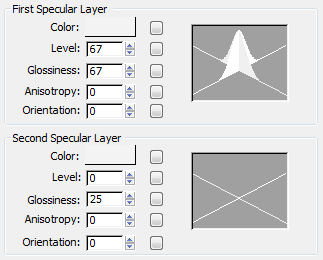
The First Specular Layer and Second Specular Layer groups have identical controls, which can have different settings.
- Color
-
Controls the specular color of this highlight. The specular color is the color of the highlight on a shiny surface.
Click the map button to assign a Specular Color map. This button is a shortcut: You can also assign a Specular Color map on the Maps rollout.
- Level
-
Affects the intensity of this specular highlight. As you increase the value, the highlight grows brighter. Default: First layer=5, Second layer=0.
Click the map button to assign a Specular Level map. This button is a shortcut: You can also assign a Specular Level map on the Maps rollout.
- Glossiness
-
Affects the size of this specular highlight. As you increase the value, the highlight gets smaller and the material appears shinier. Default: First layer= 10, Second layer=25.
Click the map button to assign a Glossiness map. This button is a shortcut: You can also assign a Glossiness map on the Maps rollout.
- Anisotropy
-
Controls the anisotropy, or shape, of this highlight. At 0, the highlight is round. At 100, the highlight is extremely narrow. One axis of the Highlight graph changes to show changes in this parameter. Default=0.
Click the button to assign an Anisotropy map. This button is a shortcut: You can also assign an Anisotropy map on the Maps rollout.
- Orientation
-
Changes the orientation of this highlight. The sample slot shows changes in orientation. This is a value in degrees that can range from 0 to 9,999. Default=0.
Click the map button to assign an Orientation map. This button is a shortcut: You can also assign an Orientation map on the Maps rollout.
- Highlight graph
-
These two intersecting curves show the effect of adjusting the values of Level, Glossiness, and Anisotropy. As you decrease Glossiness, the curves grow wider; as you increase Specular Level, the curves grow taller. As you adjust Anisotropy, the white curve changes to show how wide or narrow the highlight is.