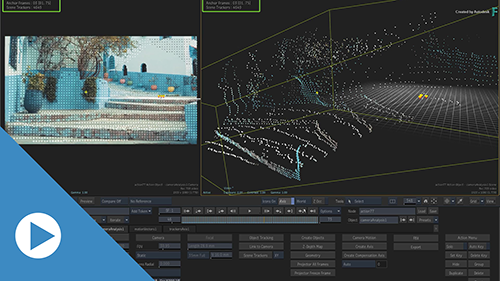
Refining the Tracking Points and the Point Cloud
Camera Analysis: Refinement & Validation Tutorial—Credit: www.pexels.com | Taryn Elliott
Refining the Tracking Points
After a analysing a shot with Camera Analysis, you might find that not all the tracking points are solidly anchored to the image and slip or drift during playback. Because you want to use stable tracking points, you can remove those low-quality tracking points from the analysis with the Refine command.
To refine a Camera Analysis:
Verify that the tracking points are not slipping.
If you don't see any tracking point slipping, you don't have to Refine the analysis.
Remove low-quality tracking points from the analysis.
Manually remove slipping tracking points from the analysis.
Click Refine
 Refine.
To see of tracking points are slipping:
Set the Viewports to the 2-Up view (Alt+2).
In the Schematic view, select the Camera Analysis node.
With the cursor in the other viewport, press F8.
Press F8 until you see the Camera view.
This displays the point cloud generated by the analysis.
Scrub the timebar. While scrubbing, look at the Camera view and search for slipping tracking points.
Not all tracking points are created equal. Some are of higher quality than others, and this quality is determined by the Camera Analysis node when it processes the shot. You exclude lower quality tracking points (also known as low confidence tracking points) with the Threshold field. Low quality tracking points are more likely to slip.
To remove low-quality tracking points from the analysis:
Display the Camera Analysis Camera view.
Remove low confidence tracking points with Refine
 Threshold.
Notice how tracking points turn black in the Camera view as you lower Threshold. The lower the threshold, the higher the quality of the tracking points that remain.
Note: You cannot use Refine Enable to restore points disabled with Threshold. To restore these points, you must raise Threshold until the points you need are available again.
If you notice that some points are slipping, select them to be removed from the analysis.
To manually remove points from the analysis:
Display the Camera Analysis Camera view.
Select the points to exclude:
- Click a single tracking point.
- Ctrl+click to select multiple points.
- Ctrl+drag to select points over an area.
Click Refine
 Disable.
Disabled Tracking Points turn black.
If you disabled the wrong tracking points: select the disabled points and click Refine
 Enable.
Refining the Point Cloud
Defining the Ground Plane
In a typical 3D track, the camera is horizontal in 3D space and the ground of the shot rotated towards the camera. And while this in fine when you look at the scene through the 3D camera, it can make compositing harder.
To make it easier to place objects in 3D space, you can define have the camera match the angle of the short.
To define the ground of a shot:
Set the Viewports to the 2-Up view (Alt+2).
In the Schematic view, select the Camera Analysis node.
With the cursor in the other viewport, press F8.
Press F8 until you see the Camera view.
This displays the point cloud generated by the analysis.
Select the tracking points that define, for you, the ground plane of the shot.
Click Refine
 Set Ground.
The point cloud orientates itself so the selection becomes horizontal, and the camera is adjusted to match.
You can always reposition and rotate the shot with Refine  Position and Refine
  Position.
Finally, you can also scale the size the scene if it's too small or too large.
Defining the Centre of the 3D Scene
You center your scene in 3D space at the origin coordinates (0,0,0). This is especially useful if you plan on importing assets into you scene, as objects imported is Action are usually placed at the 0,0,0 coordinates.
Centering the tracked shot at the centre of the scene should make it easier to find imported assets.
To centre the 3D scene at 0,0,0:
- Select the Camera Analysis node.
- Using F8 in a viewport, display either Camera Analysis Camera view or the Camera Analysis Scene view.
- Select a point in the point cloud.
- Click Refine
 Set Origin.
Validating the Point Cloud and 3D Track
To make it easier to see the behaviour of tracking points, use Test Objects.
To use test objects:
Select the Camera Analysis node.
Using F8 in a viewport, display either Camera Analysis Camera view or the Camera Analysis Scene view.
Select on or more points in the point cloud.
Click Display
 Test Objects.
The selected points now display a test object. This makes it easier to spot drift as you scrub the timebar.

