
The Object Properties Window (OPW) is a modeless window providing a way of displaying an object Property Sheet, i.e. all the data / properties for a single network object in a more structured way. By default, the data is divided up into entirely customisable groups showing data of similar type. Some data is common to more than one type of object.
Accessing the Object Properties Window
The OPW can be accessed from the GeoPlan Window, the Network Object Grid Windows, the Long Section Window or the 3D Manhole Window .
See Access Property Sheets in the Property Sheets topic for more information.
There are two additional ways of accessing the OPW (which are not described in the Property Sheets topic) :
- Select Object properties window from the Window menu.
- Click
 in the
Docking Windows toolbar.
in the
Docking Windows toolbar.
Using Flags & the Calendar Editor
See the Using Flags and the Using the Calendar Editor sections of the Property Sheets topic.
Customising the Object Properties Window
It is possible to customise the OPW using the
Configuration ( ) menu located on its toolbar. This menu has two options:
- Layout - which allows you to customise the properties layout for a particular object type displayed in the property editor. You can customise the grouping of properties, and even create new groups of object properties.
Note: It is not possible to add a new property item. The properties are system properties and cannot be edited.
When you view an object's properties, for example by selecting the object on the GeoPlan using the Properties (
 ) tool, the properties will be displayed according to the last layout that was used for displaying that type of object.
Layouts may be saved as local layouts or database layouts:
- Local layouts are the layouts of the OPW which have been customised and saved locally to a user's machine. Local layouts include any changes that a user may have made when customising the window layout. When a local layout is saved, it overwrites the previous version of the local layout for that object type. These layouts are only available to the user who saved them on that particular machine. However, it is possible to share local layouts between users as you can export the layout for a particular object or result, or for all objects or results in the current network to an XML file, which can then be imported by another user. See the section, Importing and exporting layouts to XML files, for details
- Database layouts consist of the OPW layouts, including any that have been customised, which are stored as a property of the database, allowing other users to access them. There can be more than one database layout for the same type of object. Database layouts are managed using the Manage Layout dialog.
- Options - which displays the Object Properties Window Settings dialog that allows you to customise the look and feel of the OPW. You can show or hide flags, have the properties shown in groups or not. You can also specify settings for copying objects.
See the section Customising the layout for information about customising layouts.
Customising the layout
The layout of the OPW can be modified using any of the following toolbar options:
- Configuration Menu
 LayoutEdit. Displays the layout for the current object type in the OPW, ready for editing.
- Configuration MenuLayoutOpen. This option involves an additional step to the previous option, which allows you to select the object type of your choice (therefore, you do not necessarily have to choose the same object type as the object whose properties are currently being shown in the OPW). Once this selection is made in the
Open Layout Table dialog, the corresponding layout is displayed in the OPW.
- Configuration MenuLayoutManage layouts. This option displays the
Manage Layout dialog which enables you to load an existing database layout, save a new layout or changes to an existing layout, or delete a layout. See the Managing Layouts section for further information about using this dialog.
Using any of the above options, fields (properties) and groups can be moved. Groups can also be added, renamed or deleted, and fields can be hidden. Hidden fields will not appear in InfoAsset Online.
If in Properties view (i.e. when viewing the properties of a real object, as opposed to viewing the layout for a particular object type, which represents the Layout view) you are still able to manipulate and save the layout. However, editing is restricted and groups CANNOT be added, moved or deleted.
To customise the layout:
- Make any desired edits in the OPW.
- Select the:
- Configuration MenuLayoutSave locally option to save a local copy of the layout. Note that when you save a local layout it overwrites the previous version of the layout for that object type.
- Configuration MenuLayoutManage layouts option to save the layout to the database. See the Save a layout section for further information.
- Configuration Menu
Managing layouts
Customised OPW layouts for all objects in a network can be saved, using the Manage Layout dialog, as a database layout, allowing other users to access them. Saving to the database may be undertaken by any user, or only by a Database Owner, depending on whether permissions have been implemented for the database.
The Manage Layout dialog allows you to:
Load a layout
To load an existing layout:
- Select the LayoutManage layouts option from the Configuration menu.
The Manage Layout dialog is displayed. In this dialog:
- Select the name of the database layout you want to load from the Layout list box.
A Factory default and a Factory default InfoAsset Online database layout are available for selection in the Layout list box. This layout consists of unmodified layouts or factory settings for all objects in the database.Note: Loading a Factory default or a Factory default InfoAsset Online will reset all local layouts back to their factory settings. Saved database layouts are not reset. Note that the Factory default InfoAsset Online layout is only available in InfoAsset Online.Tip: If you want to load a factory default layout for a particular object type, cancel this operation, and use the LayoutReset option instead. See the Resetting Layouts section below.
- Click Load.
If you have chosen to load the factory default layouts, a message similar to the following one is displayed:
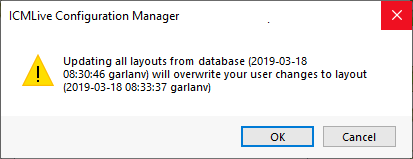
Click OK to load the factory default layouts or Cancel to cancel the load operation.
If you have chosen to load a database layout, the dialog closes, and the property sheet for the object, whose properties you are currently viewing, will be displayed in the OPW according to the selected layout.
Note: Although you may have loaded a database layout, it is treated as a local layout until any changes you make to it are saved to the database.
Save a layout
New layouts or changes to existing database layouts can be saved to a database as follows:
- Customise the Object Property Window layouts as required.
Tip: An Object Property Window can be displayed by selecting:
- One of the options described in the Accessing Property Sheets section of the Property Sheets topic.
- The LayoutEdit option from the Configuration menu.
- The LayoutOpen option from the Configuration menu, and then selecting the appropriate object from the
Open Layout Table dialog.
- The LayoutManage layouts option from the Configuration menu, and then selecting an existing layout to load from the
Manage Layout dialog.
- Select the LayoutManage layouts option from the Configuration menu.
The Manage Layout dialog is displayed. In this dialog:
- Either:
- Type in the name for a new database layout in the Selected layout box.
Or:
- Select the name of the layout you want to save the changes to from the Layout list, and its name will be displayed in the Selected layout box.
- Click Save to save the layouts.
A message similar to the one shown below is displayed:
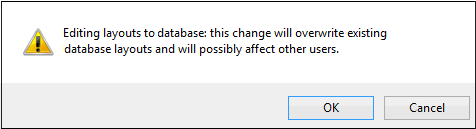
Click OK to save the layouts to the database or Cancel to cancel the operation.
Note: This operation may be permissioned and only made available to Database Owners, and a message similar to the one below will be displayed.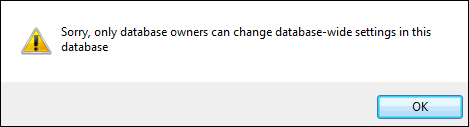
Delete a layout
To delete a database layout
- Select the LayoutManage layouts option from the Configuration menu.
The Manage Layout dialog is displayed. In this dialog:
- Select the name of the layout you want to delete from the Layout list, and its name will be displayed in the Selected layout box.
Note: You cannot delete the Factory default or the Factory default InfoAsset Online layout.
- Click Delete.
The following message is displayed:
Click OK to delete the layout from the database or Cancel to cancel the operation.
Note: The delete operation may be permissioned and only made available to Database Owners. In that case, a message similar to the one below will be displayed.
- Click OK to confirm the deletion and close the dialog.
 to close the window will cancel the delete operation.
Resetting layouts
It is possible to reset the user-defined local property layout for the currently selected object. To do so:
- Select the Configuration MenuLayoutReset Object type (where Object type is the name of the currently selected type of object) from the
Object Properties Window Toolbar, and a message similar to the one shown below is displayed:
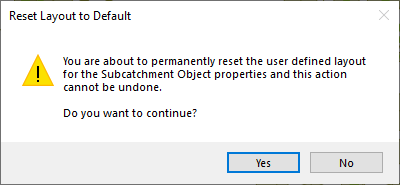
- Select Yes to reset the layout of the object properties to its factory default.
Editing network object or result properties
To select a value, click it once. You can edit it by:
- Overwriting it and typing a new value in the box, or
- Right-clicking and selecting an option from the context menu.
You can also copy/paste values.
For flags, you can select a flag value from the dropdown.
Context menu
| Option | Description |
|---|---|
|
Close |
Closes the OPW for the current object. |
|
Close all |
Closes all instances of the OPW. |
|
Refresh |
Refreshes the current OPW view. |
|
Copy object |
Copies the selected object. This can then be pasted into a text editor and saved as CSV which can then be opened in Microsoft Excel. Copy settings are configurable from the Object Properties Window Settings dialog. |
|
Cut |
Cuts the selected property value. |
|
Copy |
Copies the selected property value. |
|
Paste |
Pastes a previously copied or cut property value. |
|
Delete |
Deletes selected group. |
| Show groups |
Allows to toggle between showing and hiding property groups. If groups are currently being shown, the option has a tick in front of it. Tip: If you have specified for the groups to be hidden, (see
Object Properties Window Settings dialog for more details), this option will not be visible on the context menu.
|
| Show validation errors |
Allows to toggle between showing and hiding validation errors. If validation errors are currently being shown, the option has a tick in front of it. Tip: If you have specified for the validation error column to be hidden, (see
Object Properties Window Settings dialog for more details), this option will not be visible on the context menu.
|
| Open all groups | Opens (expands) all groups, displaying all properties contained in each group, in the OPW. |
| Closes all groups | Closes (collapses) all groups. All properties which comprise each group are no longer visible in the OPW. |
|
Move row up |
Moves selected row up. |
|
Move row down |
Moves selected row down. |
| Hide |
A toggler used to hide or show a specific object property. Only enabled in Layout view (i.e. when viewing the layout for a particular object type). Selecting Hide greys-out the property in the OPW and a check will appear next to the menu option to indicate that the property is hidden. Select the option once more to show the property. When a layout is saved, any hidden properties will not be displayed in the OPW in Properties view and will also be excluded from InfoAsset Online. |
|
Add group |
Only enabled if groups are shown and in Layout view. (i.e. when viewing the layout for a particular object type). Adds a new group. |
|
Delete group |
Only enabled if groups are shown and in Layout view. Deletes a selected group. |
|
Rename group |
Only enabled if groups are shown and in Layout view. Renames a selected group. |
Depending on which item is clicked on, or which view of the OPW is displayed (network object properties or object type layout), some of the options may be disabled.