
Property Sheets provide a way of looking at all the data for a single network object in a structured way.
There are two methods by which property sheets can be viewed in InfoAsset Manager; either in the property editor in the Object Properties Window or in tabbed format.
To switch between the two styles, change the setting of the Use property editor for asset network objects option on the General Page of the Options dialog.
Object Properties Window
The Object Properties Window is a modeless window which displays all of the properties of a network object in a tree view. Properties are grouped in Property Groups that are entirely customisable.
For more details on how to use this window and how to customise it, please refer to the following topics: Using the Object Properties Window, Object Properties Window Toolbar and Navigating Round Associated Objects.
To display property sheets in the Object Properties Window, ensure that the Use property editor for asset network objects option is checked on the General Page of the Options dialog.
Tabbed Property Sheets
To display tabbed property sheets, ensure that the Use property editor for asset network objects option is unchecked on the General Page of the Options dialog.
The data is divided up into pages or tabs showing data of similar type. Some data is common to more than one type of object, so a page may occur on more than one type of Property Sheet.
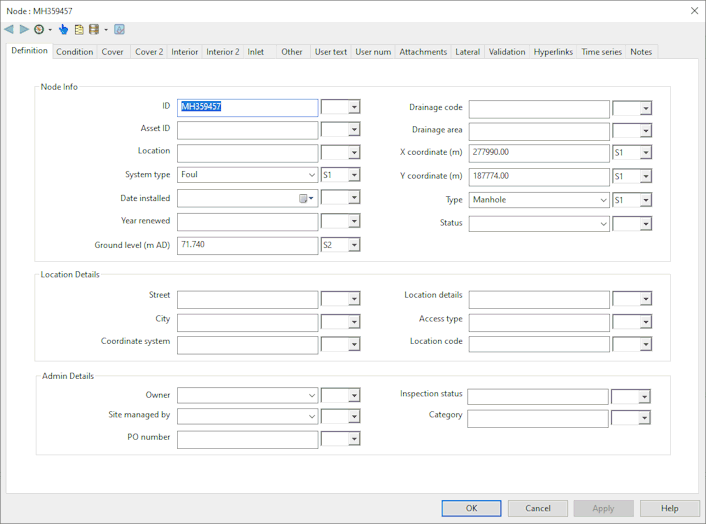
Most tabbed property sheets are modal. Work cannot be carried out elsewhere in the InfoAsset Manager interface until the property sheet is closed. Some property sheets do allow users to move to other parts of the interface and carry out other work. The property sheet remains visible but the title bar turns grey to show it is inactive.
Toolbar

| Toolbar icon | Description of Functionality |
|---|---|
|
Backward / Previous |
Move backwards, to the previous object whose Property Sheet you had opened. |
|
Forward / Next |
Move forward, to the next object (assuming the Backward / Previous button has been previously used to come back to an already displayed Property Sheet). |
|
Navigate |
Show a list of the objects to which the displayed object is connected. You can then click an object in the list and display the properties for that object. Available options are:
|
|
Select and Find |
Use this button to select on the GeoPlan Window the object whose Property Sheet is displayed. InfoAsset Manager will then zoom in or out on the GeoPlan Window, so that:
|
|
Commit History |
Display the Commit History dialog, which shows the history of changes to the object, that have been committed to the database. |

Schedule Tasks |
Displayed when viewing the property sheet for a CCTV Survey. Create new Pipe Repair task objects from selected defects. If no defects are selected, a pipe repair will be created covering the full length of the pipe with which the CCTV Survey is associated. If defects are selected in the Defects page of the property sheet, the Start length and Repair length of the pipe repair will be determined from the locations of the first and last selected defects selected in the property sheet grid. Display the Create Scheduled Tasks Dialog. |

Validate as you type |
Enabled when a validation data is active in the current network. Toggle the Validate as you type feature on and off. When the feature is turned on, validation highlighting in the property sheet takes place as soon as a change is made to a field. When the feature is turned off, validation highlighting does not take place until the user clicks off the edited field. Note: If a validation level is set in the
Default Validation Rules Dialog, this button will be disabled. Validate as you type will be turned on and cannot be switched off.
|


Navigating between pages
To move between pages, click on the appropriate tab at the top of the sheet. Changes are not saved when moving from one page to another.
Buttons
There are four buttons at the bottom of every property sheet:
|
OK |
Save changes and close the property sheet. Disabled if:
|
|
Cancel |
Close the property sheet without saving. All changes will be lost. |
|
Apply |
Save changes but do not close the property sheet Disabled if:
|
|
Help |
Display help on the current page |
Access Property Sheets
To access a property sheet from the GeoPlan Window
- Click
 on the GeoPlan Tools toolbar.
- Click the network object (e.g. node or link) to be edited.
- If there are multiple object displayed at the point clicked, these will be listed. Highlight the appropriate object and click OK.
- The Property Sheet is displayed. Data can be viewed or edited from the property sheet.
tool, this indicates that the layer associated with this object may have been marked as unselectable. Please refer to the
Layers and Themes page of the GeoPlan Properties dialog for details on how to make layers selectable.
The property sheet can also be accessed from the GeoPlan:
- Double-click on a network object on the GeoPlan Window with the Selection tool

- Right-click on a network object on the GeoPlan Window and select the Properties option from the object's context menu
If there are multiple object displayed at the point at which you clicked, these will be listed. Highlight the appropriate object and click OK.
Property sheets can be accessed from the Network Grid Views:
- Double-click on a network object grid row
- Right-click on a network object grid row and select Properties from the context menu
To access a property sheet from the Long Section View:
- On the long section plot (not the labels at the bottom of the view), either:
- on the schematic at the top, click a node or a
pipe to select it and then right-click and go to <Object Type>
 Properties on the context menu.
- on the long section view itself, click close to the vertical line representing the node for node property sheets, and between the lines for the link property sheet.
- on the schematic at the top, click a node or a
pipe to select it and then right-click and go to <Object Type>
- Click
on the GeoPlan Tools toolbar.
- Click the relevant part of the 3D Network Window to display the property sheet for the manhole or any of its pipes.
Using Flags
Many network object data fields can have additional information recorded using a data flag. This information may include:
- data source
- accuracy, reliability or confidence rating
|
Tabbed Property Sheet |
In Object Properties Window |


When editing data on a property sheet, many controls will have an associated flag control immediately to their right. Select the appropriate flag from the dropdown list and both the data and flag controls will be redrawn in the correct colour.
For more details about using flags in your models, see Data Flags.
Using the Calendar Editor
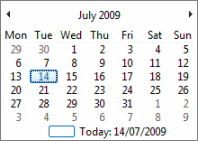
Calendar Editor
When editing a Date field on a Property Sheet, click the calendar ( ) or the arrow (
 ) button to display the Calendar Editor. Select the appropriate date from the calendar.
- Use the arrow buttons on the title bar of the editor to move forwards/backwards by a month.
- Click the month in the title bar of the editor to display a list of months to choose from.
- Click the year in the title bar of the editor to display a list of years to choose from.
Display topic links for network object data fields
For details of the data fields displayed on the network object property sheets, see the data fields topic for the appropriate network object.
Network Assets
Collection Networks
- Node Data Fields
- Connection Node Data Fields
- Storage Area Data Fields
- Outlet Data Fields
- Pipe (Collection) Data Fields
- Connection Pipe Data Fields
- Channel Data Fields
- Data Logger Data Fields (Collection)
- Defence Area Data Fields
- Defence Structure Data Fields
- Flume Data Fields
- General Asset Data Fields (Collection)
- Generator Data Fields (Collection)
- Orifice Data Fields
- Pump Data Fields (Collection)
- Pump Station Data Fields (Collection)
- Screen Data Fields
- Siphon Data Fields
- Sluice Data Fields
- Treatment Works (Collection) Data Fields
- User Defined Ancillary Data Fields
- User Defined Asset Data Fields
- Valve Data Fields (Collection)
- Vortex Data Fields (Collection)
- Weir Data Fields
Distribution Network
- Pipe (Distribution) Data Fields
- Manhole Data Fields
- Borehole Data Fields
- Data Logger Data Fields (Distribution)
- Fitting Data Fields
- Generator Data Fields (Distribution)
- Hydrant Data Fields
- Meter Data Fields
- Pump Data Fields (Distribution)
- Pump Station Data Fields (Distribution)
- Surface Source Data Fields
- Tank Data Fields
- Treatment Works (Distribution) Data Fields
- Valve Data Fields (Distribution)
- General Asset Data Fields (Distribution)
- User Defined Asset Data Fields
Asset Network
Resources
Collection Networks
Distribution Networks
Asset Networks
Repairs
Collection Networks
- Manhole Repair Data Fields (Collection)
- Pipe Repair Data Fields (Collection)
- Pipe Clean Data Fields
- General Maintenance Data Fields (Collection)
- Pump Station Electrical Maintenance Data Fields (Collection)
- Pump Station Mechanical Maintenance Data Fields (Collection)
- User Defined Repair Data Fields
Distribution Networks
- Manhole Repair Data Fields (Distribution)
- Pipe Repair Data Fields (Distribution)
- General Maintenance Data Fields (Distribution)
- Hydrant Maintenance Data Fields
- Meter Maintenance Data Fields
- Pump Station Electrical Maintenance Data Fields (Distribution)
- Pump Station Mechanical Maintenance Data Fields (Distribution)
- Valve Maintenance Data Fields
- Valve Shut Off Data Fields
- User Defined Repair Data Fields
Asset Networks
Surveys
Collection Networks
- CCTV Survey Data Fields
- Cross Section Survey Data Fields
- Manhole Survey Data Fields (Collection)
- Monitoring Survey Data Fields (Collection)
- GPS Survey Data Fields (Collection)
- Dye Test Survey Data Fields
- Drain Test Survey Data Fields
- Smoke Test Survey Data Fields
- Smoke Defect Observation Data Fields
- FOG Inspection Data Fields
- Flood Defence Surveys
- General Survey Data Fields (Collection)
- Pump Station Survey Data Fields (Collection)
- Water Quality Survey Data Fields (Collection)
- User Defined Survey Data Fields
Distribution Networks
- Manhole Survey Data Fields (Distribution)
- Monitoring Survey Data Fields (Distribution)
- GPS Survey Data Fields (Distribution)
- Pipe Sample Data Fields
- Meter Test Data Fields
- Hydrant Test Data Fields
- Leak Detection Survey Data Fields
- General Survey Data Fields (Distribution)
- Pump Station Survey Data Fields (Distribution)
- Water Quality Survey Data Fields (Distribution)
- User Defined Survey Data Fields
Asset Networks
Resourcing Objects
Collection Networks
- Resource Data Fields (Collection)
- Material Data Fields (Collection)
- Approval Level Data Fields (Collection)
- Order Data Fields (Collection)
Distribution Networks
- Resource Data Fields (Distribution)
- Material Data Fields (Distribution)
- Approval Level Data Fields (Distribution)
- Order Data Fields (Distribution)
Asset Networks
- Resource Data Fields (Asset)
- Material Data Fields (Asset)
- Approval Level Data Fields (Asset)
- Order Data Fields (Asset)
Incidents
Collection Networks
- Blockage Incident Data Fields
- Collapse Incident Data Fields
- Customer Complaint Data Fields (Collection)
- Flooding Incident Data Fields
- General Incident Data Fields (Collection)
- Odour Incident Data Fields
- Pollution Incident Data Fields
- User Defined Incident Data Fields
Distribution Networks
- Burst Incident Data Fields
- Customer Complaint Data Fields (Distribution)
- General Incident Data Fields (Distribution)
- Water Quality Incident Data Fields
- User Defined Incident Data Fields
Asset Networks
Zone Objects
Collection Networks
- Zone Data Fields (Collection)
- Property Data Fields (Collection)
- Work Package Data Fields (Collection)
- General Line Data Fields (Collection)
- User Defined Zone Data Fields
Distribution Networks
- Zone Data Fields (Distribution)
- Property Data Fields (Distribution)
- Work Package Data Fields (Distribution)
- General Line Data Fields (Distribution)
- User Defined Zone Data Fields