
To open the
Adjust Color window, select
 Adjust Color in the
Paint Layers window (hotkey: Ctrl + m).
Adjust Color in the
Paint Layers window (hotkey: Ctrl + m).
The Adjust Color window lets you perform color correction on paint layers.
Presets
Lets you select, create, or edit a color adjustment preset. See also Create color adjustment presets.
Select any of the following options. Selecting an existing preset loads the preset values in the Adjust Color window.
- Most Recent Adjustment
-
Lets you reload any curve adjustment made when you last accessed the Adjust Color window, even if you did not save the changes as a preset. (For example, if you adjusted the curve then clicked OK to close the window without saving, you can select this option to retrieve that unsaved curve.)
- Reset All
-
Resets values in the Adjust Color window back to their original values, letting you experiment with various presets and settings, then easily revert to the original colors as necessary.
- Inverse
-
Inverts the RGB channel curve of the selected paint layer.
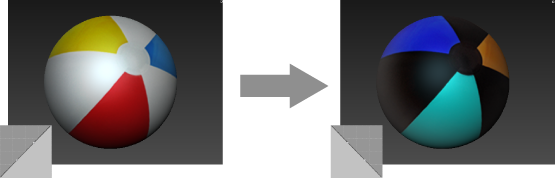
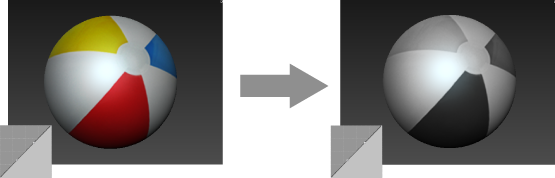
- Black and White
-
Retains the same curve but sets the Greyscale option to Use Luminance, replacing all color with grayscale values.
- Threshold
-
Converts all pixels to either maximum or minimum values. Any pixel below half-brightness turns black, and all other pixels turn white.
- More Contrast
-

- Less Contrast
-

- Warmer
- Cooler
- Darker Highlights
- Lighter Shadows
- Flatter
-
Darker Highlights, Lighter Shadows, and Flatter presets can all be used to help reduce the effect of lighting information baked into a photograph.
For example, if you're using a photograph of a face as a stencil and rubbing the diffuse texture onto a mesh head, you can apply these presets to remove as much of the shadows and specular highlights in the photograph as possible, so as not to interfere with the real shadows and highlights created by the renderer.
You can experiment with removing the shadows and highlights using these presets as a starting point, then customize other Adjust Color settings.
- Gamma 2.2
-
Applies a gamma correction of 2.2.
- Gamma 0.4545
-
Applies an inverse gamma correction (1/2.2).

- New/Edit
- Opens the Edit Adjust Colors Presets window, which lets you create a new preset or select and edit an existing preset.
HSV
Adjust Hue, Saturation, and Value settings for the selected paint layer.
Curves
- Channel
- Select the channel whose curve you want to edit. Select from RGB, Red, Green, Blue, Hue, or Saturation channels, then adjust the corresponding curve.
- Reset Channel
- Reverts any changes you've made to the curve for the selected channel, and resets the curve to a default straight line.
- Greyscale
-
Lets you quickly convert color images to black and white, for example if you want to use the image as a bump map or as a multiplier for another image. Select from the following options:
- Off (leave as color)
- (Default) Displays final color adjustments in full color.
- Use luminance
- Converts the final result of your color adjustments to display luminance as grayscale values, replacing color in all (R, G, and B) channels.
- Isolate Red
-
Copies the content of the red channel into all of the R, G, and B channels, and discards the original G and B channel information.
- Isolate Green
-
Copies the content of the green channel into all of the R, G, and B channels, and discards the original R and B channel information.
- Isolate Blue
-
Copies the content of the blue channel into all of the R, G, and B channels, and discards the original R and G channel information.
- Curve image
-
Lets you add, delete, and move points to change the shape of the curve for the selected channel. See Adjust tool falloff for details on working with the curve image.
- Preview
- When on, you can preview the effect of changes you make in the Adjust Color window on the paint in your scene, as you edit. (Changes are not applied until you click OK.)