- Add New Subdivision Level
-
Increases the resolution of the model by subdividing each polygonal face into four smaller faces. As a result, the number of faces quadruples each time you subdivide. See Mesh resolution and subdivision levels and Add a subdivision level.
To set subdivision options before subdividing, select Add New Subdivision Level Options (below) instead.
- Add New Subdivision Level Options
-
Opens the Subdivision Options.
- Step Level Up
-
Displays the next higher subdivision level, if one currently exists.
- Step Level Down
-
Displays the next lower subdivision level, if one currently exists.
- Delete Highest Level
-
Removes the highest subdivision level from the active model.
- Rebuild Subdivision Levels
-
For use on imported, high resolution meshes that were Catmull-Clark subdivided in other applications. Recreates lower subdivision levels for the active mesh. See also Rebuild subdivision levels for an imported mesh.
Note: This option works only on surfaces that have not yet been subdivided in Mudbox. If you import a high-res mesh, you must recreate the lower subdivision levels before you subdivide further in Mudbox. - Combine Meshes
-
Use this command to merge unique meshes into a single object.
Once meshes are combined, the resulting mesh assumes the name of the first mesh selected. (For example, if you select Car, followed by Wheels, and combine those meshes, the new object's name becomes Car.) The newly combined mesh also uses the pivot position of the first selected mesh.
See Combine multiple meshes into one object for information on how to blend multiple meshes into one object.
- Separate Selection
-
Use this command to split a mesh into multiple polygon objects.
Depending on what you select, Separate Selection slices the selected object(s)'s isolated geometric shell(s) into multiple objects, or splits faces from an object.
Once a mesh is split, each new mesh is named for original compound object plus an increment. (For example, if you separate a mesh called Car, the results of the split become Car, Car1, Car2, and so on. New meshes created from operation are created at level zero and have no sculpt layers.
See Separate meshes into multiple objects for information on how to partition a mesh into multiple objects.
- Generate Tessellation Mesh
-
Use this setting to creates a triangulated copy of your mesh for purposes of tessellation, which subdivides the mesh for sculpting in greater detail.
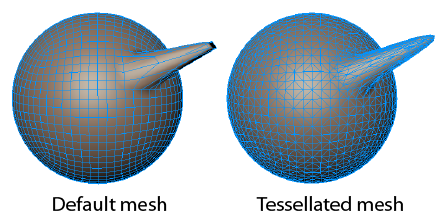
Because a tessellated mesh copy can't have any sculpt layers, subdivision levels, non-manifold edges, or PTEX setup, it is a good idea to use this technique early in your workflow (that is, before texturing).
Note: When you try to sculpt a mesh that unsuitable for tessellating with any sculpting tool that has the Tesselation option active in any of the Sculpting Tool properties, Mudbox automatically offers to convert it.See Dynamic Tessellation in the Sculpting Overview section for an explanation.See Increase mesh resolution for added detail for dedicated tools to let you increase or decrease mesh resolution on the fly.
- Reduce Mesh
-
Opens the Reduce Mesh options, letting you specify how you want to reduce the size of the active or selected meshes. See also Reduce a mesh.
- Retopologize
-
Select New Operation to start a new retopology operation, or select a previously saved operation. See also Retopologize a mesh.
- Create Mesh From Curves
-
Opens the Create Mesh From Curves window, letting you set the options you want as you create a new mesh based on 3D curves. See also Create a mesh from curves.
- Duplicate Selected Faces
-
Copies selected faces to create a new mesh. See Duplicate faces as new mesh.
When creating the new mesh, Mudbox bakes any sculpt layers at the current subdivision level from the source mesh, so the resulting mesh retains the resolution and surface features of the selected faces, but it has no subdivision levels or sculpt layers. Any paint layers or per-vertex information from the selected faces are copied to the new mesh.
In the Object List, the resulting mesh is named after the original mesh, plus the suffix '_extracted'.
- Flip Mesh
-
Flips the entire mesh around the specified axis, including all subdivision levels and any sculpt layers.
Select from the following sub-options depending on how you want the flipped mesh to be positioned:
- Around X
- Around Y
- Around Z
- Around Local X
- Around Local Y
- Around Local Z
- From Y-Up to Z-Up
- From Z-Up to Y-Up
Flipping the mesh from Z-Up to Y-Up or Y-Up to Z-Up makes it easier to work with meshes authored in other applications that use a default scene orientation different from Mudbox. For example, you can import a model, flip it to Y-Up while you work with it in Mudbox, then flip it back to Z-Up when ready to export.
Note: Mudbox also flips the mesh UVs, so any text or logos on a painted texture will appear mirrored in the flipped mesh.See also Flip a model.
- Make Symmetrical
-
Opens the Make Symmetrical options, which let you convert an existing mesh to a new topologically symmetrical mesh by copying, mirroring, and merging opposing sides of the mesh (across any or all three axes). See also Apply symmetry to an existing mesh.
- Patch
-
Fills a hole inside selected borders or removes parts of a mesh. See Patch holes in a mesh.
The Patch tool reacts to your selection. The following selections result in the associated behavior:
- A fully enclosed loop of border edges or faces: the hole in the loop is closed.
- Interior faces with no border edges: the selected faces are deleted and patched with triangle faces.
On a triangulated mesh with no border edges or faces, the selected faces are deleted and patched.
- Border edges or faces that do not form a fully-closed loop: nothing is done.
- Multiple distinct groups of interior faces (for example, the four legs of a cow): Mudbox moves through each selection, deleting the selected faces and filling the holes with patches of triangle faces.
- Tighten Selection
-
Pulls selected faces tight on the surface, like a drum. This operation makes the selected region as flat as possible between border edges and ignores the surrounding faces.
Use Tighten Selection with Patch (see Patch holes in a mesh), or as a sculpting tool. See also Smooth selected regions of a mesh.
- Fair Selection
-
Smooths the transition between selected faces and the surrounding faces, blending the selected region with the surrounding area.
Fair Selection is designed for use with Mesh > Patch. See Patch holes in a mesh and Smooth selected regions of a mesh.
- Transfer Details
-
Transfers high frequency sculpting detail, joint weighting, and sculpt layers from a high resolution mesh (the source) to a mesh with different topology (the target). See Transfer sculpt detail.