
With the Mask map, you can view one material through another on the surface. The mask controls where a second map is applied to the surface.
-

 Material Editor > Material/Map Browser > Maps > General > Mask
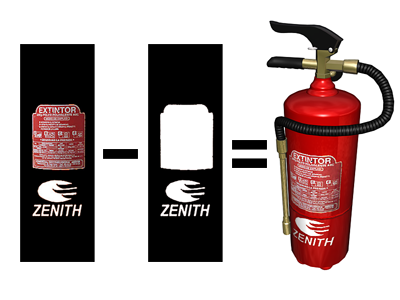
Mask map applies labels to the fire extinguisher.
By default, lighter (whiter) areas of the mask show the applied map, while darker (blacker) areas of the mask show the underlying material color. You can use Invert Mask to reverse the mask's effect.
Procedure
Example: To use the Mask map:
- In the Material Editor, create a
Standard material and apply it to an object in the scene. Set the material to
display in the viewport.
Tip: To see the full masking effect in the viewport, be sure to use Show Realistic/Hardware Map In Viewport, depending on whether you're using the Nitrous display driver or a legacy driver. Otherwise you'll need to render to see the effect.
- Set the Diffuse color of the Standard material to something distinctive, such as red.
- Apply a Mask map to the Diffuse map input in the Standard material.
- Apply a Checker map to the Mask input of the Mask map. If you like, increase the Tiling U and V values so the checker pattern is smaller.
At this point, if you're using Realistic or Hardware viewport mapping, you can see the color from step 2 instead of the black checks in the Checker map. This shows that the Mask map interprets black as transparent.
To see this if you're using Shaded viewport mapping, render the scene.
- Apply a different map such as a Bitmap to the Map input of the Mask map.
The map appears only where the white squares of the Checker mask are.
- On the Mask Parameters rollout of the Mask map, turn on Invert Mask.
Now the white squares of the Checker map mask are transparent, and the black squares show the other map.
Interface
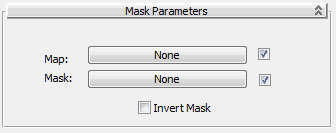
These are the controls for the Mask map:
- Map
-
Selects or creates the map to be viewed through the mask.
- Mask
-
Selects or creates the map to use as a mask.
- Invert Mask
-
Reverses the effect of the mask, so white is transparent and black shows the applied map.