Modeling
Describes changes and improvements to modeling tools.
New History Visualizer
Alias 2021 introduces the History Visualizer, which provides a new way of visualizing the flow of construction history in your Alias files. In the History Visualizer, construction history appears as a node graph with input geometry, tools acting on geometry, and the output of tool operations displaying as a series of connected nodes. In addition to seeing the nodes connections, you can query and edit history by modifying the inputs to a given tool.
You can replace one or more inputs to a tool using the Replace Selected or Replace Multiple options. When replacing inputs, the Alias prompt line assists you in selecting valid input geometry to make the replacement.The History Visualizer also provides visual alerts about any invalid connections or broken construction history.
For more information, see the following:
- Windows > Information > History Visualizer
- Work with construction history using the History Visualizer.
Selection Sets workflow enhancements
You can now create, modify, and select objects and components using selection sets in all versions of Alias. Create selection sets from a pick list with a new Edit > Create menu and then manage and modify them in the Object Lister. Selection a set in the Object Lister picks the set members in the viewport and highlights the objects in the Layer panel of the Object Lister.
You can create new sets, make sets exclusive, add objects to or remove them from a set in the Object Lister. Right-click a selection set in the Object List to access context menus for editing and managing your sets.
We've also added a new Pick Selection Set tool (Pick > Selection Set) to the Pick Tool palette. Use this tool in the viewport to quickly pick all the members of a selection set while modeling.
For more information about selection sets, see the following:
Reference Manager additions
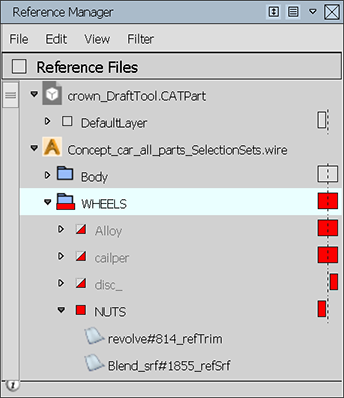
Building on the Reference Manager improvements delivered in the Alias 2020.2 Update, this release continues to add functionality that improves your reference workflows. The additions include:
Hierarchical reference support, which lets you create references from Alias .wire files that contain other references.
Layer hierarchies that contain Layer folders are now supported by the Reference Manager. This means that the layer structure shown below a reference file now matches what is shown in the Object Lister for its source file.
Toggles to turn Symmetry and Symmetry Mirror on and off at the layer level.
References created from .wire files now appear in the Reference Files list with Alias icon.
A Open Source File option, which lets you open the source for referenced files.
See the following:
Universal Transform tool enhancements
We've made several enhancements to the Universal Transform tool (Transform > Transform to make fundamental modeling tasks more efficient and productive. In previous versions of Alias, you could use the Universal Transform tool to modify geometry at the object-level. Alias 2021 extends this capability so that you can now move and rotate geometry components.
We've also added the following improvements to the tool:
- A new Planar Move option lets you restrict the movement of objects and components to the X, Z, or Y planar spaces. Click the new red, blue, or green squares on the manipulator to use Planar Move.
- A new Global mode, which places the manipulator at the central point of the selected objects or at an averaged point between selected components. In this mode, you can lock the manipulator to any location on the object, including object components, then transform the selection from its location and orientation. Select Pivot mode to use the manipulator from the object pivot points as in previous versions of Alias.
For more information, see Transform > Transform.
Subdivision modeling
New SubD Modeling workflow
We have created a new Subd Workflow Preference, which can select when you launch Alias. See What's New General Improvements for details.
Retopologize reference mesh objects with subdivision topology
A new Subdivision Retopology tool lets you retopologize imported meshes and NURBS surfaces by generating new subdivision topology directly on the reference objects. You can also use this tool to shape and add geometry to existing subdivision models using a reference object.
While generating subdivision geometry, you can begin to refine your object using the tool's hotkey options to relax CVs, insert and extend edges, and cut faces.
For more information see the following:
Subdiv Align to Curve tool improvements
You can now use any type of curve for aligning subdivision CVs, including the isoparms of a surface, curves-on-surfaces, or any G1 continuous edge or curve. The addition of Start and End controls and in-canvas manipulator let you specify which sections of the curve to use when aligning the subdivision CV.
We've also provided better control over how subdivision CVs align to curves and surface boundaries. New Projection Type and Distribution Type options let you optimize how the subdivision CVs get spaced during alignment.
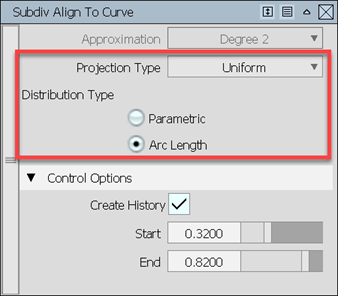
See Subdivision > Align to Curve.
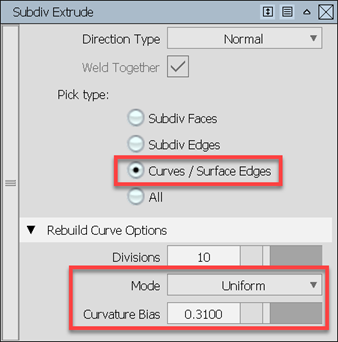
Subdivision Extrude tool additions
Building on the tool enhancements from Alias 2020.2, we've added more options for improving results when extruding multi-degree curves or surface edges. A new Pick Type also lets you select surface edges in addition to multi-degree curves.
New Mode options let you choose to distribute CVs uniformly along the extruded curve, using Uniform mode, or specify the distribution based on the curvature of the source curve using Adaptive mode. With Adaptive mode, you can fine-tune how tightly the extruded geometry fits the form of the source curve by adjusting a new Curve Bias option.
Manipulators have been added to the tool so that you can now drag the manipulators along the curve to interactively select the sections of the curve you want to extrude. This lets you to be more precise about which sections of the curve to extrude.
NURBS modeling improvements
Additions to Proportional Crown
A new Crown Position option has been added to the Proportional Crown controls, which lets you place crowns at different locations. For example, with the Skin tool, Crown Position lets you position the crown shape anywhere between the middle of the skin surface to either edge.
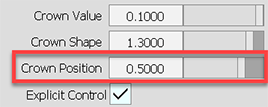
Crown Position is available in the following surface tools:
- Skin (see Surfaces > Skin)
- Surface Fillet (see Surfaces > Multi-Surface Fillet > Surface Fillet)
- Multi Surface Draft (see Surfaces > Multi-Surface Draft)
- Free Form Blend (see Surfaces > Multi-Surface Blend > Freeform Blend).
Surface Fillet updates
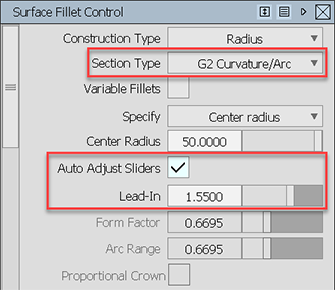
We've added a new G2 Curvature/Arc section type to the Surface Fillet Tool. This new section type lets you create a fillet that has a short curved lead-in and a true arc-shaped section. This differs from the other section types options, such as G2 Curvature, which has a longer lead-in and a single apex curvature point.
A new Lead-In control sets the length of curved lead-in. Turning on the Auto Adjust Sliders option automatically sets the Form Factor and Arc Range values to produce the optimal shape as you adjust the Lead-In value. This lets you quickly arrive at the best fillet shape without constant adjustment of these three settings.
If you turn off Auto Adjust Sliders, be aware that setting Lead-In, Form Factor, and Arc Range values independently can create undesirable section shapes. For best results in this case, use a Curvature locator (Locators > Curvature > Curvature) to ensure the curvature of the fillets meets the desired shape.
See Surfaces > Multi-Surface Fillet > Surface Fillet.
Freeform Blend Tool improvements
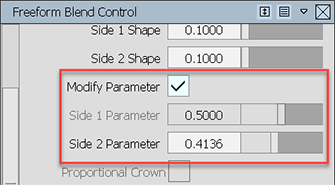
The freeform Blend Tool now lets you modify the parameter at which the blend surface is created on input surfaces. Use the Side 1 Parameter and Side 2 Parameter options in the tool control window to adjust the location of the contact line between the freeform blend and the side 1 or side 2 surface. You can also make these updates interactively using the in-canvas manipulators. Use the Modify Parameter toggle to turn the manipulator control on and off.
Pick Chain Tool
We've renamed the Surface Chain Tool (Pick > Surface Chain) to the Pick Chain Tool and extended its capabilities so that it can now be used to chain-select curves. This includes isoparametric and free curves as well as curves-on-surfaces.
Extend Tool addition
A new option lets you extend the opposite edges of your geometry unequally, such when you need to extend an edge around the pivot of its opposite edge. Use this new extend type to ensure that edges maintain true straightness along the edge after multiple unequal extend operations. Performing a similar operation using the previously available extend types could cause unwanted curvature and deformations.
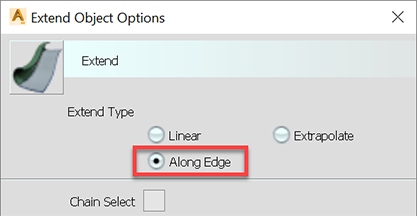
See Object Edit> Extend.
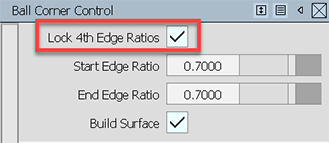
Ball Corner update
We replaced the 4th Edge Ratio parameter with a new Lock 4th Edge Ratio toggle. When this option is checked on, the values of Start Edge Ratio and End Edge Ratio are kept the same.