 Back to
previous stage.
- Ensure that the Adding a 2D zone network and the DTM ground model are both open on the GeoPlan. Alternatively, if you have not completed the previous steps, please use the provided Adding a 2D zone - step 2 completed network as a starting point.
- Ensure the
Job Control window is visible. If not, click on the
Job control window button (
 ) of the
Docking Windows Toolbar. The Job Control Window displays the order and status of scheduled simulations.
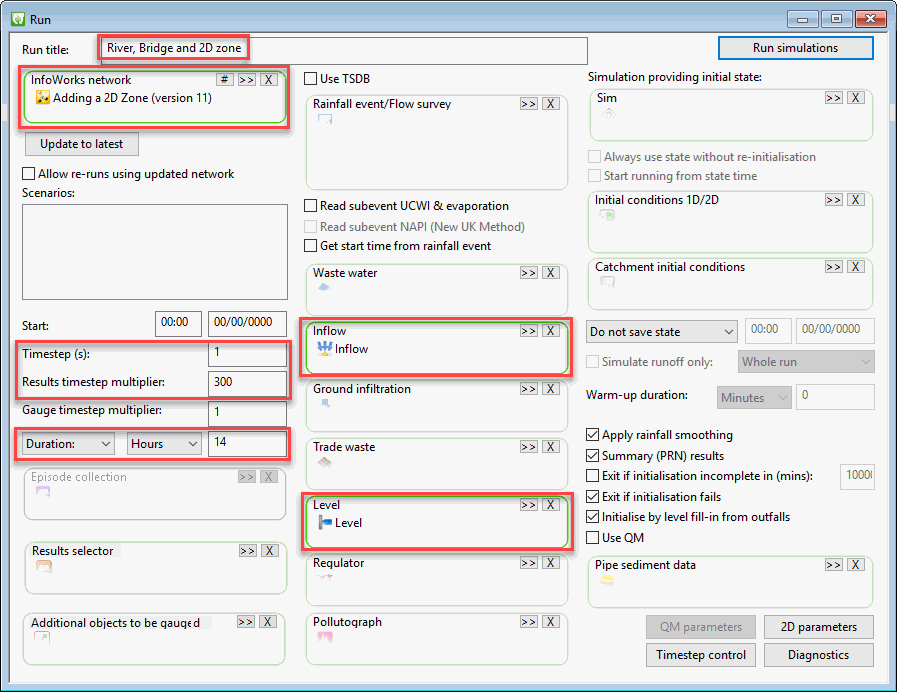
- Create a new run and define the run parameters as shown below:
- In the Explorer window, right click on the Model Group tree item and select New InfoWorks | Run to create a new run. The Schedule Hydraulic Run View dialog is displayed.
- In the
Schedule Hydraulic Run View dialog:
- Enter a name in the Run title (River, Bridge and 2D zone)
- Drag and drop your network (Adding a 2D zone or Adding a 2D zone - step 2 completed) in the InfoWorks Network drop target.
- Drag and drop the
Inflow hydrograph (set up in the
River tutorial) in the
Inflow drop target.
- If you have completed the River tutorial, both the Inflow and Level hydrograph will be available to pick in your database tree view in the Explorer window.
- If not, they can be copied from the provided transportable database. Open the transportable database by selecting File | Open | Open transportable database....
- In the new
Explorer window that gets displayed with the contents of the transportable database, click on the
 button to expand the Model Group.
- Right-click the Inflow hydrograph and select Copy from the popup menu.
- In the Explorer window of your current database, right-click on your Model Group tree item and select Paste: Inflow (with children).
- The Inflow hydrograph is copied in your database.
- Drag and drop the Level hydrograph (set up in the River tutorial) in the Level drop target. Please refer to the bullet point above for instructions on how to copy this hydrograph object from the provided transportable database in case you have not gone through the River tutorial.
- Set the Timestep to 1 second and the Results timestep multiplier to 300. (It is worth noting that 1D-2D models will typically have a lower timestep than 1D-only models.) In this example we are using 1 second, but around 5 seconds is perhaps more common.
- Set the Simulation time as 14 hours.
- Use all other suggested defaults throughout.
- Click Run simulations.
- In the Schedule Job(s) dialog, choose which computer will carry out the simulation (This Computer) and leave the other parameters as they are (store results locally and start the simulation now). Click OK to start.

- Once the simulation has completed (the simulation icon in the Explorer window will turn from blue to green and the Job Control window will show a green row with a status of Succeeded for the simulation) you can look at and analyse the results by dragging and dropping the DWF simulation onto the main window.
Runtimes for the simulation will vary, depending on the computer being used. The model includes a tightly meshed 2D zone, and a large majority of the elements in the 2D zone become wet during the simulation. This type of scenario results in longer runtimes than you would experience with a standard, 1D only, type model of this size. For example, if your computer has an Intel Core2Quad processor, the run will take approximately 5 minutes to complete.
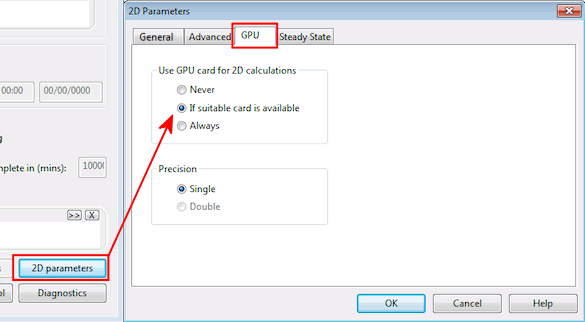
If your PC has one of the supported NVIDIA GPU cards installed, the simulation time can be reduced dramatically by activating the card prior to starting the simulation. This is done from the 2D parameters button on the Schedule Hydraulic Run View dialog.

Select the GPU tab. If you are not sure whether your GPU card is supported, select the If suitable card is available option. If you are sure you have a suitable card, select Always. Note that if you select always, but your card is not actually supported, the run will fail.
The same run, completed on the same computer as detailed above, but with an NVIDIA GeForce GTX 580 GPU card active will complete the whole simulation in less than 2 minutes.
The simulation has created a large number of results, which can now be inspected.
 Back to 2D Zone Tutorial
main page.
