
Controls to modify density map data manually, and how to use them
To edit a density map, select a part, then choose
Home >  Generate Supports.
Then, from the toolbar, choose either of the available density map controls.
-
 Edit density map: Use this to adjust spherical locations within the space occupied by the part and its support
- Projected Density Map Editor: This editor affects a cylindrical volume and adjusts in height as it intersects with the supported surface and the bottom end of the support, be that the platform or another part surface.
- Surface Density Map Editor. Use brush controls to freely specify areas on the part surface that, projected towards the platform, determine where the density map should be changed. For this, the context view provides input controls to specify the size of the brush, the factor to be applied, and the behavior for applying factors multiple times.
Jump to:
- Density map controls
- To move the density map controls
- To modify a density map locally
- To adjust the volume of effect
- To reset a density map locally
- To reset the entire density map
Density map controls
Editing the density map is done by a the control gizmo that can be moved around the build platform.
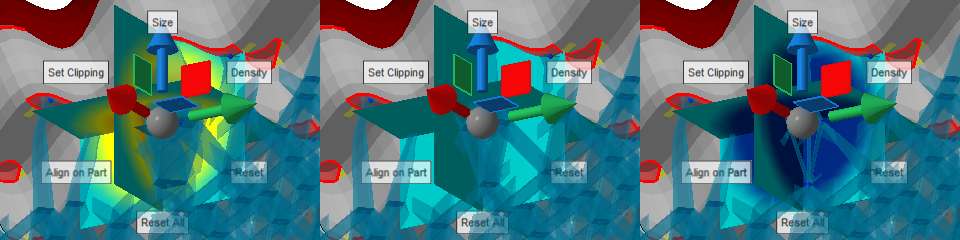
The three panes show a color-coded cross section of the volumetric map at its current location. Teal color represents zero density change, yellow and red an increase, and blue a decrease in density. Shown here is the editor for spherical changes.
|
Size |
Offers a slider to modify the size of the volume affected by any change. |
|
Density |
Provides a slider to modify the local density change information. Releasing the slider applies the change immediately, and any affected supports are recalculated. |
|
Reset |
Resets the local map volume to no change. |
|
Reset All |
Resets the entire map to no change. |
|
Align on Part |
Click this button once, then once somewhere on a part to position the control's center on the part surface at the chosen location. |
|
Set Clipping |
Positions the clipping planes at the density map controls. Note: This only positions the clipping planes but will not switch any visibility or transparency. Use the clipping planes controls to do this as required.
|
To move the density map controls
The control can be moved in multiple ways:
- To move the gizmo along one of the cardinal axes, click and hold to grab one of the directional arrows, then drag the mouse. Release the mouse button once the controls are placed at the desired location.
- To move the control parallel to the display, click and hold to grab the gray center ball, then drag the mouse. Release the mouse button once the controls are placed at the desired location.
- To place the control's center onto a part's surface, click Align on Part, then click on the part at the desired location.
To modify a density map locally
Click and hold Density, then move the mouse to move the appearing size slider. Release the mouse button once the desired density change is reached to apply the modification.
Surface Density Map Editor instead and use the controls provided in the context view.
To adjust the volume of effect
Changes to the density map are applied over the size visualized by the three teal planes. The actual change is a spherical volumetric hotspot in the center of the three planes.
Click and hold Size, then move the mouse to move the appearing size slider. Release the mouse button when the desired size is reached.
Surface Density Map Editor instead and use the controls provided in the context view.
To reset a density map locally
Place the density controls at the location where you want to reset the map, then click Reset.
Surface Density Map Editor.
To reset the entire density map
Click
Reset All to reset the entire density map for the current part to
no change regardless of the control's current location. If you're using the
Surface Density Map Editor, use the button
Reset whole density to default in the context view.