
Import a Parent Child BOM
Specify the parent and child relationships before importing the BOM.
Before proceeding with the import, review Import Validation Rules for Item Revisioning Data.
Set Up the Import Project
- Create a BOM Import Project, OR
- Edit a saved parent-child BOM import project:
- From the navigation menu, select Advanced Tools > Imports.
- In the My Import Projects table, click Edit to configure an import project.
Map BOM Data to Workspace Fields
On the Edit Import page, map and configure your BOM import data.
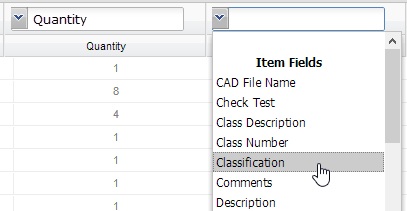
Map the incoming Excel values to the corresponding workspace fields. From the drop-down list above each Excel column, select a workspace field.
 Note: Columns that are not mapped to a workspace field will not be imported.
Locate the column in the Excel sheet that represents the parent level in the BOM. Click the header for the parent column and then select Match as BOM parent to indicate that this column will be used to determine the parent level in the BOM when it is imported.

Locate the column in the Excel sheet that represents the child level in the BOM. From the workspace field drop-down list above the child column, select the BOM field Match as BOM child to indicate that this column will be used to determine the child level in the BOM.

Importing the revision pinning property
You can import the revision pinning property for Hierarchy and Level BOMs. The Pin column indicates which revision is pinned to the parent item. Valid values are:
- True
- Yes
- 1
If a field contains any other value or is blank, the item is treated as not pinned.
Mapping to read-only and filtered picklists fields
Read-only fields
You can import data to read-only fields. These are fields with the Editable value set to False or Creation Only. Data imported to these fields is protected the same way as data in other read-only fields. You are warned that the field cannot be edited after importing, but you can proceed with the import. For help on field types, see Configure Forms and Views.
Filtered Picklist Fields
You can import data to filtered picklist fields. The mapping is validated by verifying that import values as well the combination of multiple values are valid. If not, you can choose to error out or use blanks to complete the import. In addition, when you import some values in a combination that result in a single option for another field in the combination, the import automatically populates the field with the correct value.
Import Classification Properties
You can import classification properties if the selected workspace has classifications enabled and the Excel worksheet includes classification data. One column in the Excel file must contain the system name of the class to which each item belongs. The column must be mapped as the class entry column in the import table. Fusion Manage attempts to map incoming fields to those in Classification Manager.
- Locate the column containing the classification system names. From the drop-down list above the column, select Class. This identifies the column as containing class system names.
- Locate a column containing classification properties. From the drop-down list above the column, select Field.
- The Choose Field dialog lists the system names for the classification fields in the workspace. Select the classification field to which the incoming property will be assigned and then click Select. Repeat this step for each classification property to be imported.
Configure Import Settings
For BOM parent items
Click the Import Settings tab.
If necessary, edit the project name and description.
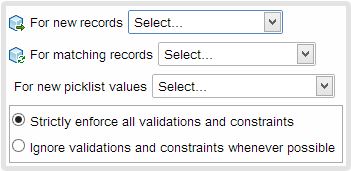
In the For new records drop-down list, indicate how to handle new parent items:
Add to the workspace
Append new records to the workspace
Skip
Do not add new records to the workspace
Error
Do not add new records to the workspace and report an error
In the For matching records drop-down list, indicate how to handle updates to existing parent items:
Add to the workspace
Overwrite the existing records in the workspace
Skip
Do not overwrite the existing records in the workspace
Error
Do not overwrite the existing records and report an error
In the For new picklist values drop-down list, indicate how to handle new picklist values:
Add to the existing picklist
Append new values to the picklist
Use blank instead
Ignore the new value
Error
Do not add new values and report an error
For BOM child items
Click the Import Settings tab.

In the For new BOM relationships drop-down list, indicate how to handle new BOM parent-child relationships:
Add to the workspace
Include new relationships with existing relationships in the workspace
Skip
Do not add any new relationships to the workspace
Error
Do not add any new relationships to the workspace and report an error
In the For existing BOM relationships drop-down list, indicate how to handle updates to existing BOM parent-child relationships:
Add to the workspace
Overwrite existing relationships in the workspace
Skip
Do not overwrite existing relationships in the workspace
Error
Do not overwrite existing relationships in the workspace and report an error
Enforce or ignore validations and constraints
Workspace fields can have validations and constraints associated with them to ensure that the proper data types are entered and that required values are supplied. You can choose whether or not to adhere to the existing requirements.
Strictly enforce all validations and constraints
All field validations and required values must be met
Ignore validations and constraints whenever possible
Field validations and required values that can be ignored will be ignored
Apply Settings and Troubleshoot
- Click Save.
- The import settings are validated and any issues are identified in the Problems tab. Click the tab to view errors and warnings.
- Double-click an error or warning to go to the problem cell.
- Make corrections to the data, mappings, and settings as needed.
- Click Save again to re-validate the settings. Repeat until all problems are resolved.
Save the Project and Import the BOM
At the top of the page, click Save.
A final validation of the import settings is performed. Any issues are identified on the Problems tab.
At the top of the page, click Run.