
Use the Rest page to enable and control rest machining for a toolpath. Rest machining is useful when you want to use a large tool to perform efficient volume removal, then use a smaller tool to machine areas of the model that the large tool could not reach, such as pockets and corners. The smaller tool machines only the areas that could not be reached by the original tool.
Rest machining — Select this option to enable rest machining for the toolpath.
Reference roughing toolpath — Each rest machining toolpath has a Reference roughing toolpath, which is the toolpath using the larger tool.
- Group Name — Select the name of the Reference roughing toolpath.
Only surface groups in the current Face window that have roughing enabled are available for selection. If no such groups exist, rest area machining is disabled.
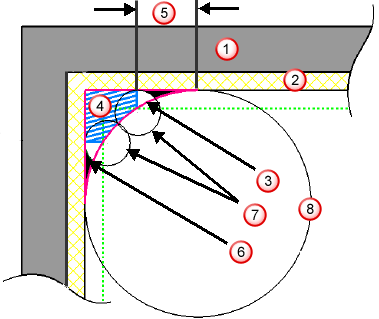
Detect material thicker than — Enter a threshold value. PartMaker ignores rest material that is thinner than the specified threshold. This helps to avoid thin regions being rest machined, where the benefit of a second cut is negligible. These thin regions can be caused by cusps from the previous toolpath.
Expand area by — Enter the distance by which to expand the rest areas, measured along the surface. Use with the Detect material thicker than value to reduce the areas to be machined to the details (for examples, corners), and then to offset these areas slightly to ensure that all the detail (for example, on the corners) is machined.
 Model
Model
 Thickness
 True rest material (outlined in pink)
 Actual rest material detected (blue hatched area)
 Amount you need to expand the area by to include all the rest material
 Undetected material (black area)
 Tool
Tool
 Reference tool
Use the Expand area by option to increase the rest area (the blue hatched area) and eliminate the undetected area (the black area).