
Update Origin Location and Orientation
The orientation and location of the origin of a point cloud can affect navigation and editing in several ways. The User Coordinate System (UCS) is a moveable Cartesian coordinate system that establishes the XY work plane, horizontal and vertical directions, axes of rotation, and other useful geometric references. You can change the UCS origin and orientation for convenience as you specify points by entering coordinates.
Manually Adjust Axes with Coordinates
On the Project screen, hover over Display Settings → Points → Update Origin.

The origin displays as a yellow dot. The Update Origin dialog opens to display the Origin Coordinates and the Coordinate System of Orientation for the origin.
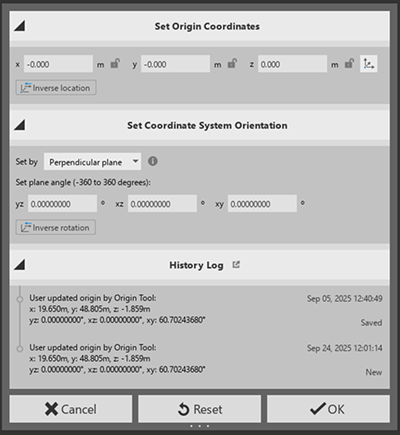
Set Origin Coordinates. Specify the x, y, and z coordinates of the origin.
Set Coordinate System Orientation. Specify the yz, xz, and xy plane angles from -180° to 180°.
- Click Cancel to ignore your changes and close the Update Origin dialog.
- Click Preview to view your changes before committing them to the point cloud.
- Click OK to accept your changes and apply them to the point cloud.
Adjust Origin Location
On the Project screen, hover over Display Settings → Points → Update Origin.
The origin displays as a yellow dot. The Update Origin dialog opens to display the Origin Coordinates and the Coordinate System of Orientation for the origin.
In the point cloud, click the new origin point. Note that the xyz coordinates in the Update Origin dialog change.
Reset Origin Location
On the Project screen, hover over Display Settings → Points → Reset Origin.
Change the Coordinate System Orientation
Change the Coordinate System Orientation by Plane
- Set Origin coordinates: click in the canvas to update the location of the origin, or use the Set Origin Coordinates dialog to enter values. Use Ctrl to update the orientation of the coordinate system, then Enter to confirm.
- Orient the Z axis by specifying xy plane: Click any model plane that is perpendicular to Z axis to orient Z axis. Use Alt to flip axis direction. To go back and set the origin coordinates, press Ctrl. To proceed with orienting the X axis, press Shift, then Enter to confirm.
- Orient X axis by specifying yz plane: Click any model plane that is perpendicular to X axis to orient X axis. Use Alt to flip axis direction. To go back and set the origin coordinates, press Ctrl. To finish, press Enter to confirm.
Change the Coordinate System Orientation by Axis
- Set the origin coordinates: click in the canvas to update the location of the origin, or use the Set Origin Coordinates dialog to enter values. Use Ctrl to update the orientation of the coordinate system, then Enter to confirm.
- Align the axis: Click to specify axis to move, then click in the canvas to specify the axis direction. Use Alt to flip axis direction.
- To go back and set the origin coordinates, press Ctrl. To finish, press Enter to confirm.
Invert Axis Direction
Press Alt to flip the currently selected axis in the opposite direction.
Exit the Origin Location and Orientation Tools
- Press Esc to ignore your changes and close the Update Origin dialog.
- Press Enter to accept your changes and apply them to the point cloud.