
Applying Selective Projections
You can use projections selectively; either inclusively or exclusively. Similarly to the Selective Lighting feature, you can connect a projection to an image, object, or its axis and make the projection affect only that connection (inclusive). Conversely, a projection that affects every object except the one it is connected to is exclusive.
To use selective projections, you must have a scene with a minimum of two objects in order for the selective projection to affect one and not the other.
To create an inclusive selective projection:
Select the media to use as a texture for projection.
Add a projector using the Node bin.
The projection is added to the scene.
To make the projection selective, access the schematic by using the ~ key or by selecting Schematic from the View drop-down.
In the schematic, the projector is displayed much like an image. By default, it projects an image across the entire scene.
Select Light Link from the Tools drop-down to create lighting connections.
Do one of the following:
To project only a selected surface, drag a connection from the Projector node to one or several nodes in your scene. A selective projection connection is represented by a blue dotted line.
Once a selective connection is created, the projector only affects the object to which it is connected.
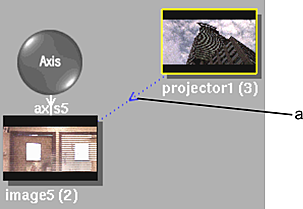
(a) Inclusive projection connection
To exclude a surface, hold the Alt key as you drag a connection from the Projector node to a surface node. The exclusive connection is represented by a red dotted line.
Once an exclusive connection is created, the projector ignores the node(s) to which it is connected.
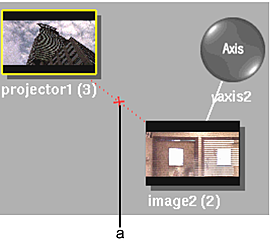
(a) Exclusive projection link