
This page is used to edit the network object display settings as well as set up themes. Objects and labels can be displayed or hidden; colours of object types can be changed. Object themes can be set up, edited and saved.
If you close the current GeoPlan view, without saving any changes, the display settings will be lost. See Managing Themes for further information.
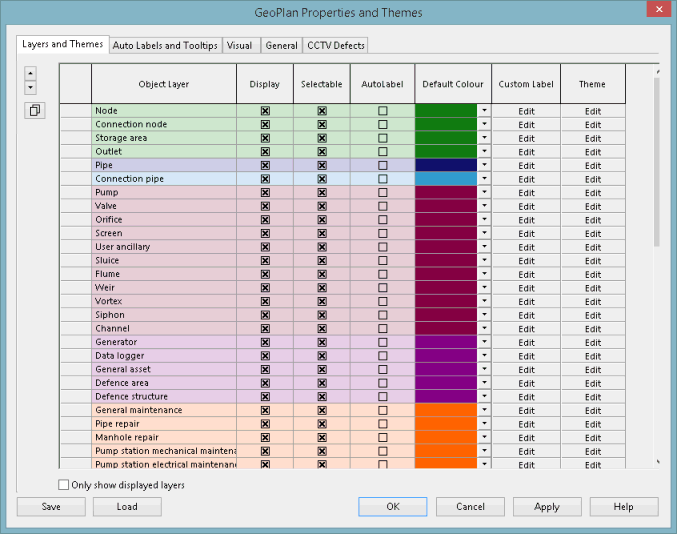
To display the GeoPlan Properties dialog, right-click on the GeoPlan and select Properties & Themes from the popup menu. By default, the dialog opens on the Layers and Themes page.
Page description
|
Option |
Description |
|---|---|
|
|
Use these arrows to move the selected row in the grid up and down, one row at a time. The order of the layers in the GeoPlan will change accordingly. Note that if the network includes Ground, Flood or Rainfall layers then these layers cannot be moved, and no other object layer can be moved below them. |
|
|
Click to copy sub themes between different object layers. See the Copying a Sub Theme section of the Managing Themes topic for further information. Note: The fields must match up between the object layers for the copying of themes to be successful.
|
|
Object Layer |
Defines the network object type or the ground model. |
|
Display |
Use the Display box to turn display of network object layer (including labels) on and off. Hold the CTRL key while clicking on a checkbox to turn network object layer display on/off for all currently selected rows. |
|
Selectable |
Uncheck the Selectable box to make the objects in the layer unselectable. This option can be useful to limit the number of network objects returned when selecting objects. Note: This functionality only applies to tools involving clicking on the object (e.g. Selection, Properties
and
Graph Pick
tools). See
GeoPlan Tools
and
More GeoPlan Tools
toolbars
for more information. Objects in unselectable layers will still be selectable using indirect methods such as the Polygon Select tool, SQL queries and selecting in grids for example.
|
|
Auto Label |
Check this box to turn on display of auto labels. (Auto labels are configured in the Auto Labels and Tooltips Page of the GeoPlan Properties Dialog). Hold the CTRL key while clicking on a checkbox to turn display of auto labels on/off for all currently selected rows. |
|
Edit AutoLabel |
Click Customise to add a custom autolabel text. This displays the Custom Autolabels Text dialog, where customised text can be entered. Note: This column is only available if Label Fields have been set to Custom in the
Auto Labels and ToolTips page of the GeoPlan Properties Dialog.
|
|
Default Colour |
Select the colour in which the object type is to be displayed on the GeoPlan Window. |
| Custom Label |
Click Edit to set up custom labels for that network object type. This displays the Custom Label Settings dialog, where the custom label display options can be edited. |
|
Theme |
Click Edit to create or amend the GeoPlan theme for that network object type. This displays the Layer Theme Editor, where themes are managed. Refer to GeoPlan Themes for more detailed information on themes. The number of current themes, including the base theme, is displayed in square brackets. Note: The [Total number of Themes] is only displayed for object layers that have sub themes.
|
|
Only show displayed layers |
Check this option to hide from the Object Layer grid the layers that are not currently selected for display in the GeoPlan (i.e. layers for which the Display option is unchecked). This option only affects layer display in the grid (not in the GeoPlan) and order layer remains the same when this option is enabled. Use this option to make the Object Layer grid dialog less cluttered by hiding in the grid the layers that are not set to be displayed in the GeoPlan. Tip: A thicker horizontal black line between rows in the left hand column indicates the presence of one or more hidden layers.
|

