
When you manually inspect a section group using a CMM or portable device, PowerInspect switches to a full-screen view and displays the Section Inspection dialog so you can probe the points on the part.
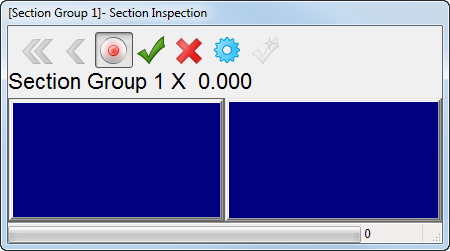
When you probe a point:
- the left panel displays the coordinates of the point on the section plane nearest the probed point. This indicates the location of the next point.
- the right panel displays the distance between the probed point and the nearest point on the section plane; the colour of the dL value indicates whether the point is below (blue), within (green), or above (yellow) tolerance.
The Section Inspection dialog contains the following buttons:
 — Click this button to delete all measured points.
 — Click this button to delete the last probed point.
 — Select this button to add the probed points to the group. Deselect the button to probe the section without saving the points. This allows you to probe points for reference only.
 — Click this button to save the probed points and close the dialog.
 — Click this button to close the dialog and create the group without saving the probed points.
 — Click this button to
change the probing parameters.
— Click this button to
change the probing parameters.
 — Deselect this button to save the points manually by clicking
. Select this button to automatically save your measurements and proceed to the next item in the inspection sequence as soon as you have probed the number of points specified for the item.
— Deselect this button to save the points manually by clicking
. Select this button to automatically save your measurements and proceed to the next item in the inspection sequence as soon as you have probed the number of points specified for the item.