
A new TIN ground model can be created from a variety of data sources, including:
- Network data (from cross section lines, bank lines, river reaches and general points)
- Another TIN ground model
- A Grid ground model
- MapInfo MIF files containing point data
- ESRI Shape files
- LandXML XML files
- Text files
To create a TIN Ground Model from other data
- On the
Explorer Window, right-click a
Model
Group and choose
New
InfoWorks
 Ground model TIN or New
SWMMGround model TIN
from the popup menu. This displays the
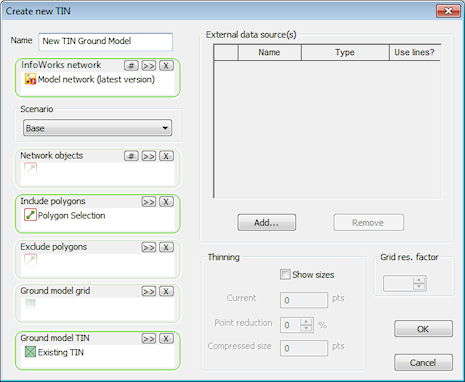
Create New TIN Ground Model dialog.
Ground model TIN or New
SWMMGround model TIN
from the popup menu. This displays the
Create New TIN Ground Model dialog.
- Enter a name for the new TIN ground model in the Name field.
- Choose the data from which the ground model will be generated (see below for more details). If conflicting points are found in the data, the data points will be prioritised so that points from data types further up this list will overwrite points from any data type below them on the list.
- Network data (from cross section lines, bank lines, river reaches and general points)
- Existing ground models
- TIN ground model
- Grid ground model
- External data sources
- MapInfo MIF files
- ESRI Shape files
- LandXML XML files
- Text files
- Click Create TIN to start the creation process.
Network data
Cross section line, bank line, river reach and general point elevation data can be used when creating a TIN ground model for InfoWorks networks.
On the Create New TIN Ground Model dialog:
- Drag and drop the relevant
InfoWorks or
SWMM network into the
InfoWorks network or
SWMM network box, or use the
 button to browse for a network.
- Drag and drop a
Selection List of objects to be used into the
Network objects box, use the
button to browse for a Selection List, or click
 to add the current GeoPlan selection.
- Click OK to start the creation process.
Elevation data of selected general points, lines and river reach section and bank profiles will be used to create new TIN vertices. Lines and sections will be treated as break lines during the creation process.
Creating a TIN from an existing ground model
A new TIN can be created from an existing TIN or grid ground model.
Parts of an existing ground model can be clipped and saved as a new TIN by using the Include polygons option on the Create New TIN Ground Model dialog.
- On the GeoPlan, draw a general polygon encompassing the part of the existing ground model to be saved as a new TIN.
- Save the polygon in a Selection List.
- On the
Create New TIN Ground Model dialog:
- Drag and drop the relevant
InfoWorks or
SWMM network into the
InfoWorks network or
SWMM network box, or use the
button to browse for a network.
- Drag and drop an existing TIN ground model into the Ground model TIN box, or an existing Gridded ground model into the Ground model grid box. Alternatively use the
button to browse for an existing ground model.
- Optionally, drag and drop a
Selection List containing general polygons into the Include polygons field or use the
button to browse for a Selection List.
- Drag and drop the relevant
InfoWorks or
SWMM network into the
InfoWorks network or
SWMM network box, or use the
- Click OK to start the creation process.
The newly created TIN will be created using only the section of the ground model within the selected polygon.
Converting large Grid ground models
For Grid ground models containing a very large number of vertices, it may not be possible to create a TIN including all of the vertices present in the Grid due to memory limitations.
If there is insufficient memory to create a TIN from the selected Grid, a message will be displayed suggesting that the Grid resolution factor be increased.
The Grid resolution factor is used to lower the resolution of the TIN ground model, where the Grid Res. Factor x Grid Base Cell size corresponds to the minimum size to be considered when importing values from the Grid ground model. The higher the grid resolution factor, the lower the TIN resolution and therefore the cruder the approximation to the original grid.
For example: if the Grid ground model has a base cell size of 2m and the Grid res. factor is set to 2, the TIN model vertices will be created at 4m intervals. In this case, height values will be the average of the values defined for the 4 base cells contained within the 4mx4m area.
InfoWorks ICM allows a maximum grid resolution factor of 100.
Create a TIN from an external data source
To create a TIN from a MapInfo MIF file, ESRI Shape file, LandXML XML file or text file
- Click Add on the
Create New TIN Ground Model
dialog, and the
New External Data Item dialog is displayed.
- Select the type of file containing data from which the ground model will be generated and Browsefor the file to be used. The path will be displayed in the Name field.
- LandXML (Breaklines, Definition): contains x, y, z lines.
- LandXML (Datapoints, Contours): contains x, y, z points. Note that the Treat polylines as breaklines box must be checked to enforce the polylines as TIN edges
- MIF file (points): contains x, y points. Select the field in the table containing z values from the Z field dropdown list.
- Shapefile (points): contains x, y points. Select the field in the table containing z values from the Z field dropdown list.
- Shapefile (pointZ): contains x, y, z points.
- Shapefile (polylineZ): contains x, y, z polylines. The points that make up the polylines will be used to create the TIN. Check the Treat polylines as breaklines box to enforce the polylines as TIN edges.
-
Text (X Y Z spot heights): contains points data used to create the TIN. The file format is three values per line defining each point (x y z). The values are separated by a TAB or a SPACE and the encoding of the file is UTF-8 or ANSI. A point (.) should be used as the decimal separator. An example of text in this type of file is shown below:
103245.5256 194091.8938 9.9019
103270.5256 194091.8938 9.497
103295.5256 194091.8938 9.4638
103320.5256 194091.8938 9.6057
103245.5256 194066.8938 9.8897
103270.5256 194066.8938 9.3361
-
Text (X Y Z polylineZ): format is similar to the Text (X Y Z spot heights) file, except the file includes the text ENDLINE, which defines the end of each polyline. Each line must be defined by at least 2 points. An example of text in this type of file is shown below:
100245.5256 191091.8938 9.9019
100270.5256 191091.8938 9.497
ENDLINE
100545.5256 190991.8938 9.9662
100295.5256 190966.8938 9.6603
100320.5256 190966.8938 9.1558
ENDLINE
Check the Treat polylines as breaklines box to enforce the polylines as TIN edges.
- If you browsed for LandXML (Breaklines, Definition) or LandXML (Datapoints, Contours) files, a
LandXML Surface dialog is displayed. In this dialog:
- If you want to specify the units to be used by the ground model, click on the Editing units setting button to display the LandXML Units dialog. Specify the units and then select OK.
- Select which LandXML surfaces you want to include in the ground model from the ones displayed in the tree structure.
- Click OK.
- Select X, Y and Z units from the dropdowns.
- Click OK to return to the Create New TIN Ground Model dialog.
- Click Create TIN to start the creation process.
Excluding / including a selection of points when creating a TIN
A new TIN can be created from a selection of points from an external data source by using the Include polygons option on the Create New TIN Ground Model dialog.
A selection of points from the external data source can be excluded for use when creating the new TIN by using the Exclude polygons option.
- On the GeoPlan, draw a general polygon encompassing the points to be included / excluded.
- Save the polygon in a Selection List.
- On the
Create New TIN Ground Model dialog:
- Drag and drop the applicable
InfoWorks or
SWMM network into the
InfoWorks network or
SWMM network box, or use the
button to browse for a network.
- Drag and drop a
Selection List containing general polygons into the Include / Exclude polygons box or use the
button to browse for a Selection List.
- Include Polygons: Only points within the general polygon will be used when creating the new TIN. The polygon defines the ground model boundary.
- Exclude Polygons: Points within the general polygon will not be used when creating the new TIN.
- Select External Data source options (as described above).
- Drag and drop the applicable
InfoWorks or
SWMM network into the
InfoWorks network or
SWMM network box, or use the
- Click Create TIN to start the creation process.