
Manage an inspection’s lifecycle
For users with Fusion connected sites, references to the 'Items' workspace should be the 'Components' workspace.
The First Article Inspection Reports template comes with the following workflow. This is found in the Workflow tab on the first article inspection. Here is where you and your team progress the workflow through its various states.
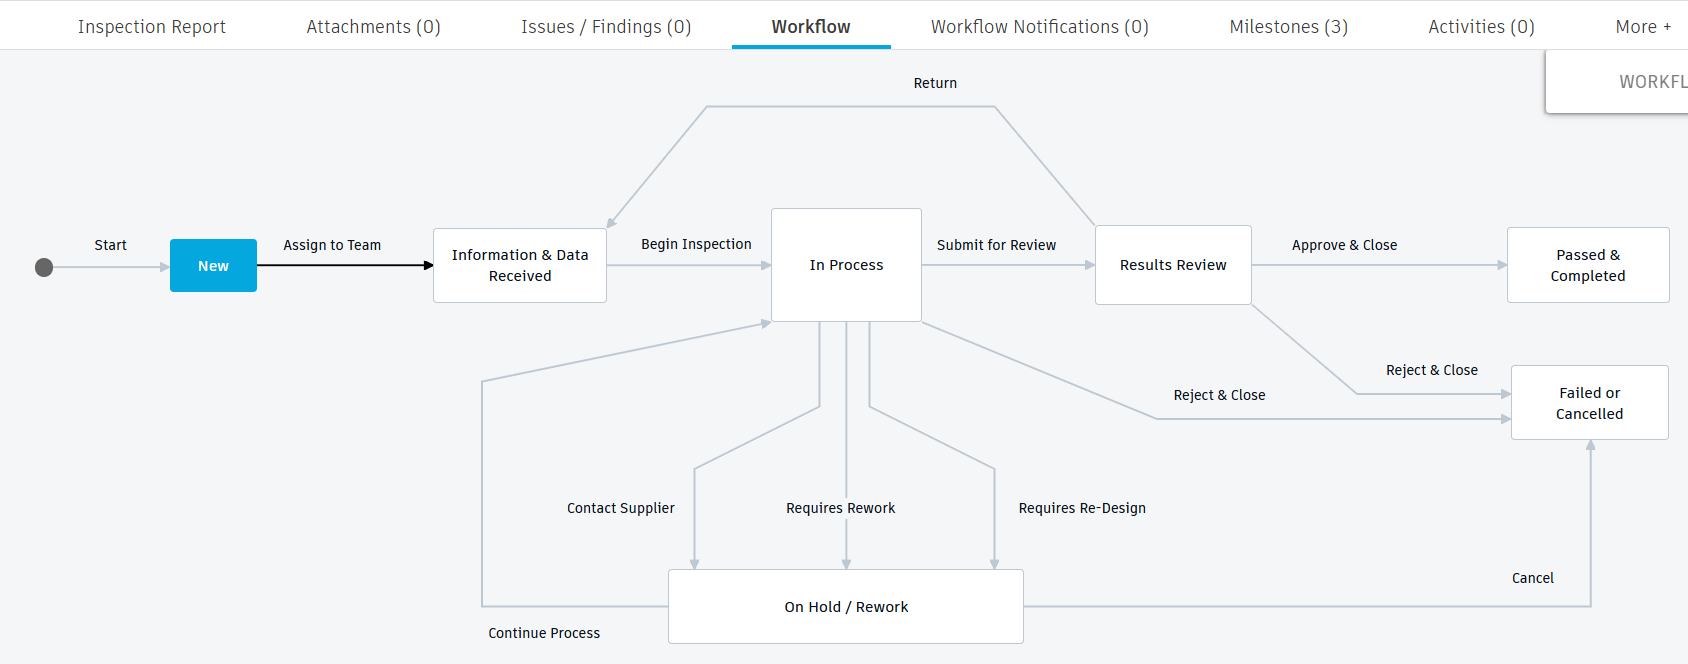
When a first article inspection (FAI) report is created, it has a status of New. It is shown in the My Outstanding Work on the main dashboard of everyone with the [R/W] role.
Assign to a team and gather data
Before the workflow can begin, at least one person must be added to the Inspection Team field in the Stakeholders section.
- Click the Assign to Team transition to move the FAI to the Information & Data Received state.
At this point, the inspection team should gather all relevant information regarding the inspection to be carried out. This may include filling in all information in the Basic, References, Inspected Item Details, and Supplier Part Details sections. This may also include gathering information on how the inspection will be carried out, when it will be carried out, the tools and equipment to be used in the inspection, and so on. This can all be added as attachments to the report.
When everything is ready, click the Begin Inspection transition to move the FAI report to the In Process state to indicate that the inspection has now begun.
Carry out the inspection
The team members specified in the Inspection Team field now carry out the inspection.
In the Inspection Report tab, click Edit.
The Inspection Results section contains columns that capture a summary of the details that were tested. In each column, select from:
Yes – if the criteria were met.
No – if the criteria were not met.
N/A - if the specific section is not relevant to the inspection.
This information is shown in the Results Summary field in the Basic section for quick analysis of the state of the FAI report.
The Inspection Summary section, specify:
Date of Inspection – Click to select the date the inspection was carried out.
Item Serial Number – Enter the serial number of the inspected item, where relevant.
Related Change Request – Click to select a change request from the Change Requests workspace, where relevant.
Notes – Any additional notes regarding the inspection.
More detailed results may be captured in the Issues/Findings tab.
In the Issues/Findings tab, click Add +.
Enter all information as required.
Repeat these steps for each finding.
Click Save.
You may also attach images in the Inspection Images section of the main Inspection Report tab.
- Click Edit.
- In each column, where relevant, drag and drop an image from your computer, or click Choose File.
- Add a description of the image.
- Repeat these steps for each image to be added.
- Click Save.
You may also add a number of attachments in the Attachments tab. See Manage first article inspection attachments.
From here, there are five options.
Click the Contact Supplier transition if information is required from the supplier of the inspected item.
Click the Requires Rework transition if the inspected item should be reworked.
Click the Requires Re-Design transition if the inspected item should be redesigned.
For all three of these options, the workflow moves to the On Hold/Rework state. The person who performed the action, the date of the action, the transition chosen, and the comment added are all entered into the On Hold Information section in the main Inspection Report tab. This can be used to monitor follow-up actions for the FAI report. From here, the report can either be returned to the In Process state or cancelled.
Click the Reject & Close transition if the report should no longer continue or the results mean the item has clearly failed the inspection without needing further review. This moves the workflow to the Failed or Cancelled state and is locked from further editing.
Click the Submit for Review transition to move the workflow to the Results Review state. Before the workflow proceeds to the Results Review state, you must have:
- Selected an option for each column in the Inspection Results section.
- Entered an inspection date into the Date of Inspection field in the Inspection Summary section.
- Selected at least one person as an Approver in the Stakeholders section.
The Outcome field in the Basic section shows Review in pending.
Review inspection results
The person entered as the Approver in the Stakeholders section must now review the findings of the inspection and determine how to proceed.
There are three options:
- Click the Return transition to send the FAI report back to the Information & Data Received state. You might do this if the information in the report is incomplete or not thorough enough to conduct a proper review.
- Click the Reject & Close transition if the results indicate the item has failed the inspection. This moves the report to the Failed or Cancelled state and is locked from further editing.
- Click the Approve & Close transition to move the report to the Passed & Completed state. The item has passed the inspection and the report is locked from further editing.