
Manage a claim's lifecycle
For users with Fusion connected sites, references to the 'Items' workspace should be the 'Components' workspace.
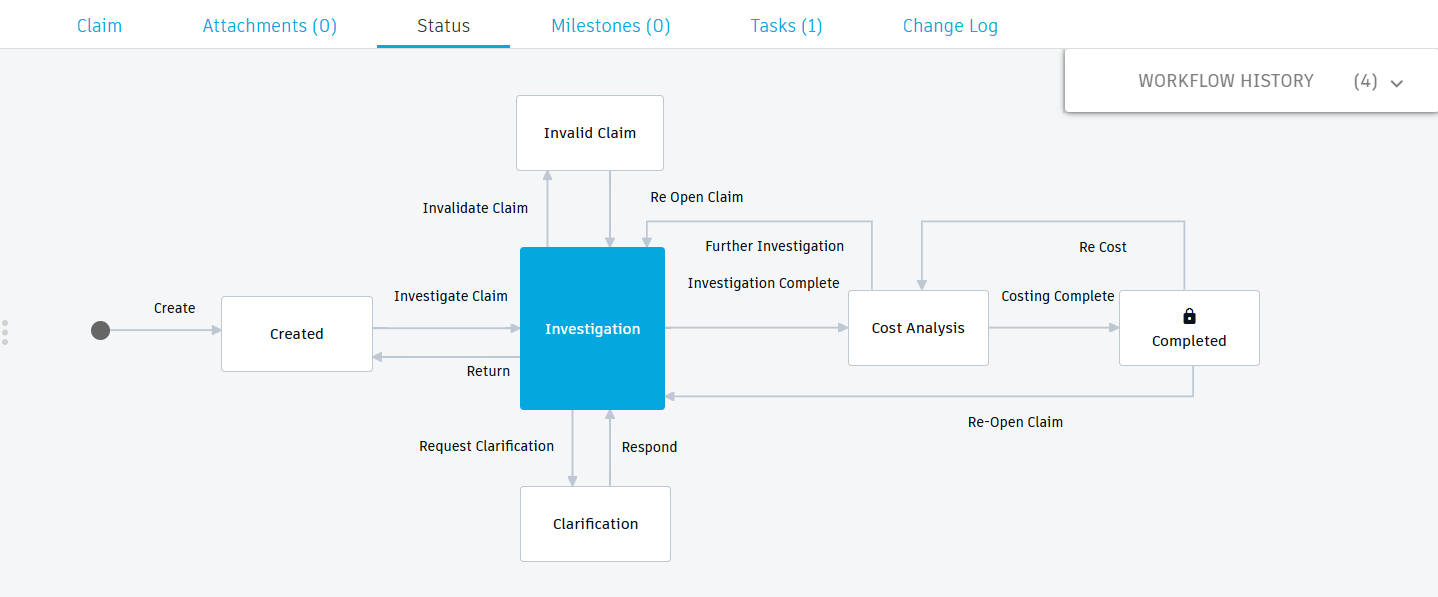
This template comes with the following default workflow. This is found in the Status tab on the claim. Here is where you and your team progress the workflow through its various states.
Start the workflow
Upon creation of the claim, the claim is in the Created state. This means it has been created but no work has started. At this time, it might make sense to fill in the Defect Description and Images sections. These steps are optional but would help to add more information about the claim.
To fill in the Defect Description section:
- In the Claim tab, click Edit.
- In the Customer Contact box, enter the name of the person at the customer company to contact regarding the claim.
- From the Supplier Involved drop-down list, select the supplier who supplied the items involved in this claim.
- In the Order Quantity box, enter the total quantity of items that were delivered to the customer.
- In the Impacted Quantity box, enter the quantity of items that have been impacted and should be included in this claim.
- In the Invoice / Order Number box, enter the number for the invoice or order sent to the customer.
- In the Delivery Date box, click the calendar icon to select the date the item in question was delivered to the customer.
- In the Root Cause box, enter the root cause of the issue with the item and any additional information regarding the reason for this claim.
- Click Save.
To fill in the Images section:
- In the Claim tab, click Edit.
- For the first image, click Choose File.
- Select the desired image, then click Open.
- In the Remarks box, enter details of the image uploaded above it. The image and its remarks should provide supporting information for the claim.
- Repeat for any additional images.
- Click Save.
Now, before it can be moved to the Investigation state, you must specify the Claim Handler who will review the claim and decide what to do next. You do this in the Claim tab in the Assignees section:
- Click Edit.
- In the Assignees section, beside Claim Handler, click in the Assignee column.
- Select one person to add them as the Claim Handler.
- Optionally set a target date that the Claim Handler should complete their investigation.
- Click Save.
Once the Claim Handler has been defined, in the Status tab, click the Investigate Claim transition. The claim is now at the Investigation state.
Investigate the claim
The Claim Handler must now review the information provided by the customer in their claim and determine what to do next. There are four options:
- Return – Select this when the claim hasn’t been properly defined. This returns it to the Created state.
- Invalidate Claim – Select this when there is no valid claim from the customer and no further work is required. This moves the claim to the Invalid Claim state. The claim can be reopened if required.
- Request Clarification – Select this when further information is required from the customer. A comment is required. This moves the claim to the Clarification state. From here, you may return it to the Investigation state. You must specify a Claim Clarification person in the Assignees section before proceeding in this direction.
- Investigation Complete – Select this when the claim is valid, and a cost analysis is required to determine the cost to proceed. This moves the claim to a state of Cost Analysis. You must specify a Claim Costing person in the Assignees section before proceeding in this direction.
If it is determined that a CAPA is required, this may be added to the Corrective Actions section. To do this:
In the Claim tab, click Edit.
In the Corrective Actions section, add a CAPA in one of two ways:
- Click the CAPA drop-down to select an existing CAPA.
- Click Add (
 ) to open the Quick Create dialog to create a new CAPA.
(Optional) In the Comments box, enter any additional information regarding the CAPA.
(Optional) In the Resolution Date box, click the calendar icon to select the date that the corrective actions will be completed.
Click Save.
Perform a cost analysis
When handling claims on a physical product, the cost can be broken down into specific categories.
Labor costs - Pertain to the expenses incurred for the work performed by employees to process and resolve the claim. They may include:
- Inspection and Assessment - Labor cost for technicians or quality assurance personnel to inspect and diagnose the defect or damage.
- Repair or Replacement - Wages for workers involved in repairing the product or assembling a replacement.
- Administrative Work - Costs for clerical staff to handle paperwork, documentation, and communication related to the claim.
- Customer Service - Costs for customer service representatives who manage customer interactions, complaints, and inquiries.
Material costs - The expenses for the physical components required to repair or replace the defective product. This may include:
- Replacement Parts - Cost of parts needed to fix the product.
- Packaging Materials - Cost of materials used to package the repaired or replacement product for shipping.
- Consumables - Small items like screws, adhesives, or other materials used during the repair process.
Production costs – Costs associated with manufacturing a new product to replace the defective one. This may include:
- Raw Materials - Costs of the basic materials used in manufacturing the product.
- Manufacturing Overheads - Costs related to running the production facility, including utilities, equipment maintenance, and depreciation.
- Quality Control - Costs associated with ensuring the new product meets quality standards.
Service costs – Costs related to the services provided to the customer during the claim process. This may include:
- Shipping and Handling - Costs of shipping the defective product back to the manufacturer and sending the replacement or repaired product to the customer.
- Warranty Services - Costs if the product is under warranty, including any extended coverage or special service agreements.
- Technical Support - Costs forof providing technical assistance or guidance to the customer during the claim process.
Other costs - Encompass a variety of additional expenses that may arise during the claim process. These may include:
- Legal Costs - Expenses for legal consultations or actions if the claim involves legal disputes.
- Opportunity Costs - Potential revenue lost due to the product being unavailable for sale or customer dissatisfaction affecting future sales.
- Inventory Costs - Costs related to maintaining extra inventory to handle returns and replacements efficiently.
- Reputation Costs - Long-term costs associated with damage to the company’s reputation, which can negatively impact customer trust and future business.
- Insurance Costs - If the claim involves insurance, any premiums or deductibles that need to be paid.
Understanding these costs in detail helps you manage claims efficiently and mitigate financial impacts while maintaining customer satisfaction.
Once you have performed the cost analysis, fill in the Costing section. Each cost type is split into Internal and External costs to separate out costs of doing something in-house versus involving a third party. For each cost type, you may enter additional comments related to the cost and how it was reached.
There are now two options:
- Further Investigation – Select this option if further information is required before an accurate cost analysis can be made. This returns the claim to the Investigation state.
- Costing Complete – Select this option if all information regarding the claim and its costing is complete. This moves the claim to a Completed state.
Re-evaluate the cost
It may be the case that it is determined that the cost analysis is incomplete or incorrect after the claim is closed.
- Click the Re Cost transition to move the claim back to the Cost Analysis state.
Re-open a closed claim
If a claim has been closed, you may re-open it to begin the process again.
- Click the Re-Open Claim transition to move the claim back to the Investigation state.